Intro #
Figure it’s time to hide your shit on a network level? Let’s go.
They offer a weeks trial for 2$ which I went for test it out and if it worked well I was going to purchase a year, here’s what I did to tunnel only select traffic over the tunnel. This is very achievable for most services if you just install the client inside the OS but this will tunnel all that hosts traffic over the VPN, this is no good for me as I wanted only my downloads to go over this link and the rest of the traffic still going over my WAN, turns out this is very easy to accomplish in pfSense if the provider allows OpenVPN connections.
The setup will follow the following steps:
- Setup VPN connection inside pfSense
- Setup interface with that VPN connection
- Setup gateway with that interface
- Add NAT rules to allow whatever VLANs out to the VPN
- Add firewall rules to tunnel the traffic
- Test the tunnel
VPN Setup #
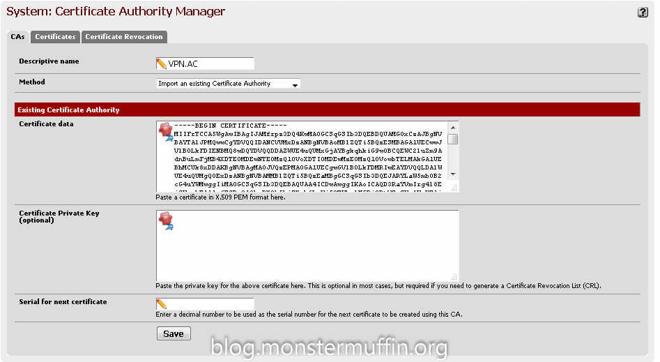
I won’t cover the VPN setup in pfSense because the methods for this will vary across different providers but there should be a tutorial showing you how to do this. For me it was easy enough, all I had to do was add a CA with my providers certificate as follows:
After that, under VPN > OpenVPN > Client create a new connection with the provided details from your provider, here you can choose which server to connect to. My provider has ‘p2p optimized nodes’ so I setup my connection to one of those servers, the closest of which to me was the Netherlands.
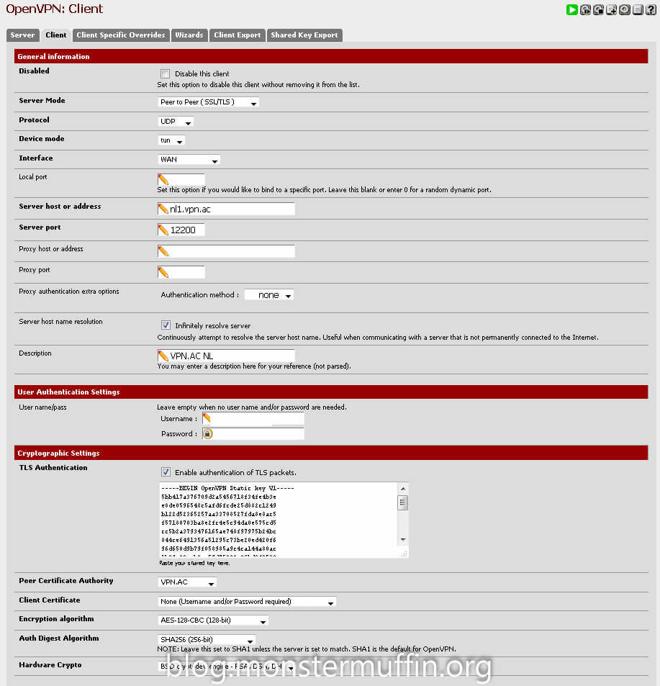
The tunnel settings were also provided by my provider with one addition made my me, the “route-nopull” setting. Checking “Don’t add/remove routes” should do the trick aswell but I added this in the advanced settings as well. The first time I did this I did not add this option and all my traffic started going over the pipe regardless of firewall rules, so ensure you add this option or you’ll end up with a mess.
Once this is done and completed going to Status > OpenVPN should list your connection and it should have the status “up”. This means we are connected to the provider.

Interface and Gateway Setup #
Next we need to add an interface for the connection and then a gateway for that interface, this is simple.
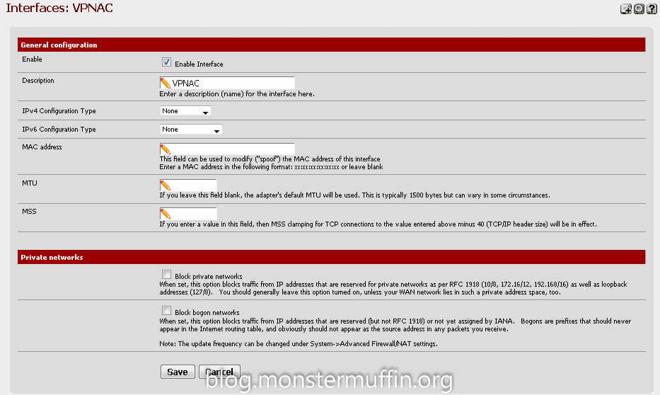
Head over to Interfaces > Assign, click on the ‘+’ icon and set the network port to your OpenVPN connection. (Yours won’t have a name yet like in mine, this is next.)

Click on the newly created interface and enable it, you can give it whatever name you want here. Once this is done, click save.
Now we have an interface for our new VPN connection head over to System > Routing and again, click the ‘+’ to add an gateway and go ahead and edit that gateway. You want to name the gateway anything you like, and set the interface to the interface we just created. The gateway settings and monitor IP will be given by your provider.
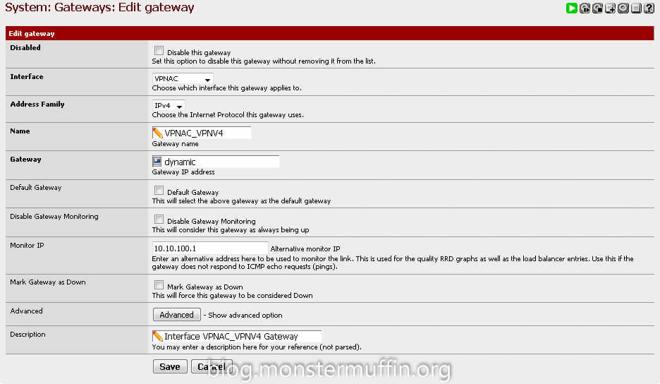
Go ahead and save that. At this point you are ready to create the firewall rules. Now, the issue I had here is that I was unable to get anything working and it was really getting on my tits, turns out pfSense was not configuring this gateway with a valid IP/correct routes straight off the bat, or even after FW state resets. I would highly recommend a reboot here as this was the only thing that made the next few steps work.
Adding NAT Rules #
The next thing we need to do is add the NAT rules to allow for traffic to go out of the gateway, this is done from Firewall > NAT > Outbound
If you have Automatic NAT enabled you want to enable Manual Outbound NAT or Hybrid, I like hybrid NAT personally. Find the rule that allows the devices you wish to tunnel to the VPN to the internet. This is most likely “Auto created rule - LAN to WAN”

You want to click the highlighted ‘+’ button which will create a new rule based on that one. Change the interface to your VPN interface, change the description and save.
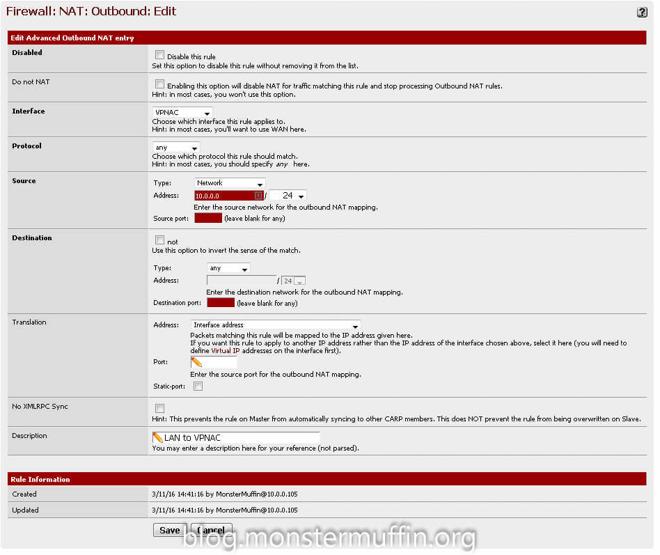
Do this for every subnet that needs to go out to the VPN. At the end of this you should have something like this for your subnets:


Adding the Firewall rules #
For me, this had to be very fine grain as I only wanted download traffic on specific hosts to go out of the VPN and not all the traffic on the hosts, this was done using source and destination addresses and ports. If you wish to send all the traffic in a subnet through the tunnel you must do the following, go to Firewall > Rules > The interface you want to tunnel > Add a new rule
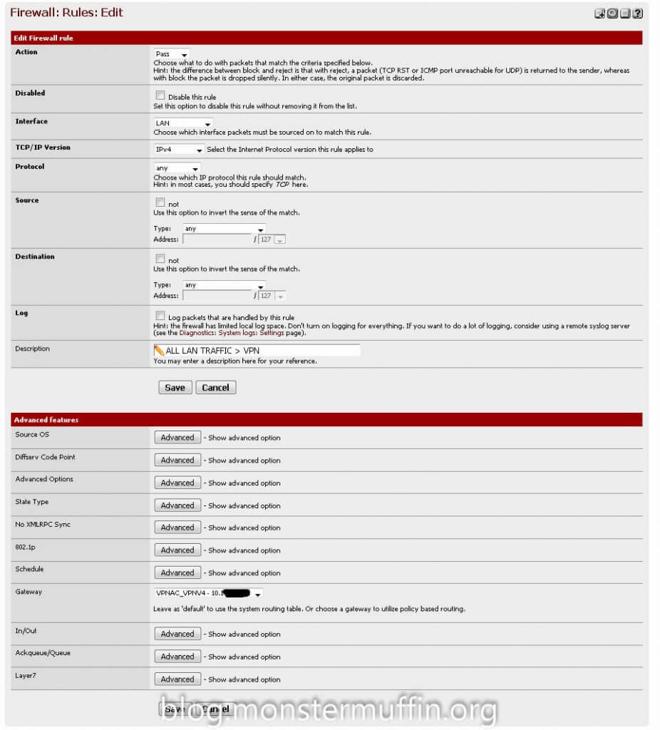
The above rule will send all the traffic on that interface into the VPN tunnel, you must ensure that the ‘gateway’ option is set to your VPN gateway and that this rule is above any other rule that allows hosts to go out to the internet. pfSense needs to be able to catch this rule before any others.
If you don’t wish to send all the traffic, like me, you can do what I did. To start with, I tackled my torrent clients. I know my torrent client uses port 56019, manually set by me, so I created the following rule under the interface where that host lives:
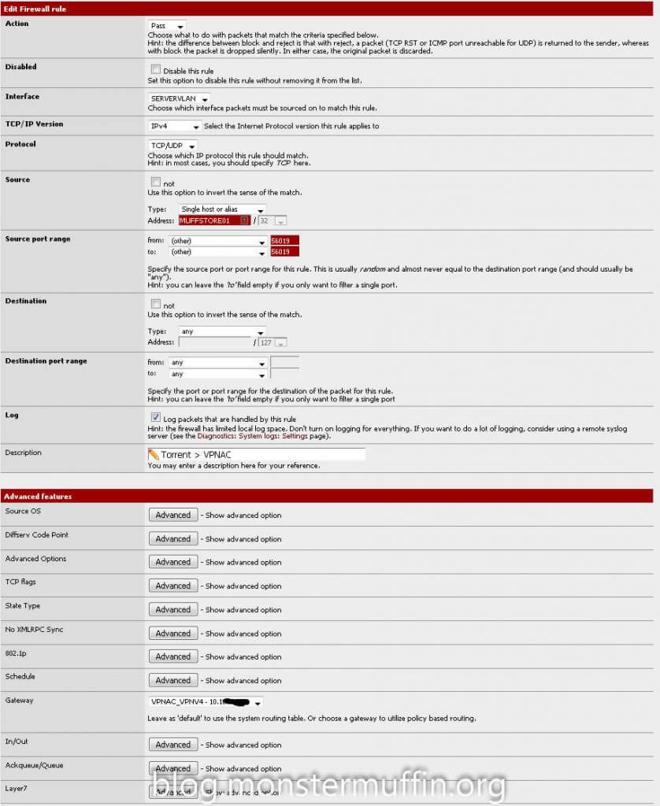
This rule works because my torrent client is going out from port 56019 from the host MUFFSTORE01. I placed this rule above my default allow all rule.
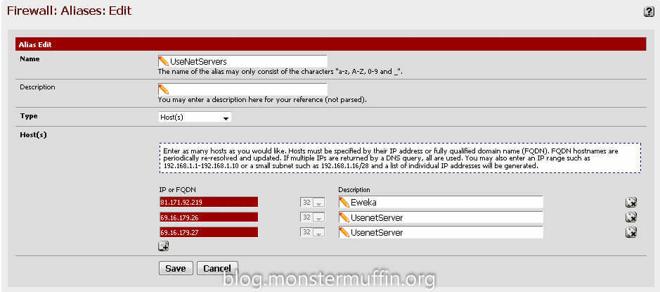
Next was Usenet, Usenet downloads via HTTP/HTTPS so catching the ports wasn’t going to work as all the HTTP(S) traffic would be tunneled, so instead I looked at the providers themselves. I use 2 Usenet providers, Eweka and UsenetServer. In my NZB client I looked at the hosts I was connecting to and they were the following:
- newsreader108.eweka.nl
- secure.usenetserver.com
A quick nslookup shows me the IPs of these servers:

Create an Alias in pfSense under Firewall > Aliases with any name you like and the IPs of your Usenet providers.
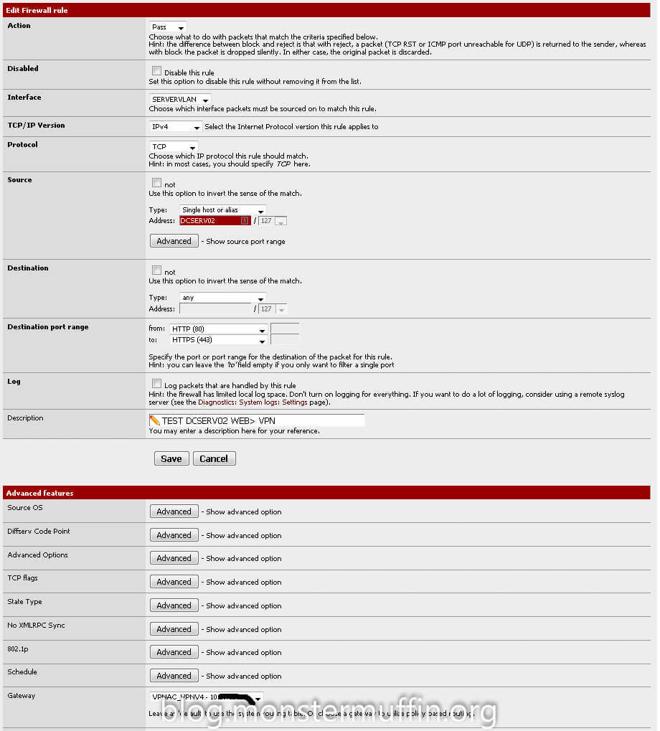
After that it’s as simple as creating a rule up top in the required interface with the source as the host and the destination as your Usenet server aliases. The ports can be ANY for both source and destination, and once again you must place this rule above any other rule that will catch internet traffic for this host.

One thing you can do if you want to see this working straight away is to create a rule to send HTTP(S) for all traffic from one of your hosts to the VPN gateway and place it on top, I did this:
After all your desired rules are in place head over to Diagnostics > States > Reset States and click on reset states. After doing any firewall changed that involve a gateway change I would do this before checking if anything has worked as in my experience it will not. PfSense WebGUI may hang once you do this and it will take a few seconds for routing to come back and up to a minute for the GUI to come back, don’t panic. Once you’re done head over to any host you configured and start downloading something, for me I went over the host I was tunneling HTTP(S) and used my favourite IP checker to see what the result was, and:
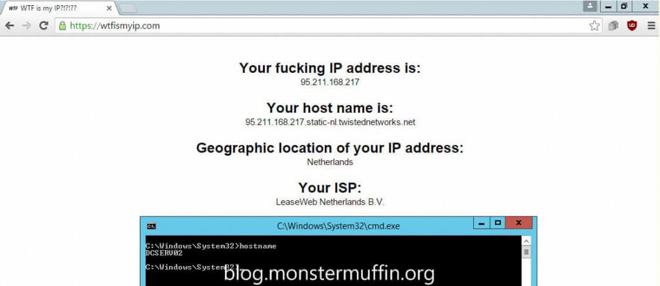
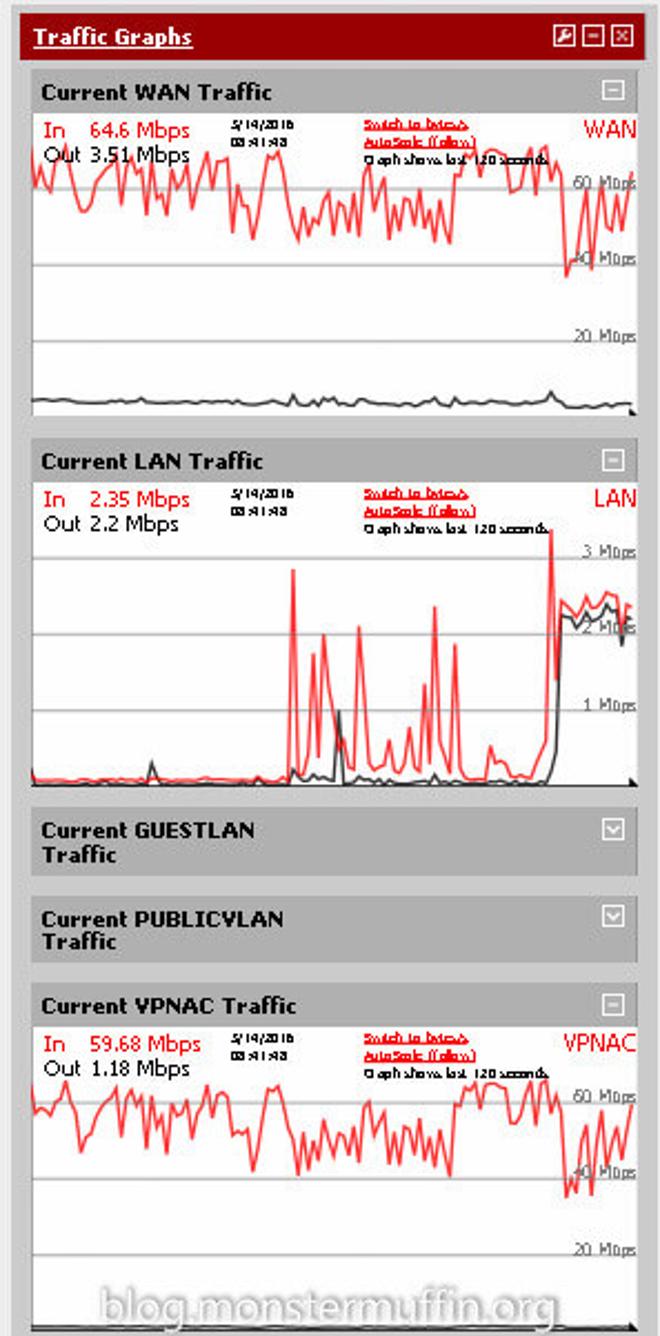
Success! Testing the torrents and NZBs was pretty simple. Add the VPN interface to your dashboard under traffic graphs and start downloading something separately. If you see traffic going out of the interface you know it’s working, here you can see I started downloading an NZB and the VPN interface matched the traffic that the application was using, as well as this it is only the Usenet traffic and torrent traffic, browsing the web still gives me my WAN IP, which is what I want.
And there you have it, using fine grain firewall rules you can tunnel as little or as much of your internet traffic over a VPN using pfSense. I live in London and downloading through the Netherlands servers that VPN.AC provides I was able to saturate my download speed which is a huge win, obviously your milage may vary depending on a number of factors but with so many providers offering free trials it’s worth a try.
I hope this was helpful and good luck! MM~~