Intro #
Virtualization is awesome. It’s been the standard for enterprises for many years and although containers are gaining interest, virtual machines remain the go-to for any business; you’d be either crazy or incompetent not to go down this route in most scenarios. This post will go through the very basics of setting up and using ESXi.
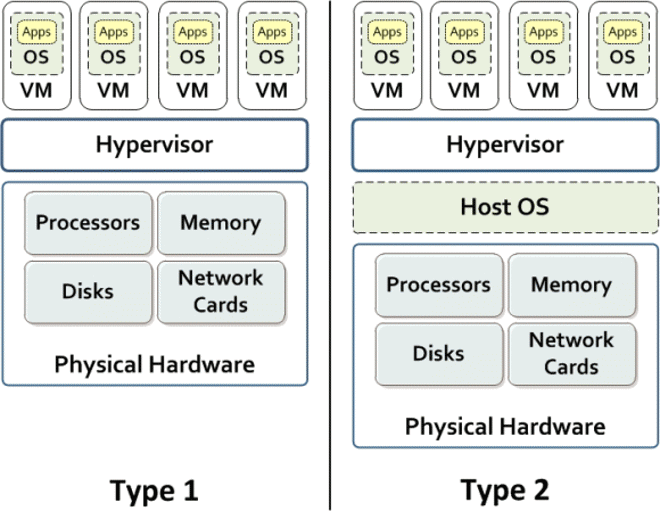
There are many ways to virtualize, some free and some not, but in this post I will be going through one in particular, VMware’s ESXi. ESXi is a type 1 hypervisor, meaning it has direct access to the hardware it’s running on, and the virtual machines running directly on top of the hypervisor. A type 2 hypervisor is one that has an OS between it and the hardware, for example, VMware Workstation running on Windows. There really is nothing wrong with running VMs inside of Windows, however, to get the full performance of the machine and not have any interference it is best to run a type 1 hypervisor to remove the intermediate OS level in-between.
The reason I am going to be talking about VMwares solution to virtualization is simply because that is what I use and swear by, I learned how to use it because the companies I worked at used it and now it has stuck with me, as I have said there are many others with their own pros and cons, but VMware is home for me.
This post will have a few sections that will get you up and running from scratch with ESXi and creating virtual machines in no time.
- ESXi’s Licensing Model and Obtaining ESXi with a Licence
- Installing ESXi
- Configuring and Accessing ESXi’s Management
- Understanding Datastores and Networking
- Creating and Using Virtual Machines
I will try and go into as much detail as possible without going into too much technical detail and allowing any beginner to follow.
Part 1: ESXi’s Licensing Model and Obtaining ESXi with a Licence #
VMware applications are expensive and this puts a lot of people off at first and I’ve seen people on the internet install the free 60 day trial of ESXi and ask what to do afterwards without knowing the licence model. ESXi has many different applications that bolt on top and plug into ESXi which cost money and add functionality, however, ESXi itself is a free product. ESXi without a licence key will be fully featured in the first 60 days and upon entering a free licence key will disable some options but for a beginner, this really is not an issue which means you get a fully functional, enterprise-class hypervisor for free. If you want to see the licencing model for ESXi to enable the full feature set you can browse here. Before ESXi 5.5 was released the free version had memory limits and CPU limits, however, post 5.5 most of these limitations are gone or have been extended to a point where the homelabber need not worry. I used to run the free version with 2x 8 core CPUs and 192GB of memory just fine.
So now you know that you get can ESXi for free with practically any hardware specification you like let’s go get the install image and a licence key. If you head over to this link and create a free VMware account and then log in, you will have links to download the current version of VMware vSphere hypervisor as well as your free license to activate it.
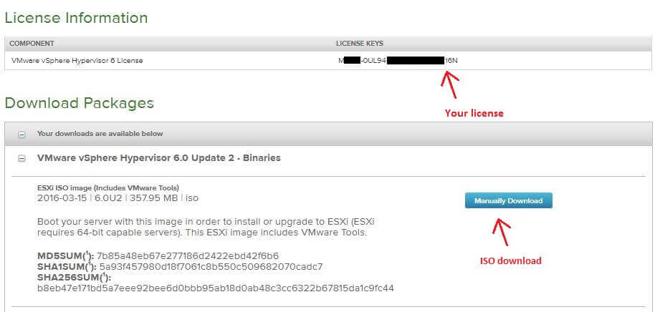
You now have an ISO of vSphere and a valid licence key so we can move onto the install itself.
Part 2: Installing ESXi #
Now, for the most-part, ESXi will install on most hardware that is 64 bit compatible (I know, fuck me right?) there is a compatibility chart you can find here. The main things you may have problems with is the network cards on some motherboards and some storage controllers, you can go ahead and do the install and if there is no storage being shown and/or no network interfaces you will have to do some meddling with injecting the drivers into the ISO so that ESXi can use the hardware. I’m not going to cover driver injection in this post but if you need this you can go ahead and read this post which has the tools you need as well as documentation.
Now, before starting the process and getting stuck in I just want to preface that you do need a functioning machine with a decent amount of memory, ESXi doesn’t use much but ensuring your VMs to run properly will depend on the resources you give them and this can only be done properly if the resources are there in the first place. As you’re just getting stuck in you can get away with the bare minimum right now but one thing I will say is that make sure the disk you are using is the best you can get, an SSD if possible. Multiple machines using one source requires that source to be at very least a good SATA HDD.
I will be installing ESXi onto my lab machine that I use to emulate entire companies from file serving, active directory to exchange. Since this is very much a lab machine I frequently wipe it and reconfigure so this is what I’ll be using here.
The lab machine I am using right now is an R710 with 2x
- 2x X5650
- 288GB DDR3 ECC
- 6x 600GB 15k SAS in RAID0
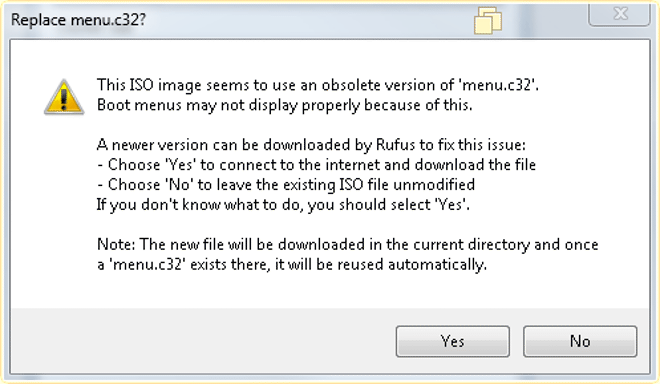
The first step is to create a USB installer for ESXi, this can be any USB memory stick but a higher end one is preferred for obvious reasons. Download and run Rufus with your USB drive plugged in and select the ISO image option and select your ESXi ISO. Make sure the correct device is selected in Rufus and press the start button to start writing the image to your USB device. If Rufus gives you the following then press yes.
Once that’s done you’ll have a working install USB of ESXi. Plug the USB into the machine you want to install it on and boot from the USB, this is usually F8 at startup but your system may vary.
One thing you want to make sure you have is somewhere to install ESXi, this can be a memory stick plugged into the back (or inside is possible) of your machine. ESXi can also be installed onto the USB drive that you are installing from since the install loads into memory. I will be installing onto an 8GB flash drive plugged into an internal USB port.
Once you have booted from the installation media let the installer load into memory. There are several screens to go through, you’ll have to do the following:
- Accept the license agreement (F11)
- Choose your install location. As I said before, this can be the drive you are booting from as the install is now in memory. I would highly advise against installing on any dataset you wish to use as a VM datastore.
- Confirm the disk selection, this will wipe the selected drive.
- Choose your desired language.
- You are asked to enter a root password here, please remember this as you will need it to log in.
- Press F11 to confirm the install and the install will start.
- Once the install has completed you will see a screen asking you to press enter to reboot, do so. Please make sure that wherever you have decided to install ESXi to is set to boot from by default.
Part 3: Configuring and Accessing ESXi’s Management #
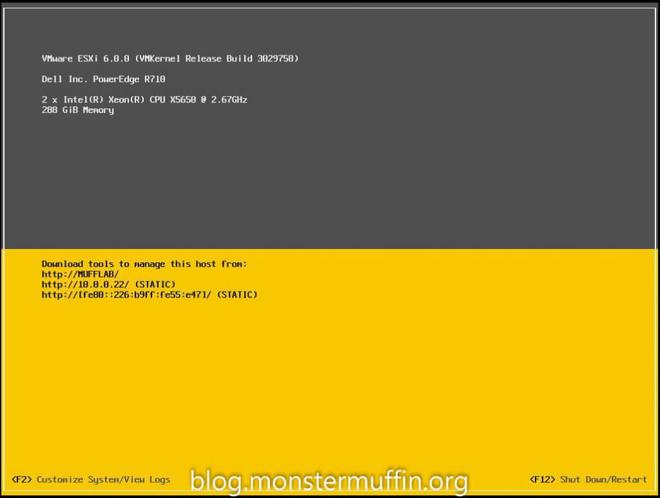
Now that we have the hypervisor installed we need to make sure we can manage the server, most of the time this is done via DHCP but we should double check this whilst we still have the machine connected to a monitor and keyboard. Once ESXi has booted you should see this screen:
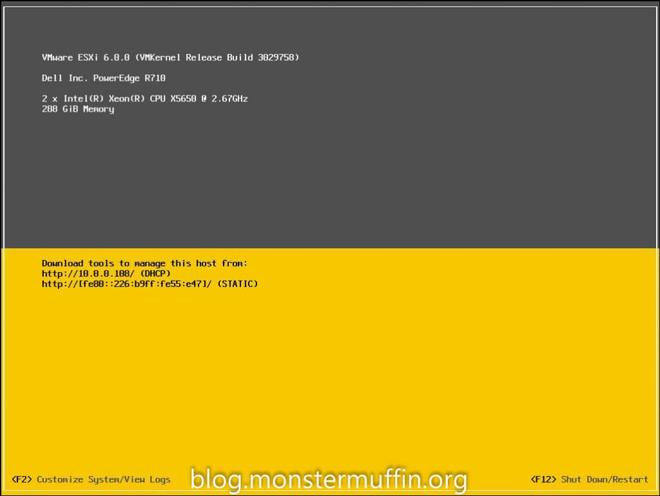
As you can see my DHCP server has already given this server an IP, but I will set it statically anyway, along with the DNS name. You should do this too to keep consistency and ensure this doesn’t unexpectedly change.
- Press F2 at this screen and it will ask for your root password, this is the password you set in the setup.
- Go into ‘Configure Management Network’
- - If your management network is on a separate VLAN that is tagged on the port you can set this in ‘VLAN’. If you are not using VLANs you can skip this step.
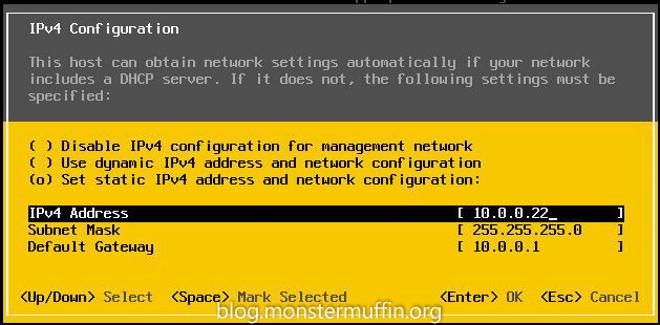
- IPV4 configuration > and change the setting from dynamic to static and enter your desired IP settings here. Press enter to save this setting.!
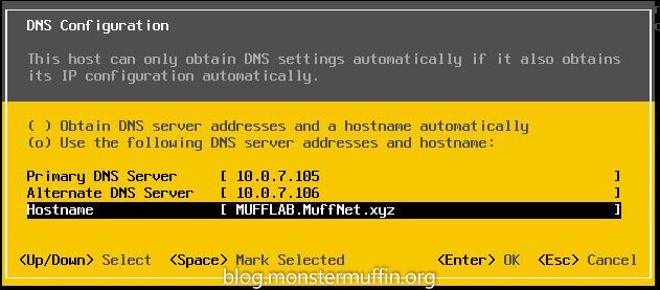
- Head over to ‘DNS Configuration’ and enter your DNS servers here, enter a DNS hostname for the machine too, Press enter.
- These settings have been saved but not applied, press ESC to exit and you will be prompted to apply the changes, press Y to accept this change and the management network will restart and take the settings you have entered.
- Press ESC one more time to get back to the main screen and you should see your new settings like so:
Now this is done you’re ready to go headless! As there is nothing to do on the machine itself you can turn it off (F12) and move the server somewhere else without a monitor/keyboard, just make sure it has power and network connection.
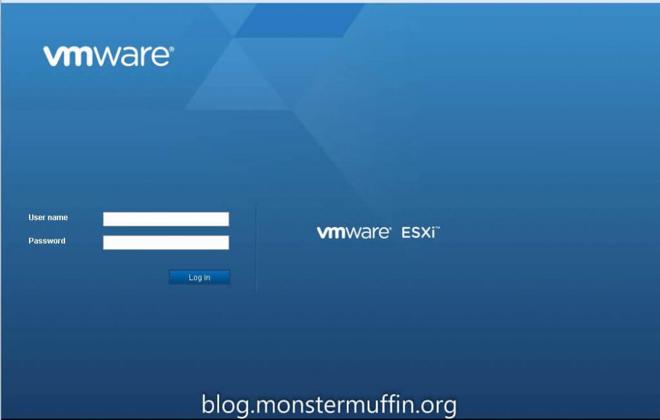
Once you’re happy with where the server is located, if you decided to move it, head over to another machine with an OS and a web browser. We will now access the management of the server, this used to be done via a Windows app, which was actually quite good but is now, at the time of writing, being phased out in favour of their new HTML5 management interface, so I will cover that instead of the fat client. Note: The web client is only officially available in ESXi 6.0 Update 2, you will need to use the fat client for any version below this. Head over to https://
Part 4: Understanding Datastores and Networking #
Once you’re logged into the management interface there are some things we need to do in order to get started.
- Apply your license. Currently, it is running on a trial license enabling all features, you can leave it like this or apply our free license now, it’s up to you. If you’re just starting out applying it now is fine as the advanced features will not matter.
- Setup datastores. We need somewhere to store our VMs.
- Set up networking. What good are virtualised machines without networking?
Applying your license. (Optional) #
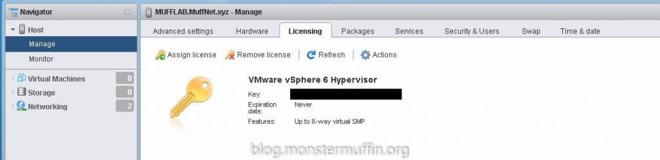
On the left-hand side is where you will navigate the hosts management, head over to Manage > Licensing and you will see you are in eval mode as previously mentioned. If you wish to apply your license now, hit ‘Assign License’ and enter your key in here, after applying you will see the change has taken affect and a lot of the features are gone, that’s fine.

Setup your Datastores. #
Now we need somewhere for your VMs to live, this is done under ‘Storage’ on the left-hand side. Datastores for the most part for beginners will be local storage, that is, storage that is physically attached to the host, whether it be 1 or 10 SATA disks, or a RAID array, the datastores are created here, You can also use storage on your network, this has many advantages but you must ensure you know what you’re doing. Storing VMs on devices on the network needs storage designed for VMs and good networking or your performance will suffer. The NFS protocol is what is used to mount network stores into ESXi for VM use.
For my example, as previously explained, I have 6x 600GB SAS disks in a RAID0, so I will add this as a datastore, making this a datastore will erase all partitions on the disk and create a VMFS partition, this is what VMWare uses. So,
- Click on ‘New datastore.’
- ‘Create a new VMFS datastore’ to use local storage.
- Give this datastore a name, I used ‘LabArray01.’
- Select which disk you wish to use, for me this was a 3.27TB ‘Dell Disk.’
- Select a partitioning scheme, for simplicity you should use the full disk however if you wish to customise the partitions you may do so.
- Click next and finish to confirm the settings. You will be warned that the disks will be erased, be sure you are comfortable with this and continue.
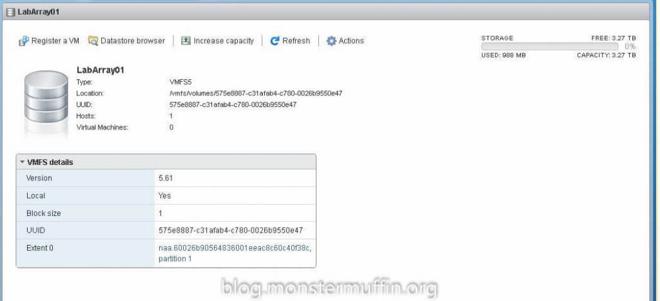
The wizard will then format the new datastore, this shouldn’t take too long as it is a low-level format and under ‘Recent Tasks’ on the bottom of the management screen you will see the task ‘Create a VMFS Datastore.’ Once the format is complete the datastore will be visible in the ‘Datastores’ tab like so:
![]](images/datastorecomplete-1024x207.jpg)
![]](images/recenttasksdatastore-1024x100.jpg)
Once the datastore has been created you can view more details by clicking on the datastore itself.
One thing you can choose to do here is to click on ‘Datastore browser’ which will take you to a browser where you can manage the files on the datastore. Here, you can create a folder and upload ISOs that you wish to store for VMs, I personally do not do this as I use ISOs on my computer instead but if you wish to do this you can do that now.
Datastore created! Now we can move onto networking.
Part 5: Understand Networking #
Networking is configured via the networking tab on the left.
You will have one vSwitch and two port groups by default. You can see these by the tabs to the top. Networking in ESXi is really easy to grasp once you know what you’re doing. A vSwitch is exactly what it sounds like, a virtual switch running inside of ESXi.
Why is this necessary? If we had 10 physical computers we would connect their ports to a switch, and that switch to an upstream device, maybe another switch or a router, that’s how they would communicate and get out to the internet, right? The same thing is happening here, VMs are assigned to vSwitches which have an uplink (the physical port on your host) to a switch, You can make multiple vSwitches with different physical uplinks to different switches if you like, but vSwitches work the same as switches.
What is VM Network and Management Network? These are groups that VMs get assigned to. VMs do not get assigned directly to the vSwitches, instead, they get assigned to groups which are assigned to vSwitches. VM Network is the default group that is created which your VMs get assigned to, this is attached to vSwitch0 which, again, is default on the uplink that is plugged into your host. The Management Network group is what you are connected to, it is a network with the management services attached to it and this should not be changed as you risk losing connection to your host. Why are groups useful? Groups are great as it is a great way to arrange and manage your machines using one uplink. On my production hosts I have a group for my VLANs, so, my server VLAN is VLAN7, I have created a group called ‘Server Network’ which is on VLAN7 and another group called DMZ which is VLAN5. If I build a machine that is a server, I can assign it to the server network group, if I build a machine that needs to go in the DMZ, I assign it to the DMZ network. You can assign a VM to more than one group, so the VM can be in multiple networks simply by assigning to different groups. Another use case of vSwitches and groups is segregation. I frequently spin up labs on my hosts to mess with things and the best way to do this without disturbing my network is to create a new vSwitch with no uplink and create groups on that vSwitch, this means I can create labs with machines that can network between themselves without them ever touching or knowing about my main network, pretty sweet. So, you’re pretty good to go on the networking side of things. Things you may want to do is add LACP to your vSwitch if you have more than one NIC on your host, or creating another group on the vSwitch with VLAN tagging, but that is not the basics and won’t be covered here, it is extremely easy however.
Creating and Using Virtual Machines #
Time to get stuck in with virtual machines! Right clicking ‘Host’ in the navigator to the left will bring up a context menu, select ‘New virtual machine.’
- On this first screen you can choose to create a new VM, Import a VM from a template (created by you, or downloaded from the internet), or register an existing VM you have uploaded to the datastore or already exists on the datastore. Go ahead and click on ‘Create new virtual machine.’
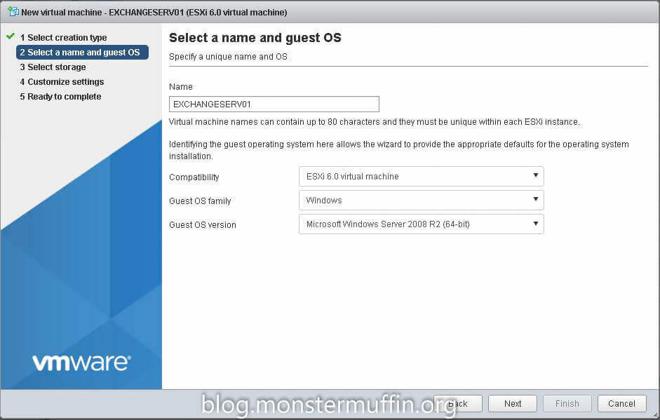
- Give the VM a name, for me this will be EXCHANGESERV01. You can leave compatibility at 6.0 or drop it down if you think you may ever move the VM to a lower version of ESXi, which is unlikely. OS family and version ensure the best virtual hardware compatibility with the VM, so select what you wish to install, I will be installing Windows Server 2012 R2 so I have selected that.
- Continue and select the datastore you created earlier, this should be the only one there anyway.
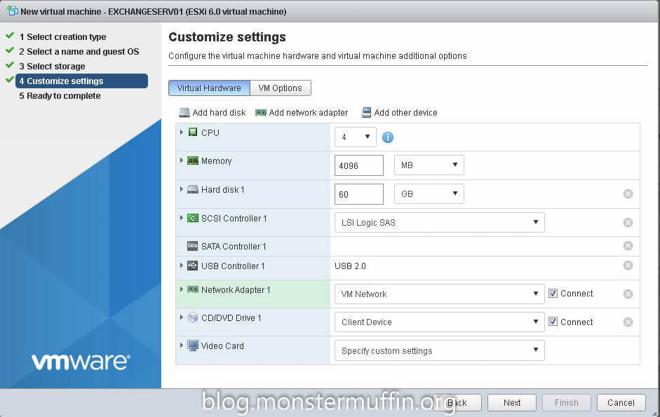
- This next screen is where you setup what resources the VM has, the number of virtual CPUs, memory, HDD space, network selection and more. Make sure you assign enough resources to the machine to run properly but do not over provision as the more VMs you create the more ESXi will have to share the resources, slowing everything down. It is possible to give X amount of VMs X amount of CPU cores but this will mean that VMs will have degraded performance as they wait for the CPU to become available. You cannot overprovision memory or storage as once you’re out, you’re out. You can also choose to mount an ISO located on your datastore from here too if you like, but it’s not necessary. All of these settings can be changed after this setup so don’t worry too much.
- The next page gives you a rundown of what you have chosen, press finish and you will see the machine be created under ‘Recent Tasks.’
- Your VM, once completed under recent tasks, will be available in the Virtual Machines section of the navigator now, clicking on it will take you to that VM.
Now your VM has been created you can go to it as described before and from here you can edit the VM settings, control the power, take snapshots and console into the VM. Turn your VM on by clicking ‘Power On’ and then click the ‘Console’ button. You will want to select ‘Download VMRC’ this will take you to the VMWare website, download and install the tool. Once the console tool has finished installing go to ‘Console’ again and click on ‘Launch Remote Console.’ This console allows you to attach ISOs from your local computer to the VM directly, the other in browser console options are fine if you have attached an ISO from your datastore. From the Remote Console window you can click on the drop down menu, Removable devices, CD/DVD drive, Connect to a disk image file. From here you can select an ISO to install on your local computer. Once you have done that click on the drop down, ‘Send Ctrl+ALT+DEL’ to reset the VM keeping the ISO mounted and your VM should boot into your ISO installer. Continue the installation as you would normally.
And that’s it! You have a VM with an OS installed on it that you can do whatever you want with! Once you have your VM installed you must ensure that you install VMWare tools as this will ensure ESXi can gather information about your VM, send shutdown commands, and greatly improve the performance. Some Linux distros have this built in under a 3rd party tool ‘Open-VM-Tools’ which is fine.
That’s really all there is to the basics. There is a lot more to learn and get stuck into with VMWare, which I will attempt to cover in subsequent posts. Get stuck in, break stuff, create and try things. I hope this has helped you, cheers for reading.
Muffin~~