Intro #
So a lot of you read and enjoyed my colocation post a while back and since then things have been going well.
I’ve used the colo’d host pretty heavily and it’s been serving me great for what I needed it for, my public facing applications have never been happier. I have since deployed cool things like an entire VDI infrastructure there which has been awesome, I’ve pretty much managed to ditch my desktop and use my MacBook Pro along with my Windows & Linux VDI machines with minimal lag, it’s been great.
Recently, however, I have been running dangerously low on storage and upgrades need to be done to accommodate the new use cases I’ve brought to the host. The following post will be my adventures into kitting the host out as best I can for the workloads I am throwing at it, in the ‘muffin fashion’ of hobbling shit together until it works.
The Issues #
So there are a few issues I need to address with this host, and being very far away from me (I live in central London, the host lives about a 4 hour drive up north) I need to make sure I can solve these issues at once and be done with it.
- VM Storage - My RAID10 VM storage, at the time of writing, has 20Gb free. This is not ideal. The current array of 6x 300GB disks isn’t going to fly.
- File Storage - This was never meant to be a file host, but there is a lot here that I need to store, the homelab FTP and my music collection for example. The 2x 900GB disks in a RAID1 is flat out, out of space now.
- Accelerated Graphics - Now I am running a full VDI infrastructure I need to accelerate the graphics performance instead of emulating this in software. I also cannot push anywhere near UHD unless I get this acceleration.
- SSD Datastore - Currently, my VDI machines are running from the main spinning rust datastore, to increase performance these VMs need to be moved onto SSDs.
- SSD Caching - As well as upgrading the VM storage, I need to add some solid state cache to the host to allow for increased performance for things like swap.
- Memory - 92GB is just not enough for this host. Upgrades will happen.
The Plan #
So I have a very elaborate plan to solve all these issues that are far from best practice but hear me out. I am writing this blog post ‘as it happens’ so whether or not this all works we will find out. Let me try and explain my thought process here.
I want as much storage as possible without breaking the bank with Thor’s hammer. The host only has 8x 2.5" slots which are connected to the P410i, which I use for RAID for VMs, so I’ve figured out a way to work around this.
I recently decommissioned one of my DL380G7s in favour for a G8, so I will be using this host to do all the work in, then swapping it out with the 360 in colo when the time comes.
Here’s the plan:
- 8x 1TB Seagate 2.5" SAS in RAID 10 for VM store - This gives me 4TB of meh storage for VMs. I already own these.
- PCI-E > 2.5" (One of these bad boys) in one of the PCI-E slots passed through to my fileserver VM for bulk storage.
- This 2.5" 2TB Seagate drive in the aforementioned bad boy.
- StarTech.com M.2 Adapter - This gives me 1x NVME slot for a drive and 2x M.2 SSD slots when connected to a host card.
- PCI-E SATA Controller for connecting the 2x SATA SSDs on the above board.
- 2x Crucial CT275MX300SSD4 275 GB M.2 - These will be used for ESXi datastore/VM caching.
- 1x Samsung 960 EVO 500GB - This will be a datastore just for my VDI machines.
- Some stupidly convoluted GPU setup as explained below.
- Some more 16GB RDIMMs to bring the machine to 192GB.
Now, this all sounds pretty nuts but it’s the best way I can possibly think of to do what I want to do without adding external storage or going to the cloud. So, with the main thinking out of the way I ordered all the parts.
Originally I was planning on putting a FirePro GPU in this bad boy as well but there were a few factors stopping me from doing so:
- VMWare in all their infinite wisdom and totally non money grabbing selves have dropped any cards that are obtainable for a decent aftermarket price off their list of supported cards in 6.5, meaning I would have to shell out a lot of money for an Nvidia GRID card which is a lot of £££ for a hobby project.
- I would need to get the aftermarket riser for the server which has 1x PCI-E x16 slot and the appropriate power on both the slot and auxiliary port to power the card via a 6P pin. This would be fine if the card was reasonably priced in the UK and came with the proprietary connector to connect the GPU power, which it didn’t and this wasn’t easy to find.
- This would push me well over my allotted power limit for my colo contract so all things considered, this was the biggie.
What I decided to do in the end is very limiting but it will work for what I need. Since I have a total of 6x PCI-E slots via the 2 risers in the server, I’ve planned to use the 3 left over slots for very basic GPUs which will be added to the VDI VMs via passthrough for GPU acceleration. This allows me 3x VDI VMs that can be graphics accelerated, a far fetch from what I wanted to do with the FirePro but such is life.
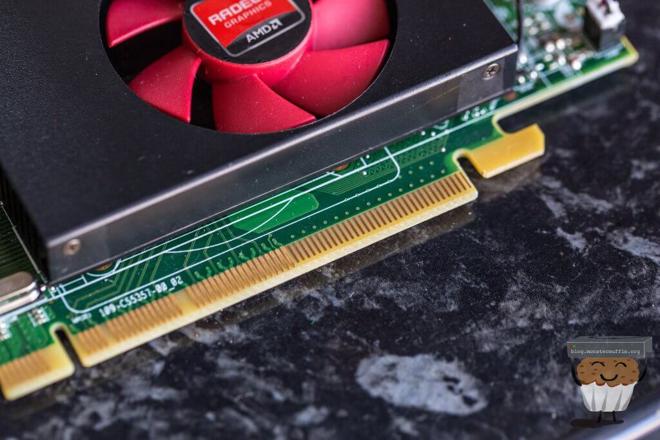
The GPUs in question are AMD R5 240’s and they were simply chosen as I have loads of these lying around.
Installing Hardware #
So, a lot of you may have looked at the above and thought why on earth I am doing what I am doing with unsupported hardware, and you’d be correct in thinking that. I pretty much looked high and low for a good solution to do what I wanted and this was the best I could come up with, I may need to do some driver injection to get everything to work but once that’s done and if everything shows up like it’s supposed to I really have no issue doing what I’m doing.
If things don’t work, I will return them and go back to the drawing board. So, 1-2 days from now and instantly for you here are some pictures of my new hardware:
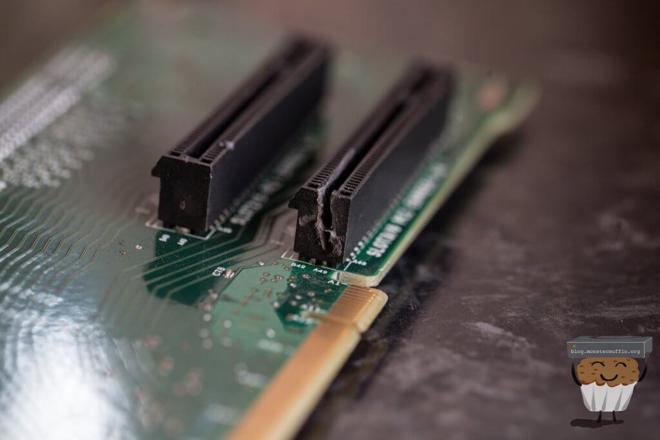
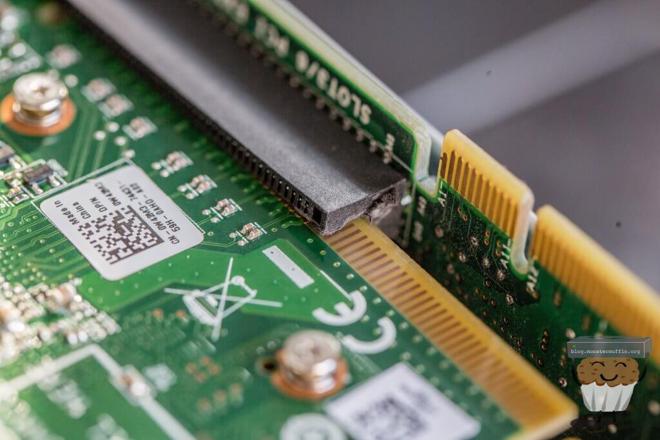
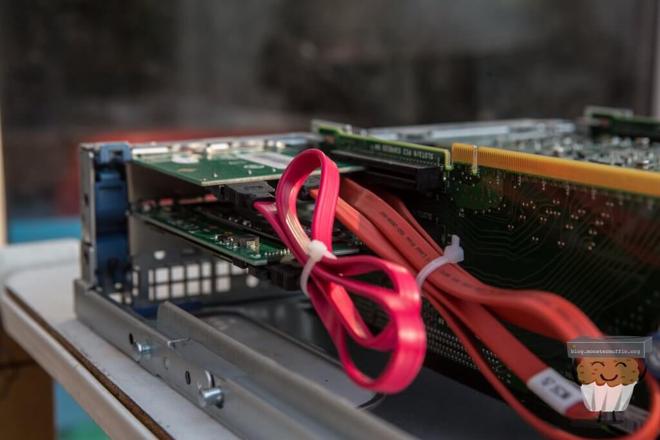
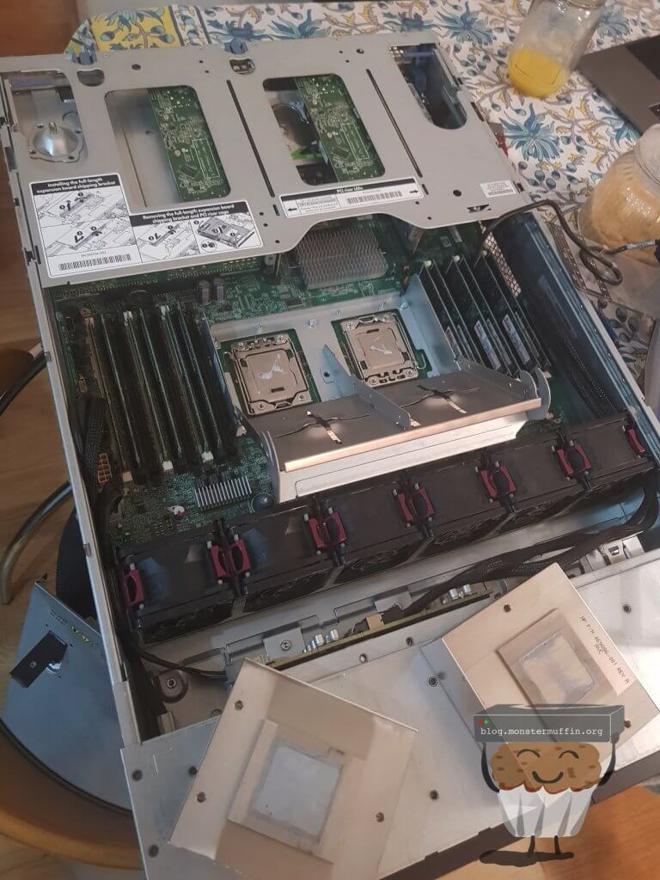
Here are some pictures of what the risers looked like in the riser cage, it all looks a bit like a clusterfuck but it all fits and works as planned. I managed to put 2 of the cards in the x16 slots (electrically x8, however) but had to cut open one of the x8 sized slots for one of the cards as you can see below. This is perfectly fine as you can see those pins on the card don’t actually go anywhere anyway, as you can see here.
I used tools that were not meant for the job, at all, so please don’t judge me too much but it did get the job done.
The entire thing looks rather interesting too;
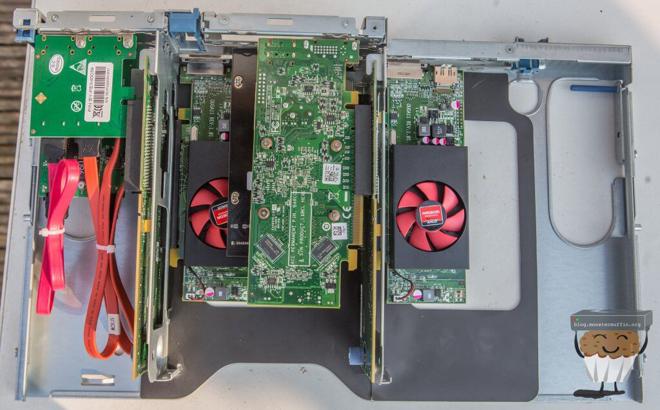
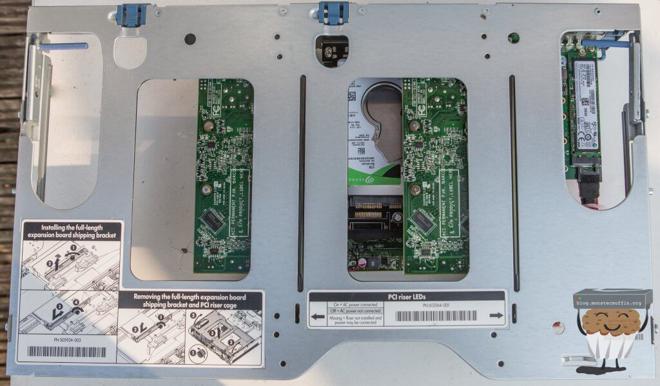
You can see I’ve tried to make full use of the available space. The SATA cables are connected to the M.2 drives with the host SATA controller above it.
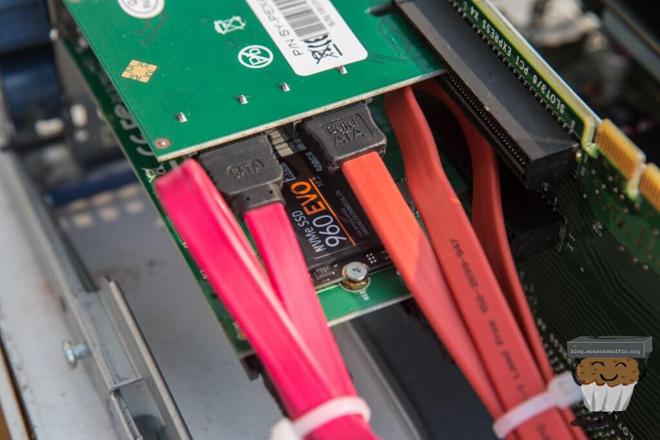
The NVME drive pictured uses the PCI-E bus for communication which is why I’ll be using putting my VDI machines on there.
Configuring The Hardware #
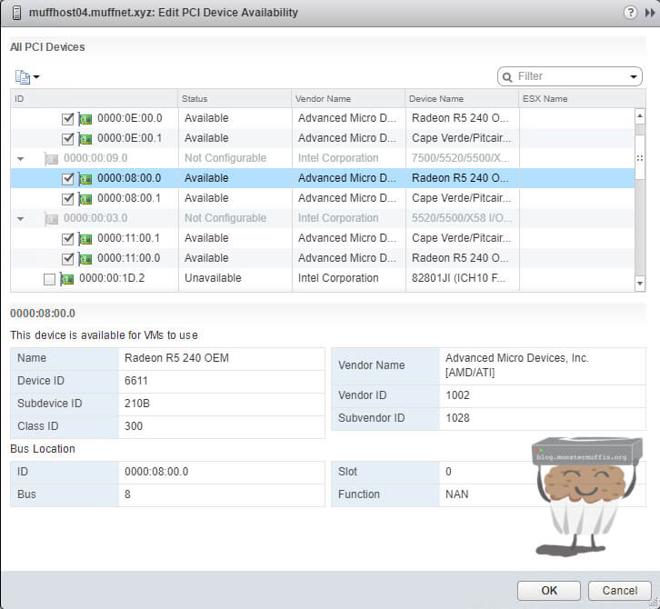
So, to my surprise both the controllers worked out of the box in ESXi 6.5, showing the drive in the datastores menu and, obviously, the PCI-E device under the PCI hardware menu, allowing me to check it for passthrough purposes, awesome! I didn’t think the AsMedia controllers would be natively supported and my research came up with people injecting VIBs but they both show up as ASM1062 Serial ATA Controller.

So, with that all hunky dory I went ahead and configured pass through for the SATA controller in order for it to be used by a VM, and the GPUs for VDI use.
I also went ahead and set one of the two Crucial SSDs to be used as a VM cache under the SSD caching menu in vCenter.
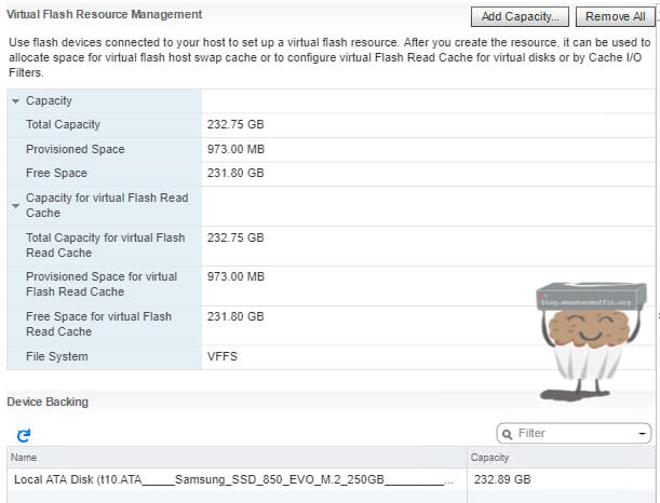
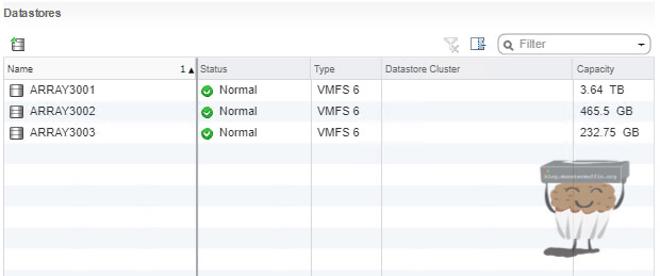
The other M.2 SSD will be used as a datastore along with the NVME drive.
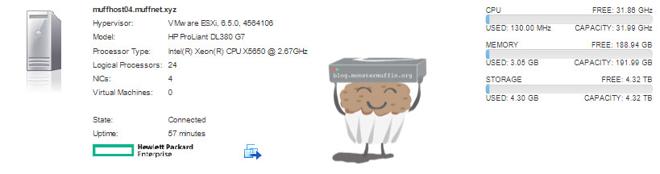
So, after all of that one of the last things left to do on the hardware side of things was to replace the 2x x5690’s with 2x x5650’s. Every watt counts at colo as I don’t fancy being told I’m over the limit as I am extremely close as it is.
The final product was the following:
Migration #
Migration was always going to be tricky. With the datacenter so far away and being limited by my residential internet connection at home there really was no way of doing this without downtime, the way I wanted to do it.
In my eyes, when this thing goes in it should become the old host, not be a new one. The reason for this is to maintain a lot of my automation that uses the hostname and keep stats etc. So, the best way to do this is the following in my eyes:
- Setup temporary vSwitch w/ VMKernel on my home network for access.
- Setup networking identical to colo host without putting the interfaces into the vSwitches.
- Set IPs identical to colo hosts on VMKernels.
- Shutdown all VMs in colo apart from pfSense.
- Take a full backup of colo host.
- Shutdown colo host.
- Rename host to 03 from 04, change DNS to reflect current, temp IP.
- Ensure the new 03 is accessible in vCenter after DNS change.
- Restore VMs to 03 and set autostart.
- Add interfaces to vSwitches.
- Remove temporary network on 03 via console.
- Change DNS to reflect colo IP range for 03, so when the host comes up vCenter can poll it on its colo address.
After this, the host should be ready to simply be plugged in and have everything come back to life as was the old machine. The downside to this is to ensure I have time to do everything all these changes will be made the day before, so the host will be down overnight :(.
The other option would have been to setup the new host alongside the old one and vMotion everything across, locally, there and then. Whilst this is far simpler and makes more sense I simply do not know how long this would take and if anything were to play up, I don’t want to be sitting in a small datacenter all day.
So, with that done it was colo day…
Colo #
All things considered, swapping the hosts out went just as expected. I did have a hiccup where the default route was lost when I removed the old VMKernel and it did not get this automatically. I was having issues where the host was contactable via L2 local traffic but had no default route to access other local VLANs or my lab at home, plugging in my Macbook directly and adding the default route manually fixed this issue completely.
Here are some images of the server in it’s new home:
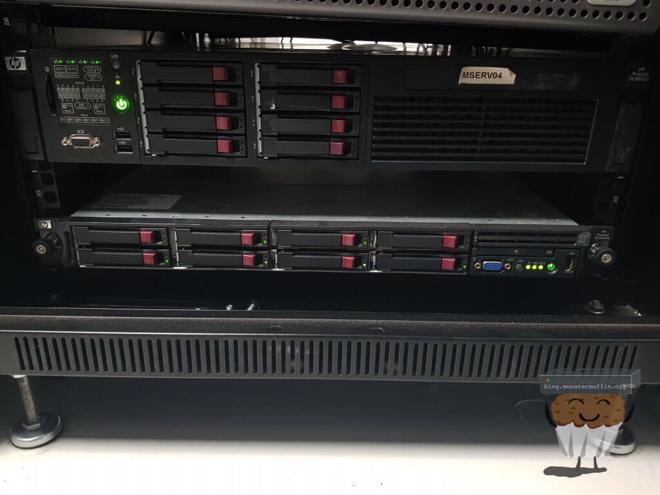
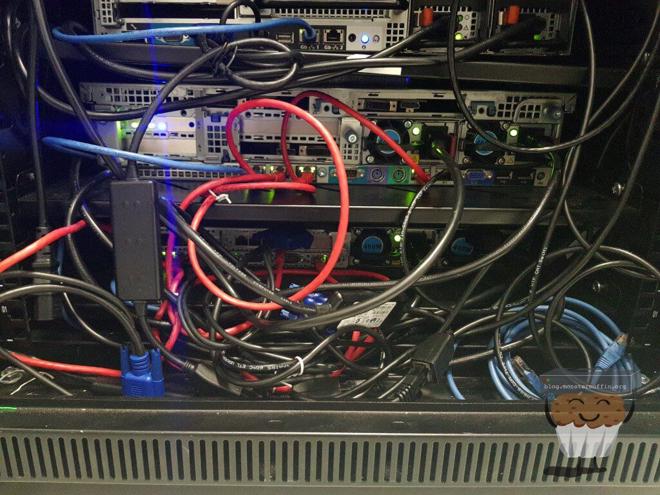
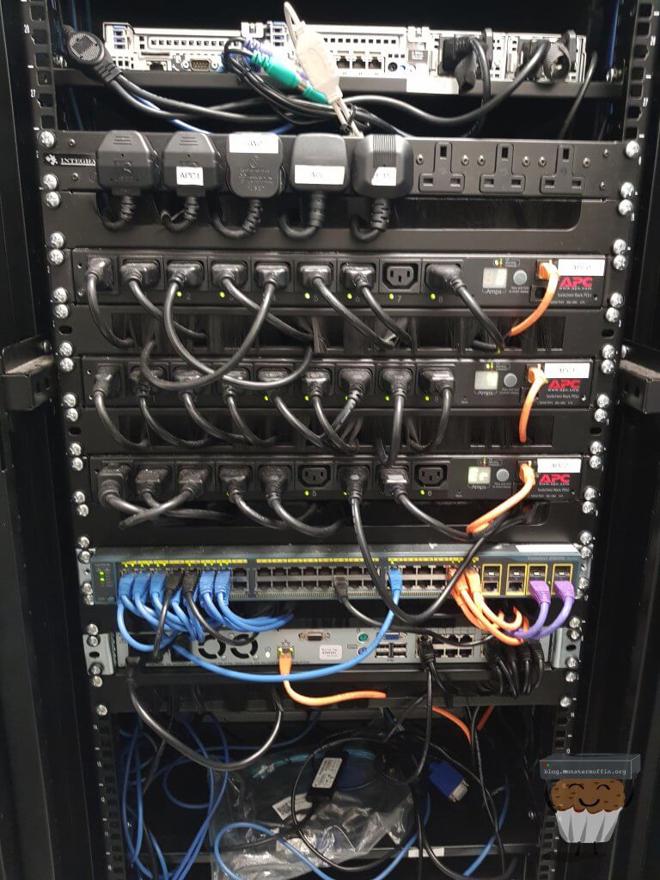
Admittedly it’s a bit of a clusterfuck but honestly, that’s not really my problem. One thing that is slightly annoying is that someone has decided to mount a 2950 right above me lopsided, but as long as it doesn’t fall on my server I’m not awfully bothered.
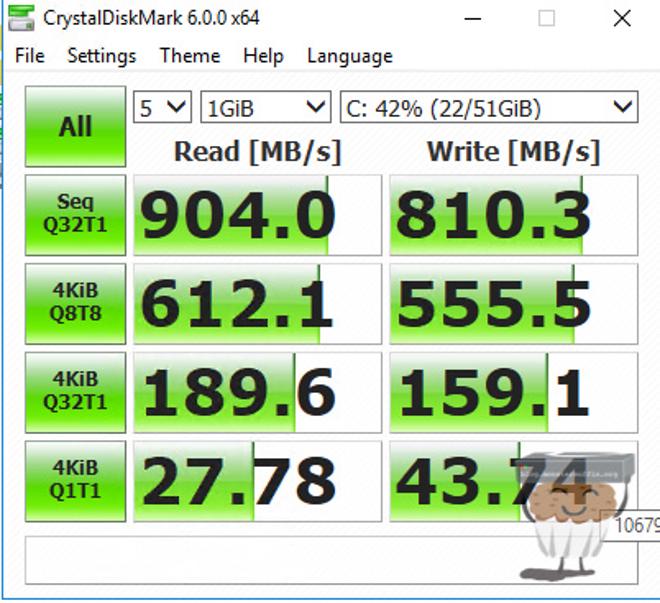
The NVME SSD seems to be doing the trick with the VDI machines too, with 12 machines running from the same datastore I can get the following speeds which isn’t too bad all things considered. The machines feel a lot snappier now too which is nice.
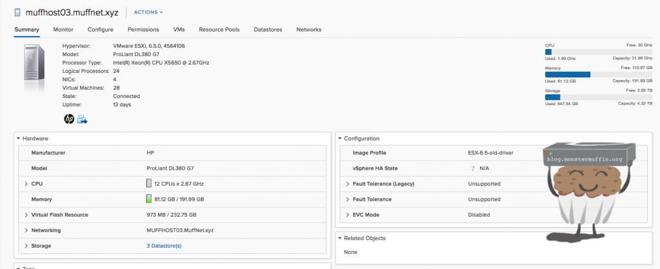
And here is the finished product in vCenter.
And that’s it folks! Thanks for following along, until next time.
~~Muffn