Intro #
So it’s that time of year again when my girlfriend and I decided we wanted to move, after a few months of searching we found a very cosy (and a not so cosy rent price to go with it) flat in Zone 1/2, London. Without boring you with a life story, the aim of this move was to be extremely light, only moving the bare essentials so when it came to moving back out, there weren’t masses of furniture and servers to move. Moving servers is not fun.
This blog post will be about a build I wanted to do for this move, a small, low powered host that would live in this new flat as a local VM host//storage server for when accessing things from the lab would be inefficient.
It’s a pretty cool project if I do say so myself and this type of build would be ideal for a lot of people that I see on the internet that want something ‘all in one’ that fit the requirements I set. I’m hoping people in similar situations will find some inspiration in this build and either copy it or use it as a stepping stone for something similar.
So, let’s get to it.
Why though? #
So as you may have summarised from the intro I am keeping my lab alive and kicking in the shed of my previous abode, so why on earth do I want this?
The reasons are quite simple really, having local compute resources is always better than accessing stuff in the ‘cloud’, and whilst I could just shove a ‘prosumer’ router/AP combo in the new flat and connect back to the lab, that’s just not who I am. These are just some of the reasons I think that a local machine like this is important:
- pfSense - Running a proper firewall with advanced features, policy-based routing, multiple VPN tunnels etc is extremely important to me. I will be connecting to 4 other sites via BGP, for example, so this makes that possible.
- Local Domain Controller - Not that this is massively important as everything AD related can go over tunnels but it’s always good to have a local machine to auth against, also having DNS and DHCP locally on a domain controller with replication to/from other sites is crucial.
- Editing - I have a 6TB ‘prod editing array’ in my lab which are files that I’m currently working on, be it video or photo, over AC wireless this is fine and most of the time I’m doing this work is via hardline, but this isn’t possible over a tunnel. I’d like to have an array locally that keeps in sync with the array in MuffNet.
- Labbing - A lot of the times I’m writing posts for this blog, for example, I’m spinning up and messing with different things, having a host locally to do this on is pretty sweet.
So, after persuading myself that I do in fact need a server, the fun part can begin..
Goals/Requirements #
As with all my projects, requirements have to be set to make sure I keep true to the aim of the project. All of these in this case needs to be met for any of this to be worth it for me.
- Quiet - Server has to be silent. As I stated previously the new flat is extremely small (Welcome to London) and this server will be sitting with the TV equipment in the living room, and the flat being pretty open plan means that it cannot make any noise. Living spaces should be silent when needed.
- Small Form Factor - Following all the reasons above ideally, I’d like something that can look sleek and not out of place in a living room.
- Low Power - Power is expensive and I’d like this thing to sip as little power in idle as possible. Hardware has come a long way in recent years so getting something that pulls less than 80 or so watts from the wall isn’t too unreasonable. This will mean getting something that is reasonably modern.
- Able - Whilst I have no desire for high-end Xeons/i7’s for this project I’d still like something that can route at full gigabit, run a handful of VMs and storage without being pegged. The Atom stuff, for example, wouldn’t cut it for this.
The Search. #
All in ones aren’t that amazing. They can be if they fit your requirements, but nothing I could find for a reasonable price ticked every one of my boxes. I wanted to be as cheap as possible with this and I just didn’t feel like I was getting my monies worth.
The closest thing I could find that would work was the Dell T320 but I concluded that the thing was just too darn large and not as new as I’d like considering an average price point of about £500.
So, I started looking to build something myself..
The Plan #
So following my disappointment in trying to find something that I deemed suitable I looked at spec’ing something out myself, to my disappointment this was also not as easy as I thought it would be. Hardware is currently pretty expensive and it seems parts are not as available as I would have thought, possibly with the Christmas season upon us (at time of writing) and everyone and their dog mining for crypto the consumer hardware market is a difficult place to be, nevertheless, I settled on the following:
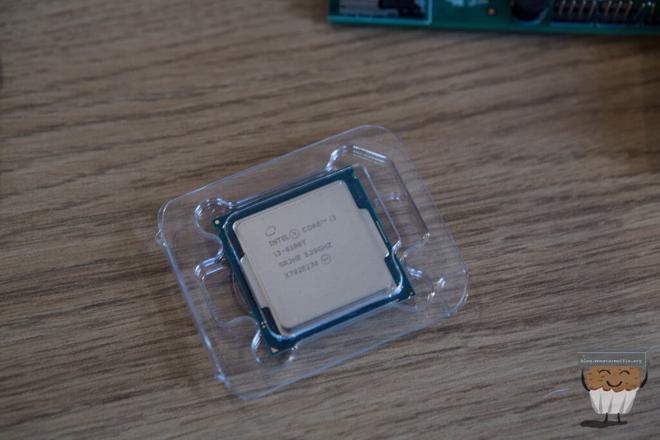
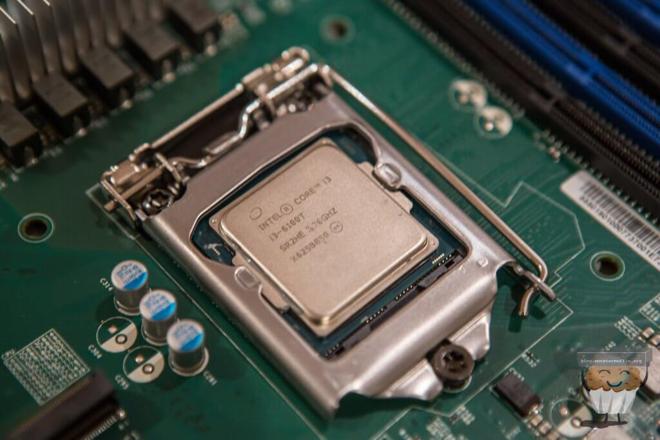
Intel Core i3-6100T #
So I went with the i3 for a myriad of reasons. The price on these processors isn’t awful, for £100 RRP you’re getting 2 pretty decent cores with hyperthreading which is just fine for what I need. At 35w TDP it really is a great little chip too. ECC support is included as well. The bummer is that I have an i5-6500 just sitting in my draw, but because of my FreeNAS VM I would like to use ECC memory which the i5 doesn’t support. Ideally, I would have sprung for the 7300T but Kaby Lake processors are just not available anywhere at the moment, but this will do. Now, 1151 Xeon processors do indeed exist but I could not find anything around the £100 mark so the i3 wins.
Supermicro MBD-X11SSH-LN4F #
Finding a motherboard that wasn’t some stupid RGB gaming thing was tough to impossible (this is why I ruled out Ryzen FYI). Most of the motherboards I was finding were not geared towards the 24/7 server type of workload I was planning for it. Most motherboards don’t support ECC either which is a huge annoyance and include things like audio chips which I really couldn’t give two shits about. The MBD-X11SSH-LN4F was the best thing I found for not insane amounts of money. There were ever so slightly cheaper AsrockRack motherboards but I don’t trust them enough and the difference in price was so small. This board seems to have everything I would need including IPMI, 4x Gigabit Intel NICs, 64GB of memory support for future expansion, an M.2 slot and many other attractive features.
Kingston ValueRAM 16GB (1 x 16GB) DDR4-2133 #
Holy fuck memory is expensive. I’ve known memory has been expensive for a while but god fucking damn this is ridiculous. This stick of memory is currently £150 and it is all I will be buying until the prices drop. Whilst 16Gb is pretty scarce for me, it will need to do until the market calms down. The sweet thing about this though is that I can pretty easily get to 64GB with 3 more sticks.
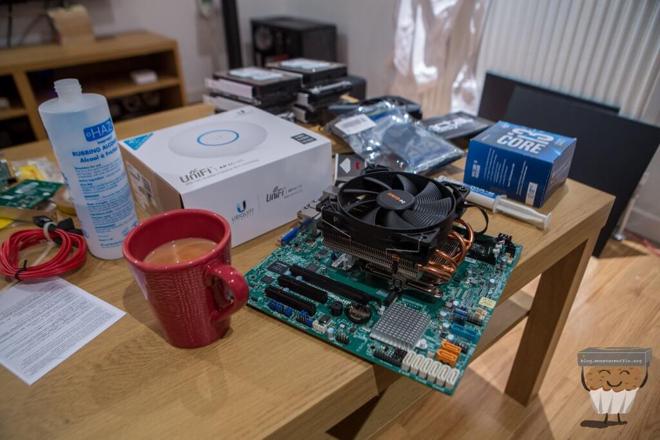
be quiet! Shadow Rock LP #
A low profile cooler isn’t exactly the best choice for this but I found this cooler from this project where I couldn’t use it because I’m stupid so it will do just fine. The original plan was to use the cheapo be quiet! Pure Rock Slim which is a better fit for this build but free is always better.
SeaSonic 450W 80+ Gold Certified Semi-Modular ATX Power Supply #
Again, it’s cheap (ish), it’s a decent wattage, 80+ gold and Seasonic, what’s not to love?
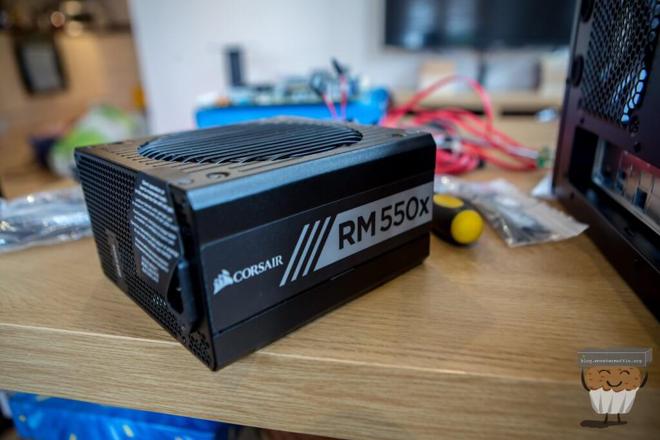
Corsair 550 W RM550x Series 80 PLUS #
When it came to ordering time the above Seasonic wasn’t available for a little while and this one seemed like a good contender. I’ve had a good run with Corsair PSUs in the past and this one seems no different after reading some reviews, for a mere £6 more than the Seasonic I’m getting a fully modular PSU and 100 extra watts which is cool, I suppose.
Fractal Design Define Mini #
I actually decided on this case after much back and forth but Fractal has never disappointed me before. I decided the MATX form factor was the sweet spot for this build, motherboards have enough space to be useful, and cases have enough drive bays. This case has 6 internal 3.5" bays which is great, the case also looks like something you don’t mind being in a living room doing it’s thing and has lots of noise dampening material, so I think it’s a good choice.
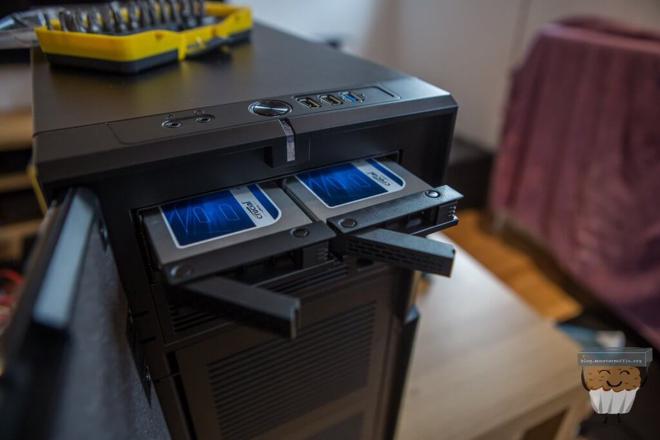
Crucial 250GB SSD x2, Samsung 128GB SSD x1 #
Now, I don’t really like the Crucial’s that much, but I already have them so I might as well use them. I’ll be running two of these in a RAID1 for VM storage. 256GB isn’t a lot but for some VMs it’s just fine, I can always add more SSDs if I need to spin up larger VMs for any reason. The remaining Samsung SSD will be used as a read cache for the below array.
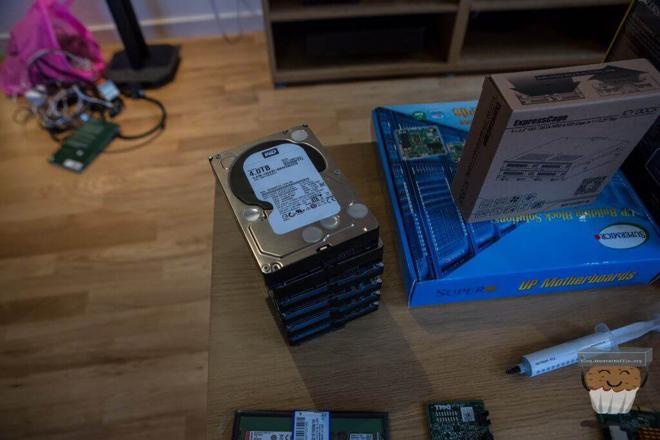
WD 4TB RE4 x6 #
Again, I already have all these drives spare. I’m planning on running 4 of these in a Z2 to give me 8~TB of usable space which should be fine as an editing partition for my projects. These remaining 2 drives will be running in a mirror and will simply be used as a file store for anything that needs to be accessed locally. 2TB of this will be a Timemachine backup target for my Macbook and a backup target for my girlfriends Surface.
These pools will have its snapshots sent over to my main storage in my main lab as a backup, as well as keeping in sync with rsync with the data in the main lab.
LSI 9211-8i / H200 #
Ah, the ‘ol faithful. I’ll be using this card with breakout cables to the HDDs to pass through to the FreeNAS VM. I’ll also be hooking up that one cache SSD to this card. The reason I’ve put two cards here is that I’m planning to get whichever is cheapest when it comes to buying time.
RocketRAID 2720 #
I have one of these RAID controllers from a long time ago and I think will work perfectly for this. It will be used for the RAID of the SSDs for the VM datastore. I much prefer this over using the chipsets RAID on the board itself and I always try and shoot for some form of redundancy when doing VM storage.
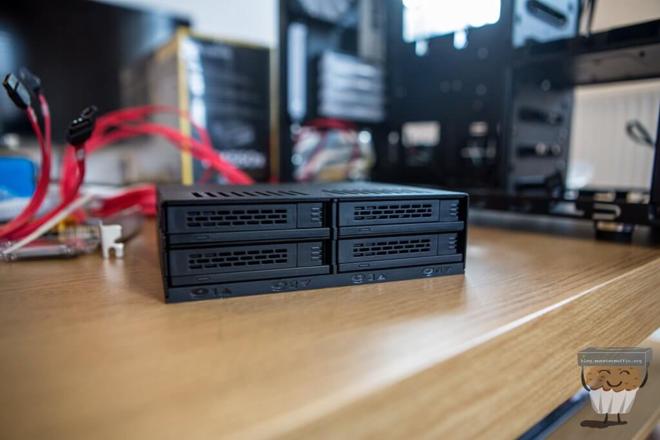
Icy Dock 4 Bay 2.5 SAS/SATA Mobile Rack #
So, this thing turns a 5.25" ODD bay into 4x 2.5" SSDs. I could just shove the SSDs somewhere in the case but this makes things a little more elegant and easier in the long run. Adding/replacing SSDs is easy this way too as I can just do it without opening the chassis.
So here’s a breakdown of everything I’ll need for the build with vendor and price paid.
| Item | Vendor | Price |
| i3-6100T | eBay | £70 |
| MBD-X11SSH-LN4F | Ballicom International | £220.32 |
| Kingston DDR4 16 GB DIMM CL15 Unbuffered ECC Memory | Amazon | £146.99 |
| be quiet! Shadow Rock LP | N/A | £0 |
| Corsair 550 W RM550x Series 80 PLUS | Amazon | £76.42 |
| Fractal Design Define Mini | Amazon | £77.44 |
| Crucial 250GB SSD x3 | N/A | £0 |
| WD 4TB RE4 x6 | N/A | £0 |
| H200 | eBay | £39.95 |
| SAS-9212-4i | N/A | £0 |
| Icy Dock 4 Bay | Amazon | £37.99 |
| SAS Breakout Cable x3 | N/A | £0 |
So, a grand total of £669.11 isn’t too bad. Using a lot of spares I have in my inventory helps, if I had to buy HDDs this would be much higher. Overall the price isn’t too bad considering what I’m getting and with expandability pretty high, I don’t see what I could have gotten for this price that has all the pros of this custom build.
The Build #
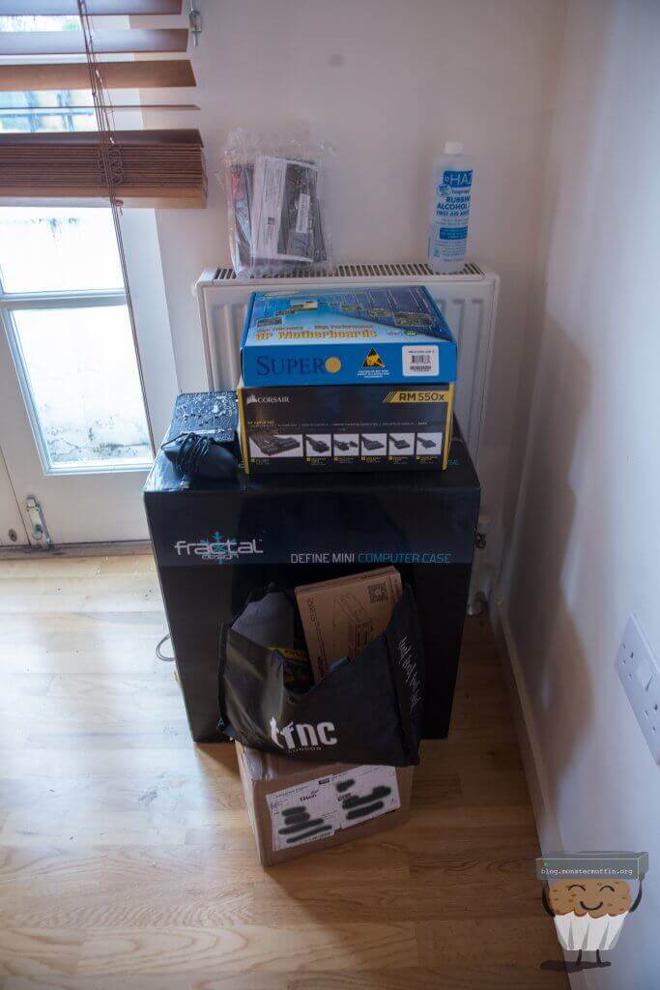
Annoyingly, I ordered most of the parts too late due to how busy I’ve been and just pure laziness which ended up meaning almost all the parts arriving the day before the moving date or on the day itself. This meant I had to move all the hardware to the new place and build there which isn’t a massive deal but it would have been easier to move just one machine with everything inside it.
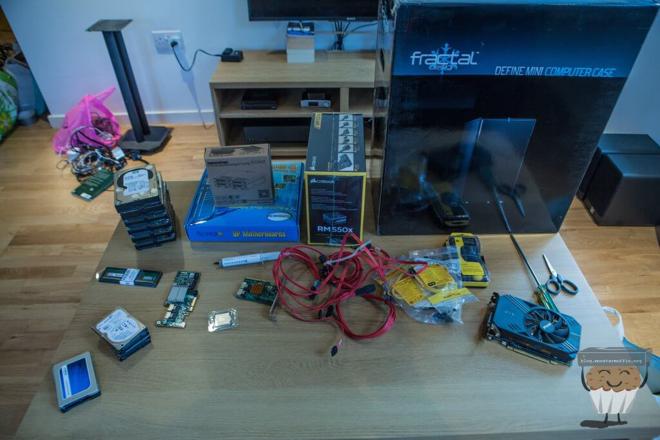
So, the day after the move I ended up with all this in the corner of the room and decided to give the build a crack. Enjoy some hardware porn:
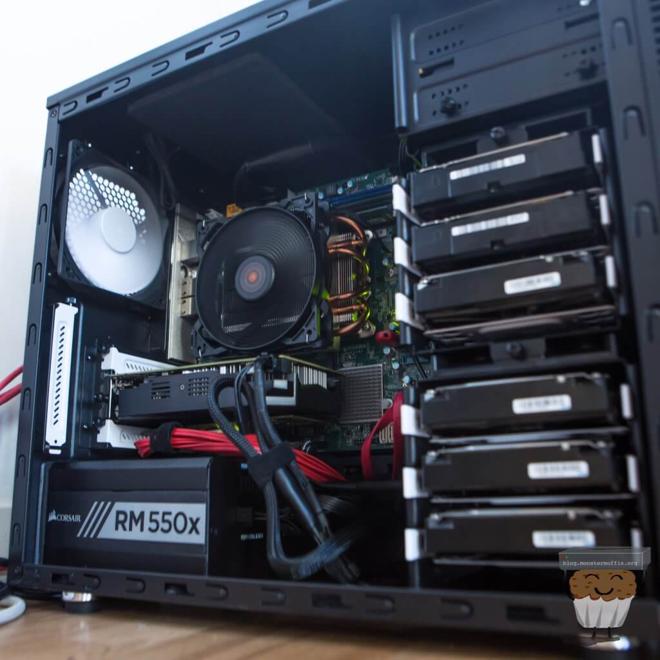
Muffin, why is there a GTX1060 on the table? Good question, I’m planning to use it in a streaming VM for my Macbook to play steam games, I will be blogging about this so if you’re interested be sure to check back at some point.
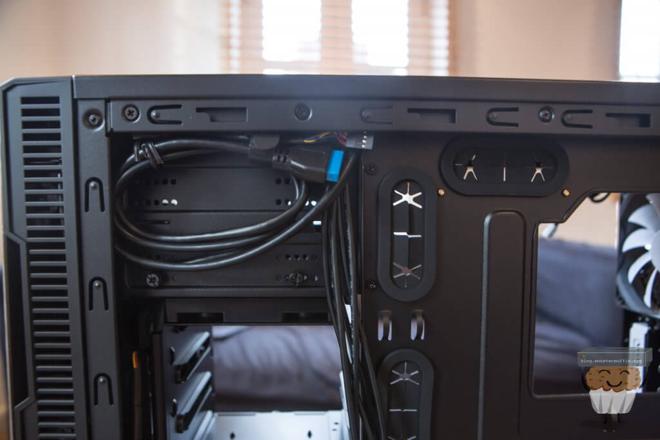
I ended up tucking away the USB3 and audio headers as this just isn’t needed for this build and it helps make things neater.
I was happy to see the dog was settling in quite nicely in the new place too.

Protip: Tea makes builds a lot better. At this point, I’d gone back to my family home to grab some leftover stuff and also the CPU cooler which I’d managed to leave behind as well as my new networking gear which arrived that day, dope! (Flat lab setup can be found here.)
When it came to booting her up I realised that the H200 was using an ancient firmware and I needed to crossflash this thing, so I went ahead and did that which ended up being more of a ballache than it needed to be, but when is anything I do not?
So, I took out the RAID controller, flashed the card, plugged the RAID controller back in aannndddd…. it was dead. Years of moving hours and tossed into boxes with other PCIE cards seems to have killed it. Sigh. I managed to get a HP branded LSI card from @Wings3D on the homelab Discord (thanks again!) which also turned out to be dead… My luck eh?
I ended up plugging the SSDs directly into the board using some SATA extension cables and called it a day, a problem for another time.
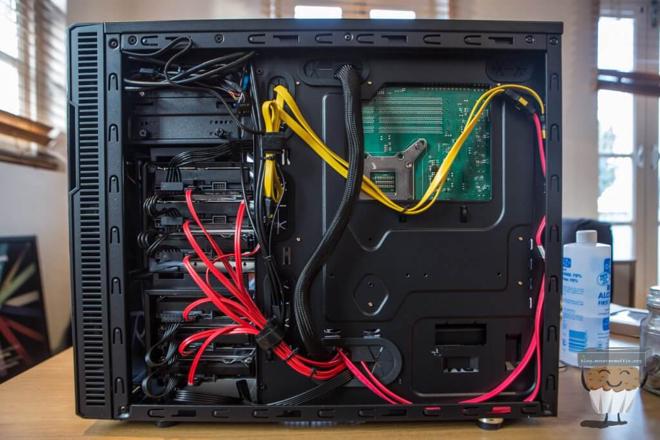
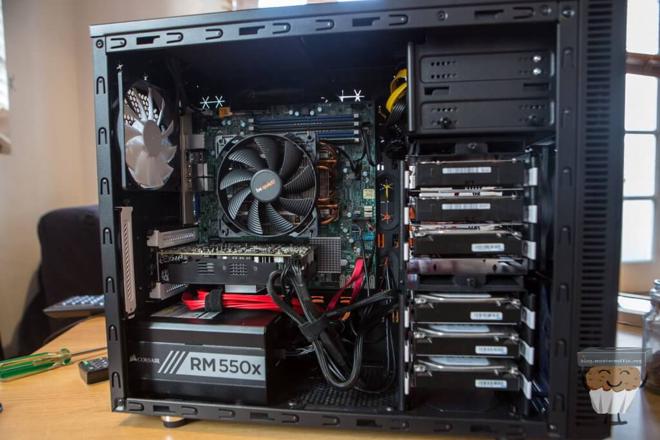
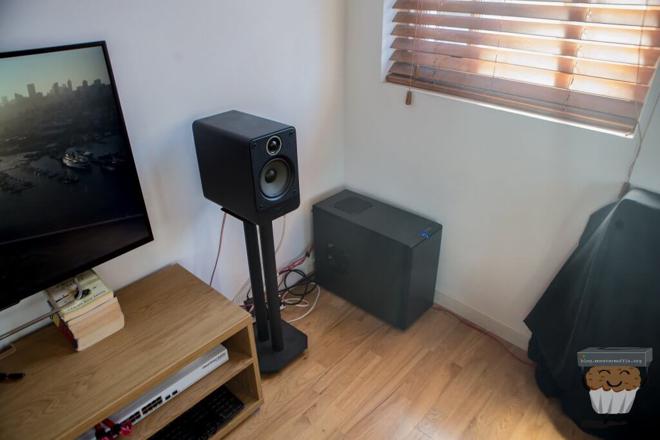
So here she is, all complete, GPU and all. There was nothing really notable about the install, it’s all pretty basic stuff. I really am glad I went for this case in the end though.
The Setup #
Once the system was built and some BIOS settings adjusted I installed ESXi onto an internal USB stick and set her all up and created my first VM, pfSense.
So, with my main OpenVPN tunnels setup I went ahead and configured OpenBGP to start receiving and distributing routes and all was well, my network was fully up and running and this machine was added into vCenter hosted back ‘home’.
I decided to call this site ‘Gondor’ because, well, why not?


Gondor was fully functional at this point and I had started creating VMs, this is where I started to have issues…
Pick your SSDs Wisely #
I needed to standup a local domain controller, so I started doing that and in doing so realised that Windows Server was taking a stupid amount of time to install, odd… Once it had installed, which took over a fricken’ hour, the machine was very sluggish and not really doing what I wanted. Looking at the hosts stats showed me the culprit…
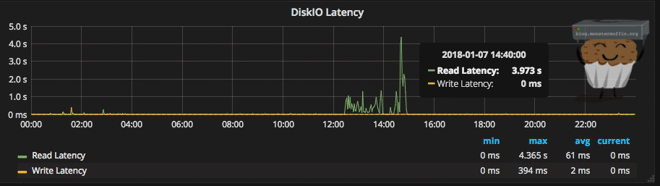
Yes, that is almost 5 seconds of latency. So, this is pretty awful. I tried connecting the SSDs directly to the board in case the hotswap bay thing was causing issues which it wasn’t, so I just concluded that these SSDs were just shit, far shitter than I remembered.
I really wanted this to get going at this point, so I just prime now’d a Samsung 960 Pro and inside of an hour I was installing the NVME drive into the motherboard.
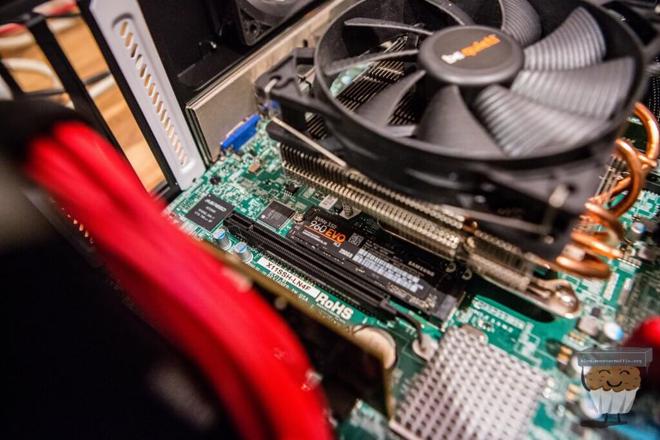
After moving the VMs over all my issues simply vanished, everything was very responsive and things were working as intended, sweet! Unfortunately, I didn’t get any screenshots of the performance of the drives, but they were both benching about 250MB/s Read and 60MB/s write which is pretty fucking appalling. Now, however…
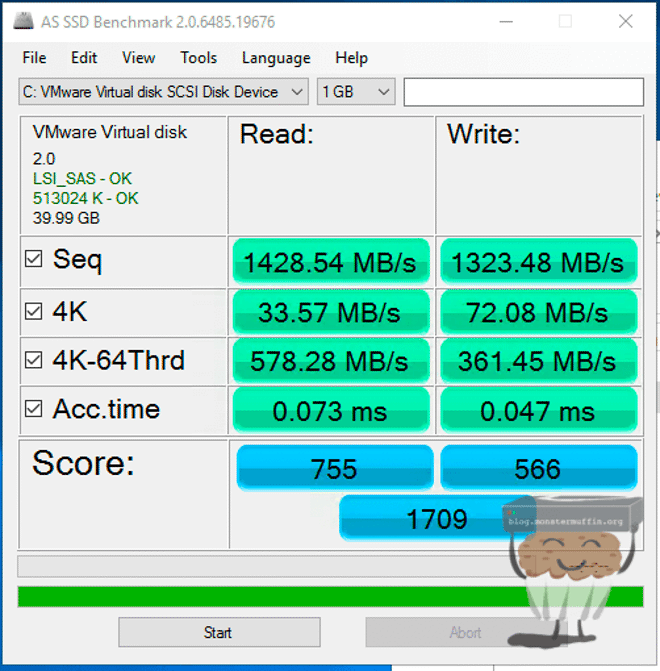
If you’re planning on doing a similar build to me I would highly recommend you invest in some NVME storage for your VMs, the only reason I didn’t originally was to save costs but that ended up being a moot point. Seriously, do it.
VMs #
The host’s VMs currently looks like this:
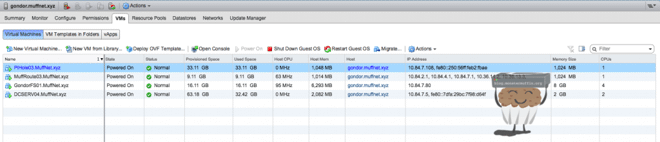
Now, due to memory limitations there isn’t much room to expand but for now, I’m running what I need just fine.
My FreeNAS VM has the following VM config and is the main hog of resources, but for good reason.
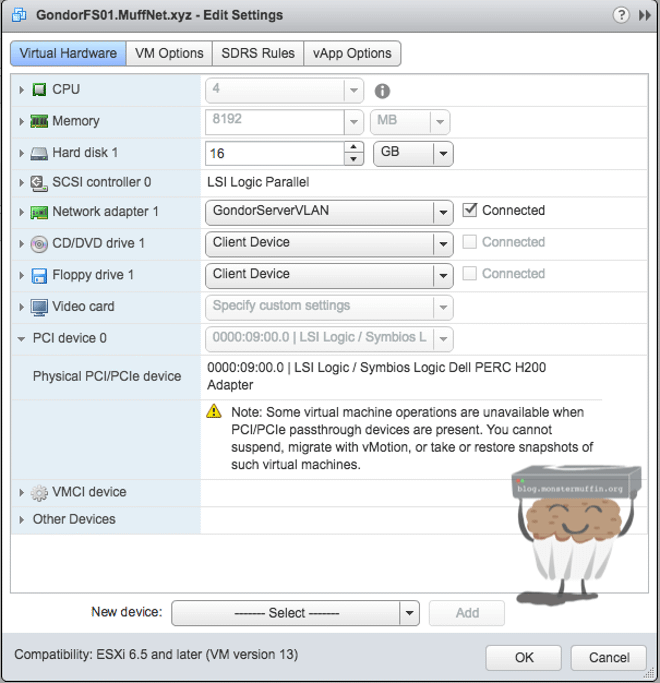
Everything passed through just fine as expected too, the GTX1060 is currently unused but set to passthrough for when the time comes. The FreeNAS VM has the HBA attached and the VM is detecting the disks with all the SMART data just fine.

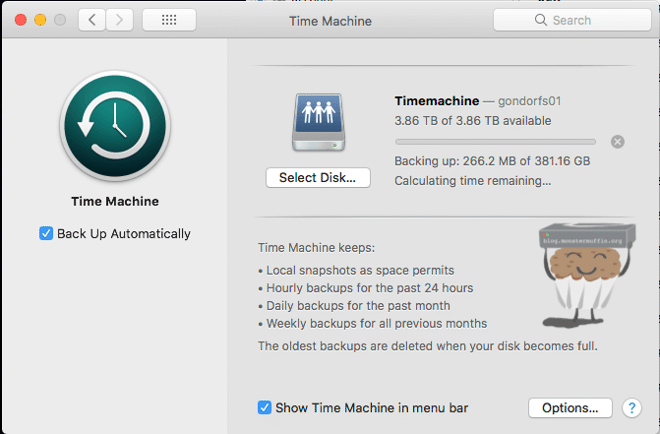
Timemachine is working as expected on the FreeNAS VM too.
The main issue with building this machine after moving out as opposed to before is that I can’t do a local, initial data synchronisation. Copying a few TB of data over my tunnels would take days, thankfully I knew my incompetence would slow down this build so before moving I copied most of the large chunks of production data onto a few drives, so once this is all moved from my Macbook to the array I can start an rsync job to get the two arrays fully into sync. Neato.
Stats/Dashboard #
My scripts for polling vCenter started collecting stats on the host as soon as it was added and after some quick adjustments to my templates I had a fully working dashboard setup for this host (the latency screenshot above is actually from this.) I used the same script as I use for my other hosts to pull IPMI info using ipmitool which spat out some temperature and voltage information. Unfortunately, host power can’t be obtained like this because of the PSU used, I’m not even sure if this motherboard supports PMBUS.

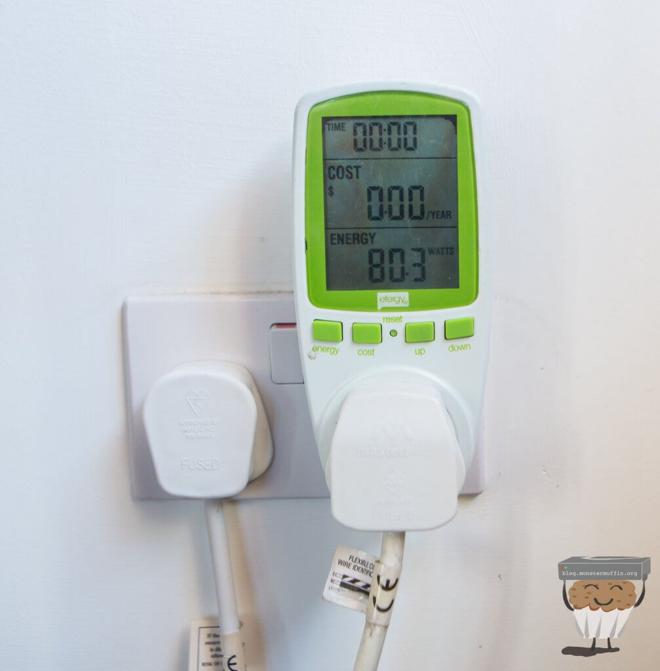
Power #
I am currently monitoring the system’s power (along with my switch and modem) via a dumb power monitor, which is doing the job for now. I am eventually planning to replace this with an IoT plug that I can poll for data, shove into influxDB and then graph in the dashboard, but the cheaper ones are all out of stock right now.
Whilst the power monitor does show 80w, this is bundled with my switch and modem which are both pulling around 10w each, so the host sits at around 60w with all 6 disks. This drops to between 30-40w when the disks aren’t powered but that’s something I can’t get around. Nevertheless, 60w total for this setup day to day is fine for me, this is including the idling GTX1060.
Fan Woes #
So the machine was pretty quiet. During the day it was impossible to distinguish it from background noise, even at load and with the heating on. The issue is in the evenings when everything is a lot quieter there was a very low hum in the room, this wasn’t very noticeable unless you were actually listening for it but it was enough to annoy me.
The first thing I tried was issuing some ipmitool commands over the network to drop the thresholds and the RPM speed, but I somehow managed to make the fans louder. They didn’t seem to want to reset either, so accepting defeat I went ahead and ordered these:
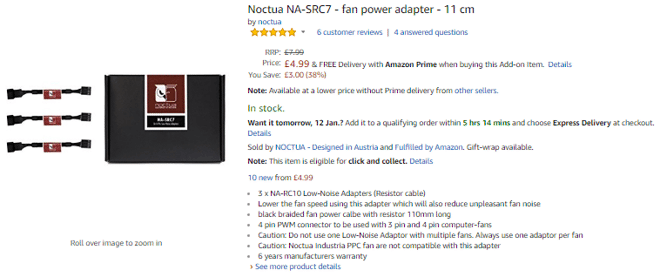
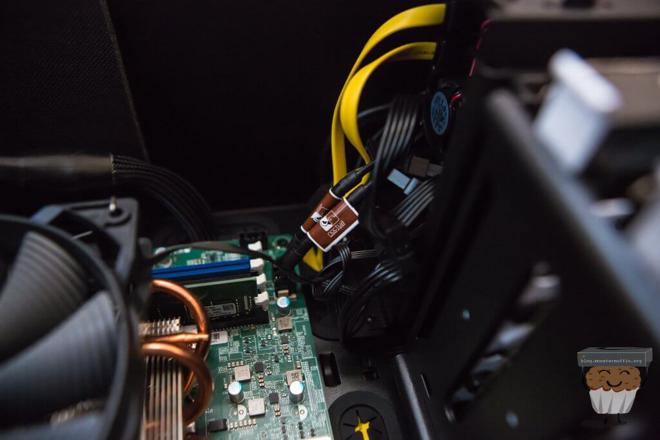
So here you can see I’ve put these adaptors inline with the fan and the motherboard and the RPMs have indeed dropped and the low-level hum has now been resolved. Dope.
Conclusion #
So all in all, I’m pretty happy with how things have turned out, looking back on my initial goals I’ve pretty much nailed this in the head in my opinion.
- Quiet - So, after my modifications were made as above everything is pretty much silent. Not only can you not hear the machine during the day but now there isn’t even the slight whirring during the quietest hours of the night. Obviously, this thing will ramp up a bit with GPU use but that’s fine as it will only be when the GPU is in use. Temperatures seem just fine and the drives are spinning down which is contributing to the silent operation.
- Small Form Factor - Success! Obviously, this is pretty subjective, but I think the machine looks pretty good. It could, of course, be a lot smaller but for my use case and amount of disks I think it does a really good job. The machine also looks sleek and doesn’t look out of place, which is exactly what I wanted.
- Low Power - So, as above the above showed, 50-60w for this machine alone is pretty good I’d say. A lot of this as previously mentioned are the HDDs so overall all things considered, I’m happy with the power consumption of the build.
- Able - So this one is a difficult one to answer because it can be pretty subjective. For the purposes of this build I would say that I’ve fulfilled this requirement. The i3 is able to run my VMs and keep power low when idling, and when power is needed even with 2x hyperthreaded cores the machines are never chocked. The memory is a bit sucky as I’ve pretty much used it all, but I’ve used it all on things I needed in this site, in the future once memory prices drop it will be easy enough to drop in another 16GB and eventually get this host to 64GB with 4 sticks.
Future Plans #
- Memory - Once memory falls to a reasonable price again I’ll be sure to add 3x more sticks to this thing and max the board out at 64GB so I can have some more fun. I may even switch out all the DIMMs with DDR4L once that becomes available.
- Streaming VM - This relies on the memory but once that’s done I want to set up a Windows VM that runs steam 24/7 so that I can spawn gaming sessions on the VM streamed to my Macbook. I’m not expecting to run AAA games on this thing, I have a HTPC for that, but some strategy games, for example, would be cool. I’ll be sure to blog about that when I get round to it.
- IoT - So when we got internet for this new place they actually sent us a free Google Home which is pretty dope, I’m planning to integrate this with a lot of cool things in the future so some VMs will be required for some of the stuff I want to do.
- UPS - I’m very bad at putting my systems behind a UPS, but when I can be bothered I’m definitely going to buy a small UPS and put this system behind that.
If you’re planning on doing something similar or have anything to say please do say so in the comments!