How to pfSense #
So, you’ve decided to ditch that POS ISP provided router, or just literally anything marketed towards consumers and have installed pfSense, so.. what now?
The following will be a guide on how to create, manage and understand both firewall rules and NAT in pfSense. I get asked a lot of questions daily and I thought this should be useful for those that are either new to pfSense or want to understand what they’re doing when they create rules.
This guide is not just for pfSense, it’s just what I use and is extremely popular so I’m doing a post about it. A lot of the fundamentals and methodology will carry over to many other devices/software.
In this post, I will try and explain why these steps are being taken and add some networking 101 into the mix as well.
This post will be split up into several sections underneath NAT and firewall rules.
NAT #
- The Fuck is NAT?
- Port Forwarding
- Outbound NAT
- Static Port
- 1:1 NAT
- NAT Reflection
Firewall #
- Rule Placement
- Basic Rules
- Aliases
- Advanced Options
- Basic Traffic Shaping
- Floating Rules
- Logging
The Fuck is NAT? #
NAT (Network Address Translation) is pretty much the only reason the internet is around in the capacity it is today, it’s the only reason IPv4 actually worked and managed to expand the internet like it did. I know a lot of you know what NAT is so I’m not going to go into detail, but for those of you not quite sure here’s the low down:
Your network has utilises RFC 1918 addresses, that is, a local network address that are not routable on the internet, ever. These addresses are 10.0.0.0/8, 172.16.0.0/12, 192.168.0.0/16. You’ve seen these before and know what I’m talking about. When you talk about internal networks 99.8% of the time you’re talking about IPs in these ranges.
So, the elders of the internet assigned these for private networks, but why? And does everyone use them? Yes (99.9% of the time). The point is that your private address is translated by your router and masked behind your public routable IP address. This is why all traffic from your network appears to come from one single IP, regardless of the device behind that router, and regardless of that device’s private IP. This is done using a randomly generated source port so that many requests can be made from the same IP.
This is how it works, in extremely basic terms:
- Client: “Hi router, I want to get to blog.muffn.io”
- Router: “Okay, you’re coming from 10.0.0.150 with a source port of 12345 to 78.157.193.91 on port 443”
- Router: “I’m going to send out this packet to 78.157.193.91 from IP 40.40.40.40 on port 12345”
- Server: “I have received a packet from 40.40.40.40 from port 12345 to 443, I am going to send this webpage back to 40.40.40.40 to port 12345 from 78.157.193.91 "
- Router: “I have received a packet from 78.157.193.91 on port 12345, this must be for 10.0.0.150, I will send this packet there”
NAT. This is happening constantly on your routers forwarding table, it’s remembering all those ports so it knows where to send what. This is why you can visit the same website from multiple devices from within your network, because they use different outbound ports.
Quick Note: #
Originally, the above said ‘routing table’ to make this easier to understand however it was pointed out to me that this is just wrong, and I agree. This NAT information is stored in a routers forwarding table which is different to the routeing table. The routeing table is responsible for finding a suitable path for a packet from the sender to destination whereas the forwarding table is responsible for sending the packet toward the destination based on routing information.
Port Forwarding #
Port forwarding is extremely easy in pfSense and is useful for exposing services in your local network, but why do you need to do it in the first place?
You run a webserver on your network and host a website, awesome. HTTP runs on port 80, so you can access your website by going to that servers local IP address from any other LAN device and it works, but what about externally? If you try and put in your public IP nothing will happen.
Without a valid port forward rule the firewall will not know where packets destined for a port are supposed to go, and the packet will be dropped.
By adding a port forward, you are telling pfSense “Hey, if you get a packet destined for port 80, pass it to this IP”.
So now we shall setup port forwarding, and it really couldn’t be easier.
-
Go to Firewall > NAT. You will be in the ‘port forward’ section. Click add to add a rule, either at the top or the bottom, it doesn’t really matter. If you added two rules for the same port the top-most one will be the one active.
-
Use the following settings for your port forward:
- Disabled: Ticking this box will disable the rule, so leave it unchecked.
- No RDR: Leave unchecked.
- Interface: WAN
- Protocol: The protocol of the expected traffic, likely TCP and or UDP.
- Source: Leave the defaults.
- Destination: WAN address.
- Destination Port Range: What port will the traffic come in on? This can be a range of ports if you wish. You may also use the drop-down service selector which will select the appropriate port.
- Redirect target IP: The end device to be forwarded to.
- Redirect Target Port: The port on the device receiving the traffic. Usually the same as the destination port, and if the destination port is a range, use the start of said range.
- Description: A description of the rule for your interface.
- No XMLRPC Sync: Leave unchecked.
- NAT reflection: Use system default.
- Filter rule association: Add an associated filter rule.
The following is an example of how I would port forward a web server with a simple WAN setup:
Note, as you can see in the screenshot you can enter the port manually or use pfSense’s drop-down which has common ports listed, here you can see I used ‘HTTP’ for port 80.
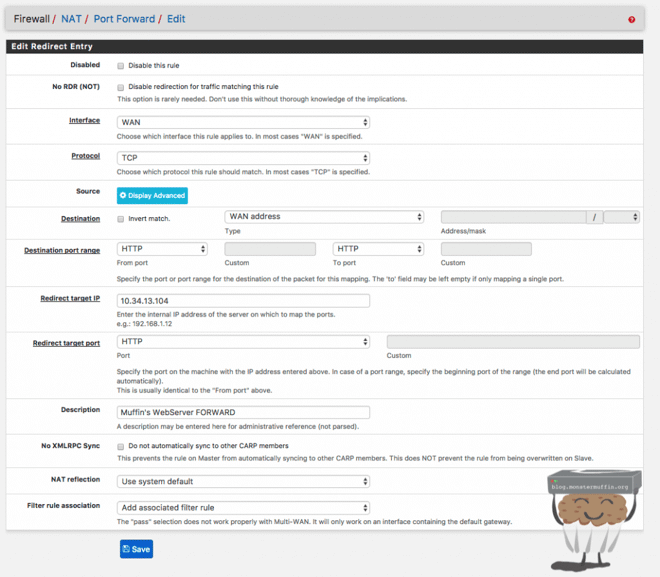
Once this is done you will see the following rule has been added to the NAT tab:

And this will be at the top of the page, click it to apply the rule and add it into the routeing table.

Heading over to Firewall > Rules > WAN you will see the rule there as well. You have successfully created a port forward in pfSense. Do this as many times as needed for as many services as you need, but always be careful exposing services to the outside world.
Outbound NAT #
Outbound NAT is what allows the firewall to translate your local IPs to your public one. pfSense has pre-configured rules for outbound NAT allowing you to translate your LAN networks. To have a look at these, head over to Firewall > NAT > Outbound.
At the top you will see the following options:
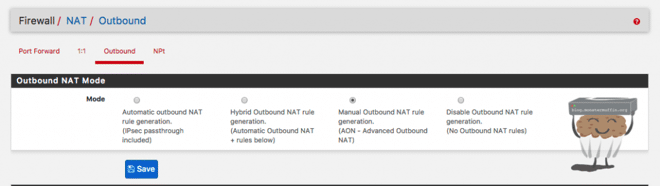
- Automatic Outbound NAT: This setting is the default. pfSense will add outbound NAT rules itself when required, and the defaults will allow for traffic to be translated, you cannot edit anything in this mode.
- Hybrid Outbound NAT: This setting keeps the automatic rules, uneditable, but allows you to add your own outbound NAT rules to the table.
- Manual Outbound NAT: The automatic rules are added, but you are able to edit//add//remove as you want.
- Disable Outbound NAT: As the name suggests, disables outbound NAT rules, not recommended unless you know what you’re doing.
As you can see I have mine set to ‘Manual’ and I will try and explain one of the reasons why.
I tunnel all of my traffic through a VPN provider (I have a guide here), and to do this I need outbound NAT rules. What I have done is add an outbound NAT rule allowing my ‘LAN’ to be translated with my VPN IP address, allowing my LAN to browse the internet behind my VPN IP. This is simply allowing my LAN to do so, not forcing it to, that comes under firewall rules which I cover later. The rule is as follows:
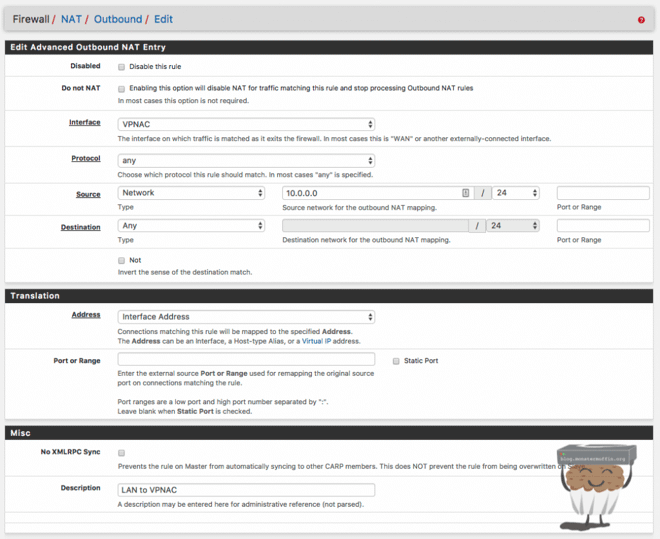
I have done this for all my VLANs, you can, also, do one rule with a summarization. So instead of specifying each of my VLANs with a rule, I can just say “translate 10.0.0.0/16 via VPNAC address”. As long as this covers all my VLANs, it will work and only requires one rule.
I also have the following rule from the automatic rule, but have disabled it:

By disabling this rule, I have stopped leakage of internet data from my LAN when my VPN may be down. Because pfSense now has no rules telling it to translate LAN traffic with my WAN address, if my VPN goes down devices cannot carry on like normal unmasked, which is what I want.
As you add VPN servers to your pfSense machine you will see more and more rules get added automatically to allow for your new subnets to get to the internet.
Another interesting thing to mention here, which I have not dabbled in myself yet, is address pools. Address pools allow you to NAT using different WAN IPs. If you have multiple WAN IPs configured on your firewall, you can tell pfSense to NAT using all of the IPs using a number of pool options, such as a round robin. This is all configured under the outbound NAT rules.
Static Port #
One of the more interesting things that pfSense does is the way it handles NAT. Remember when I said that packets come from a random port on a client machine, and NAT forwards this into the internet behind the WAN IP? Well, it does do that, but it scrambles the source port.
Your machine could request a website from source port 13523, but pfSense will change that when NAT’ing to mask this. This is a security feature. When the packet returns it knows what it scrambled it to, so it knows which source to put back on the packet and sends it back to the client.
Awesome, right? Well, kind of… This source port rewriting can break some applications, this is especially true for some online game services I have found. There is, however, a fix which I will show you.
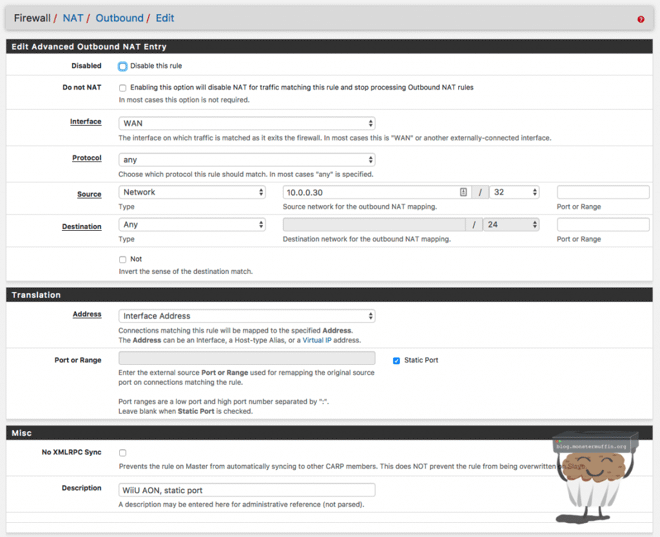
- The first thing you need to do is ensure that the machine you want to use a static port configuration has a static IP. Either assign it on the device itself or uses a static lease. I add all my game consoles into a static lease in Windows DHCP for this.
- Add a rule to the top of the outbound NAT rules. The rule must be placed on top. This is because pfSense must match this rule first before matching the other rule that allows devices to be NAT’ed to the internet.
- Configure the rule as follows:
-
Disabled: Ticking this box will disable the rule, so leave it unchecked.
-
Do not NAT: Leave unchecked.
-
Interface: WAN
-
Protocol: Any
-
Source: Network - Your device IP goes here /32
-
Destination: Any
-
Address: Interface Address
-
Port or Range: Blank - Click on Static Port
-
Description: Enter a description for this rule as a reference.
Once done, save the rule and click apply at the top. To ensure that this change takes effect, I like to purge the states table and let it rebuild with our new rule, to do this go to Diagnostics > States > Reset States and click reset. You will lose the WebGUI for a few seconds as all connection states are dropped, this is fine.
1:1 NAT: #
1:1 NAT is extremely simple to understand and is heavily used in many enterprise networks for various reasons. You may see this being called a MIP or a VIP with other vendors, it’s the same thing.
All a 1:1 NAT does is **bind a public IP address to a private IP address. ** This can be useful if you have multiple IP addresses and want to expose an entire server to the internet, many companies do this for servers in a DMZ. One of the benefits of this is what the server has complete access to the internet whilst still maintaining a presence in the LAN via its private IP.
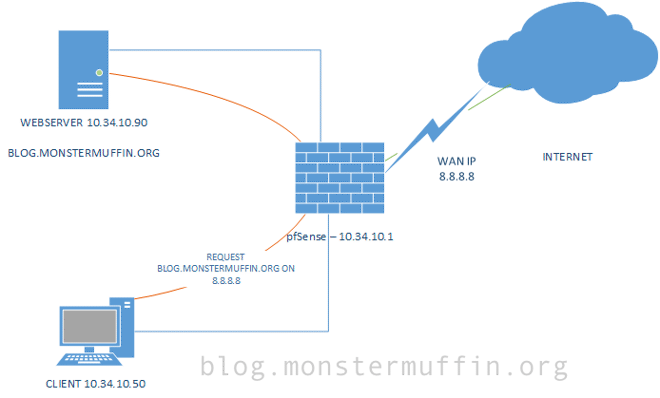
NAT Reflection: #
NAT reflection can be a confusing topic, so I’ll try and keep it simple. NAT reflection is also known as NAT Loopback and NAT Hairpinning. The bottom line of this is that it allows you to access local services via your WAN address without leaving your LAN. This means that if you’re hosting a website called monstermuffin.org on 10.0.0.143, and want to access it from 10.0.0.155, you can do that using its public IP instead of its LAN IP.
If your WAN address is 8.8.8.8, and your client machine requests a service on 8.8.8.8, pfSense is smart enough, thanks to NAT reflection, to say “I don’t need to send this packet out to the internet, I know that this packet is destined for this interface so I will instead send it to the port it requested.” So as long as you have a port forward for that service, pfSense will forward the packet locally to the webserver, as if it came from the WAN.
Have a crudely drawn diagram that I put together quickly:
Firewall #
Rule Placement #
So let’s move onto some firewall stuff. First thing is first, let’s take a look at the firewall tabs and how the placement of rules work. Navigating to Firewall > Rules is where we will do our work.
These tabs are your interfaces, be it virtual or physical. Under here is where you place your firewall rules to allow or restrict traffic from that interface.
A good way to remember where to put firewall rules is the following, place rules where the traffic originates from.
- You need to block a weird IP that keeps pinging you, that ping is coming from the internet so you would place the block rule in the WAN.
- You want to block your IP camera from accessing the internet, the IP camera lives in your LAN, so this is where you would place that rule.
The placement of the rules is also paramount to success with firewall rules. Firewalls, like pfSense, will attempt to match a rule from the top to the bottom, one by one. Once traffic matches a filter any rule beneath it will not apply to that traffic.
One rule you are likely to see a lot is an “allow all” rule, which looks something like this in pfSense:

What this is saying is, allow anything [protocol], from anywhere [source], from any port [port], to go anywhere [destination], to any port [port], via default gateway.
This rule is normally there to allow traffic out to anywhere it needs to go, if you need to add blocks you can do this above this rule, so that you don’t have to specify what each and every IP can and can’t do. This is why allow-alls are normally at the bottom, as any specific firewall rules will be matched before this rule is applied.
So, the lesson to be learnt here, more specific rules should be above more broad rules.
Basic Rules #
So now that you understand rule placement we can move onto configuring more basic firewall rules. Firewall rules, for the most part, are pretty straight forward and self-explanatory.
To create a basic firewall rule to allow traffic from one subnet//VLAN//interface to another, we go to Firewall > Rules > {Your interface}
Aliases #
Aliases are awesome. They allow you to predefine a set of IPs, a range or just a single IP to an alias to be used in firewall rules. This is especially useful when blocking multiple random IPs, or routeing IPs. Aliases can be used not only for IPs, but also for ports and URLs.
Aliases are configured under Firewall > Aliases.
Here is an example of an IP alias that I use. This alias has 2 of my domain controllers IPs in it so I can easily create rules as you will see.
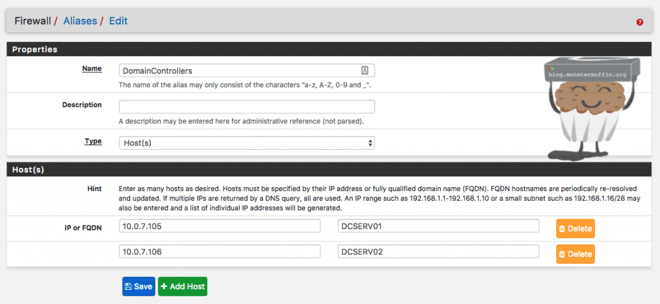
Now with this setup, I can do the following via firewall rules:

These rules are in my GuestVLAN. Since I have almost all traffic blocked in that VLAN I need to specify everywhere clients are allowed to go. Here I have created 2 rules, these allow the devices on the GuestVLAN to access my domain controllers for DHCP requests and DNS requests. I could have simplified it even further by creating an alias for those ports and just create the one rule, but this is fine.
Aliases can be used any number of times, anywhere interchangeably.
Advanced Options #
Firewall rules have hidden advanced options that can be revealed by clicking the “show advanced” when creating or editing a firewall rule.
Pretty much all of these options will not be required, especially not in this basics tutorial, however, we will cover two options you may use, “Gateway” and “In/Out Pipe”.
“In/Out Pipe” will be explained in the next section so we will talk about gateways. I covered how this can be used here, when tunnelling traffic over a VPN. This option allows you to set a specific gateway for traffic to use bypassing the default, this is useful when you have multiple IPs, or a VPN tunnel.
The following rule shows that I am forcing any traffic that is not local traffic via my VPN gateway.

Now excuse the stupid long screenshot but I wanted to show you the actual page instead of snippets.
As you can see here I have used a negate rule, which we looked at earlier, to tell pfSense the following: Any traffic not going to 10.0.0.0/8 (WAN traffic) must leave via VPNAC gateway. This is effectively forcing my WAN traffic on the LAN interface to go out my VPN, which is what I want for privacy reasons.
Basic Traffic Shaping #
So here I will show you how to do some very basic static speed traffic shaping, or more, traffic throttling.
pfSense can utilise static throttling per client, which may be useful to you. I use these on my GuestVLANs to ensure that guests on my network cannot eat all my bandwidth.
What I mean by static is that you are setting a limiter on a subnet/client that will cap upload/download at the set rate, this is regardless of what else is going on, there is no adaptive intelligence in this method.
To get started with this head over to Firewall > Traffic Shaper Now if we go to Limters > Add New Limiter
Here we can create a new static limiter which will be used for either upload or download, let’s create one for 10Mb. This is what that would look like:
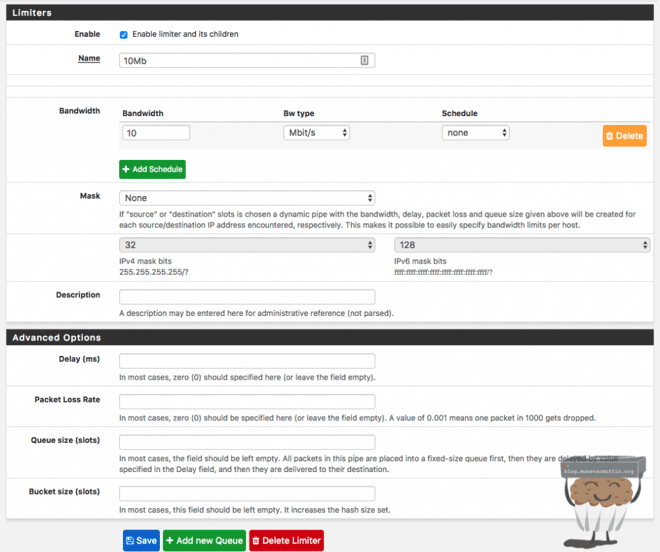
Create another one for your upload/download if desired and save. Now you will have a list of basic limiters that can be used.
Next head over to Firewall > LAN (or whatever you want to slow down, be it a client or entire subnet). For this example I will create a rule just for my MacBook however you can do this for an entire network simply by adding it into a general rule.
The following rule will limit my Macbook to the speeds you can see in the limiter settings, as you can see I have set 5Mb/10Mb, this will cap my upload at 5 megabits and my download at 10 megabits, this will only apply to my MacBook as I have specified that IP address under source, and have placed this rule at the top.
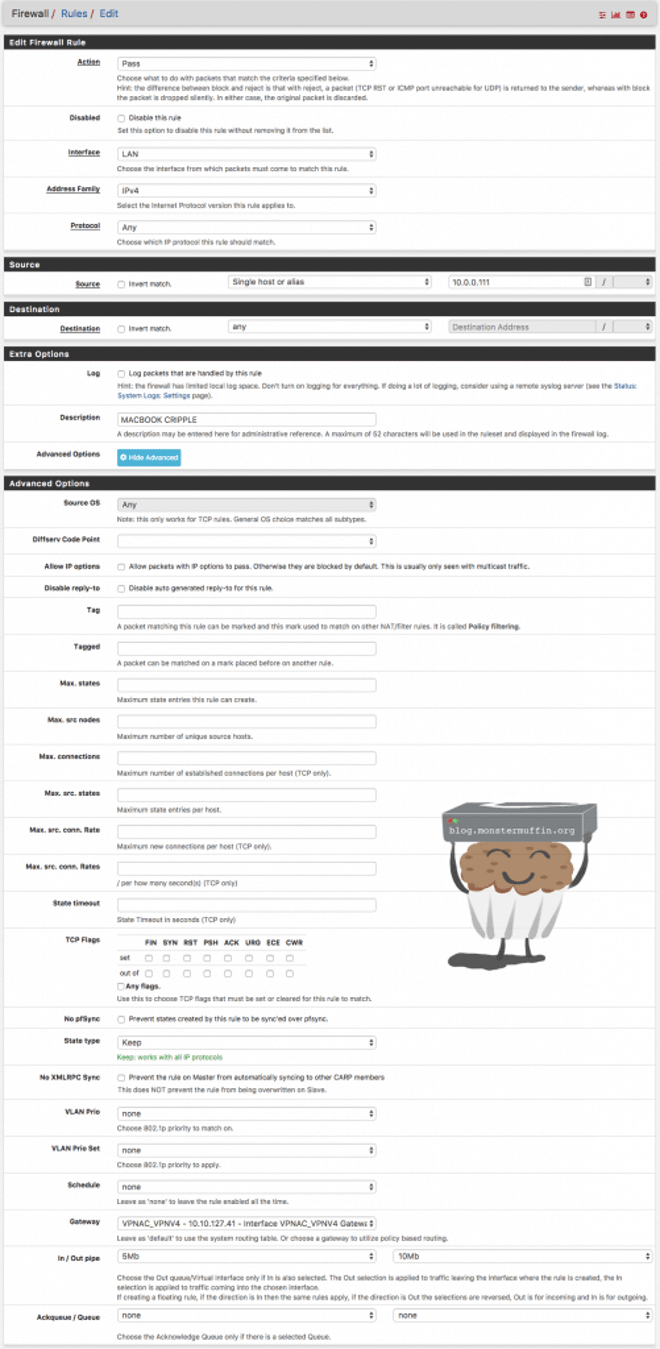
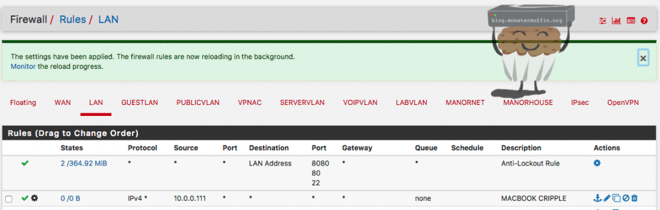
Note that the cog on the left side of the rule shows that there are limiters applied.
Once this is applied and I go and do a speedtest I get the following:
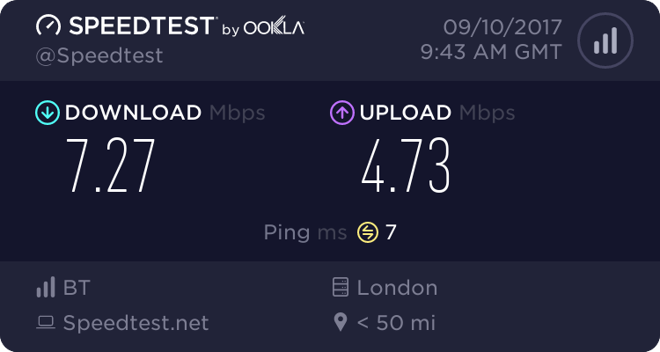
Whilst the limiter isn’t an exact art, you can clearly see here it has done what I intended and hard capped the connection. This is extremely useful for Guest networks applied to the ALLOW ALL rule.
Note that limiters will not work on layer 2 traffic, that is to say, limiters are only applied when routeing is taking place, therefore only traffic destined for outside the specified network can be throttled in this way.
Floating Rules #
Floating rules are interesting and will probably not need to be used by most people.
Floating rules are located in Firewall > Rules > Floating
Floating rules allow you to create rules that apply to multiple interfaces at once, filter outbound traffic amongst other things.
There is little need to use them in most deployments, I have for testing and to apply rules to the firewall itself but beyond that can be quite an in-depth topic, I just thought I would mention them in case you wanted to dig further.
Logging #
Now, the last part of this post, logging.
Logging is invaluable and I apply logging rules to almost all of my firewall rules. Logging is extremely simple and very powerful in pfSense. Firstly, go to one of your firewall rules, an allow all rule is probably best for this to test it out.
Edit the rule and check the “Log packets that are handled by this rule” checkbox. Now save the rule.

You will now see that in the rules overview there are 3 bars on the left-hand side, this tells you that logging is enabled for that rule.
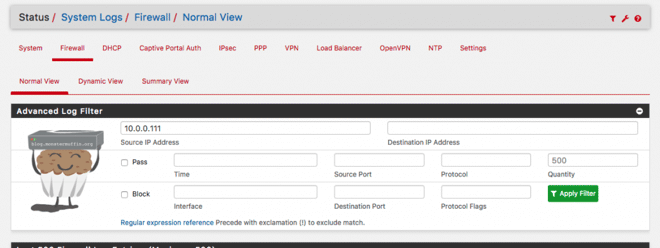
Heading over to Status > System Logs > Firewall is where we can keep track of these logs.
Everything handled by all logging rules will show up here and is invaluable for debugging issues, I would highly recommend applying logging to all firewall rules. I would also apply this to all the blocking rules as you can then see intrusion attempts in this view too.
Filtering is pretty easy using the filter button and you can specify anything you like, here is me filtering source traffic from my MacBook’s IP.
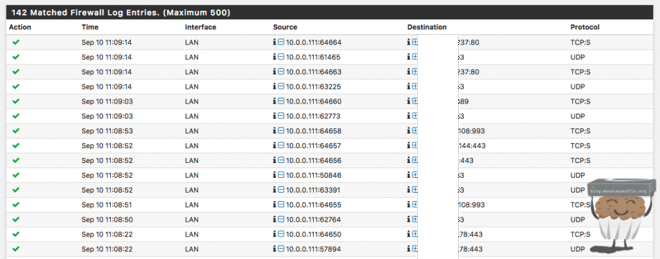
The following shows me this:
Clicking on the green tick (or red cross) will show you exactly what rule has allowed or blocked the traffic. As you can see, this is extremely powerful and becomes even more powerful once you start shipping these logs off to a logging server and doing analysis of the data, but that’s a post for another time.
And that’s it for this time folks, I sincerely hope you’ve learnt something from this rambling, I am planning on doing a more in-depth post about the more complex things pfSense can do, so look out for that.