The fun may be over. Google has started forcing older users like myself into Workspace and they have not been clear about what is going to happen with storage. Whilst their plans still claim ‘as much as you need’, varying reports are coming out seemingly pointing out that this will no longer be unlimited.
My account is now showing as being 3000% utilised and support is telling me different things. Will we be able to ‘request more storage’ as their support pages state? Or is that a veiled way of putting in hard limits? We don’t know.
I will update this post once there is more solid information. If this service is no longer feasible, I do have a good backup which is slightly more expensive depending on how you go about it, but it’s a solid solution. Keep an eye out for that here.
Should you carry on with this now? Maybe. At the time of writing, you won’t lose too much if the limits come into effect and we are in fact hard limited.
Either way, it’s been a good run boys. End of edits.
What’s this now? #
This post is going to walk through how to create a Plex server with a Google drive backend for ‘unlimited’ storage. There are a few caveats explained below, reoccurring costs and a variety of ways to achieve this, but this will be the Muffin way.
I go into a lot of detail on some of these steps and applications used, this is not a ‘wham bam thank you mam’ blog post to copy and paste some stuff and have it running (although that may well work.) If you don’t mind rambling and want to understand what is happening and why this is the post for you.
Some things to note #
This is conditional on Google continuing this service. I can already hear the screeching from so many people right now, “but gOOGLe wIll jUSt end UnLiMiTED stOrAGe And tHeN yOU’LL SeEE”. And, yes, they might do, and probably will at some point, but that’s a problem for another time. As of the writing of this post, Google currently does allow unlimited storage for a small price per month which can be used for what we’re going to be doing. If you feel like this is too risky then this isn’t for you. I’m more than happy to run 100s of TBs locally if I need to, but right now I don’t, so I won’t. Always be aware that this service can be pulled from you at the drop of a hat. This doesn’t necessarily mean you shouldn’t do it, or flex this fact to people, just be aware of the situation.
You need a monthly Google apps/workspace subscription. I’ll go through this below, but this storage will cost you $20~ per month, if you feel like this is worth it then continue reading, if not then dropping insane amounts on drives and managing storage is still the best option. Remember, unlimited storage space is useful for much more than streaming Linux ISOs. Let’s not forget that you also get your own mailbox and all that jazz too. I leverage my storage in workspace heavily for use with Google photos and cold backups, for example.
You need a good internet connection. Files will be being pushed and pulled from the internet regularly, the better your connection, the better your experience is likely to be. I would say a 100Mb/100Mb is the lowest I would do this on. Now, if you don’t have as good of an internet connection as that (I don’t!) there are other options.
You need a decent server. This is true of most installations in any case, but if you’re going to be transcoding stuff then you need to be able to actually do that reasonably, the services we will be running alongside need to be able to run comfortably too. Your server will still need a reasonable amount of local storage, for cache purposes.
None of your files are accessible via Google Drive without rclone. The way we are doing this setup is to fully encrypt both the file and file names to keep our data safe and account safe. This means that you will not be able to access your media files directly from Google Drive on the web, for example, but this is how we want it.
Why are you doing this Muffin? #
Good question. I have about 250TB of storage in my old lab, but I downsized a lot. I needed something that required less work, wasn’t in my backyard, didn’t cost me an arm and a leg in electricity and let me dump in data like there was no tomorrow.
I told myself if this worked well, there was really no need for the headache of managing such large arrays at home, and here we are.
Methodology #
I will be doing this differently to how I have this setup at home, simply for ease of explanation and following along. My setup involves more moving parts than is probably required, with things on different VMs with shares between them and all that jazz but this can all be done on one host/VM, and we will be doing it on one.
You are, of course, free to do this however you feel if all you need is an example of the setup.
Below is how I have things set up at a high level:
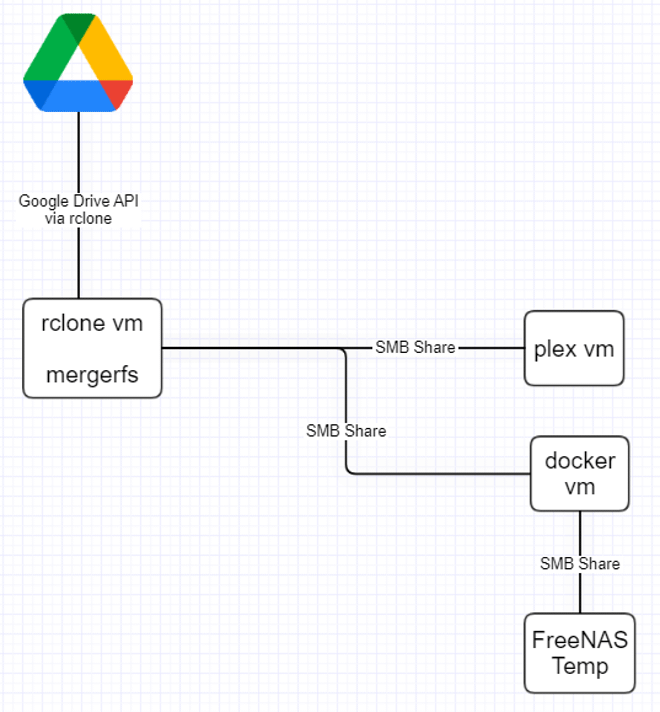
And here is how we will be setting this up here:
Firstly, please excuse my awful diagram but it kind of gets the point across. Don’t worry if you don’t know what some of these things are just yet, we will go over them.
What I was trying to illustrate here is simply that this tutorial will be deploying everything on one machine/VM.
The server #
You’ll need some kind of server for this, whether you run this all on bare metal or in a VM, colo/vps/dedicated/home server is up to you. Here is a reiteration of some of the points previously made about the server required.
-
Decent server. So, this is completely up to you how you go about this. You’ll need to size up what kind of server spec you need for your workload, if you’re planning on transcoding 4K for instance, you need to take this into account. You’re not going to get a good experience on cheap VPS machines unless you’re certain you can direct stream everything. Below you will see what I use for my setup.
-
Good internet connection. You’ll need to upload to Google drive at a reasonable speed as well as pull down content that you’ll be streaming. If your server is not in the same location that you’re watching, you’ll need to pull down content and then upload it to your client. I would say 100Mb/100Mb is the bare minimum to consider.
-
Local storage. Before being uploaded to Google drive your content needs to sit locally for a little bit, depending on how much you’re uploading this will need to be reasonably large. Google Drive has a 750GB a day upload limit, so if you ended up downloading terabytes of data at once, only 750GB of that can be uploaded per day, so the rest of it will need to be stored locally until your quota frees up. Not only this, but the way we’re going to do this means anything streamed will be downloaded locally and kept there for a certain amount of time as a sort of cache, so if you end up watching a 50GB BD-RIP, you’ll need 50GB locally to watch it. I would say a few TB will have you sitting comfortably, you can manage with much less but you’ll have to ensure your cache time is short, and you don’t download too much at once. Configuring the intricacies of this is on you, and I will point out in the configs where you can make such changes to suit your setup.
If you’re lucky enough to have a 1Gb/1Gb connection at your house and already have something you can use or don’t mind building out a server for this, then that will be the best bet. If you’re like me and have to deal with abysmal internet connections and expensive power, then you’re better off trying to co-locate a server as I have, or sucking up the cost for a dedicated server.
I myself do everything in VMs as you saw above, with a co-located server with a decent uplink. This server has an Nvidia P2000 passed through to the Plex VM so that I can leverage hardware transcodes and am not bound by CPU horsepower, this has worked really well.
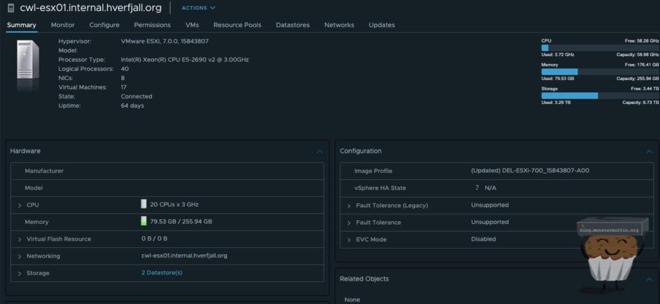
This R720 sits in a data center and does all the work, the P2000 really comes into its own as I’m able to do multiple very strenuous transcoding tasks with ease.
For the purposes of this tutorial, I will be using a dedicated server I rent from Hetzner to do a variety of tasks. I can see this being a viable route if you want to rent a dedicated server, the prices are pretty good if you can nab something decent, and the speeds to Google are about 80MB/s in my testing, with unlimited bandwidth. Here is what I rent for £23 per month:
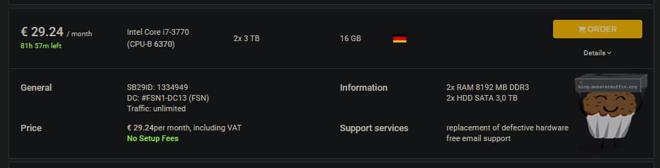
I can see that this has gone up at the time of writing, but this seems to be a trend globally, I’m sure prices will settle down once the world does too.
This is connected back to my home network and I can access it like any other server on my network.
Getting a workspace account #
Here I will walk you through acquiring a workspace account with unlimited storage. If you look at the tiers at first glace it would appear as if you cannot get this option without contacting Google, but at the time of writing there is an easy workaround for this.
First thing you’re going to need is a domain which won’t be covered here. Once you have a domain it’s time to purchase a Google Apps Workspace account.
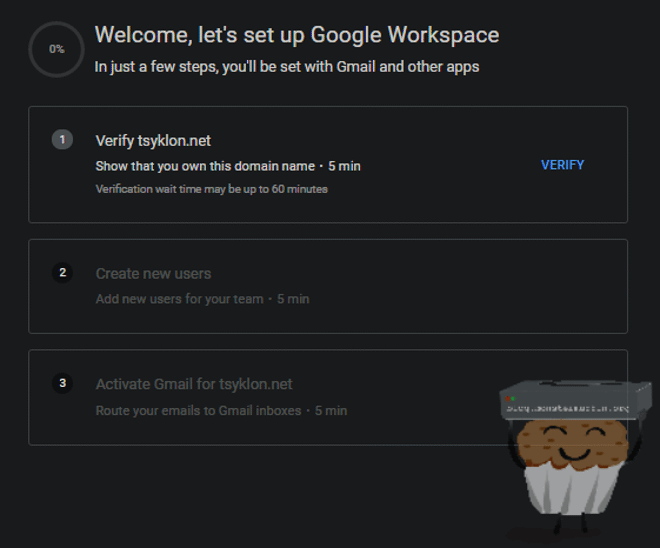
Head over to this link and follow the steps to get your workspace account setup.
For this tutorial, I will be using a spare domain I have. Once you get to the following screen, simply continue.
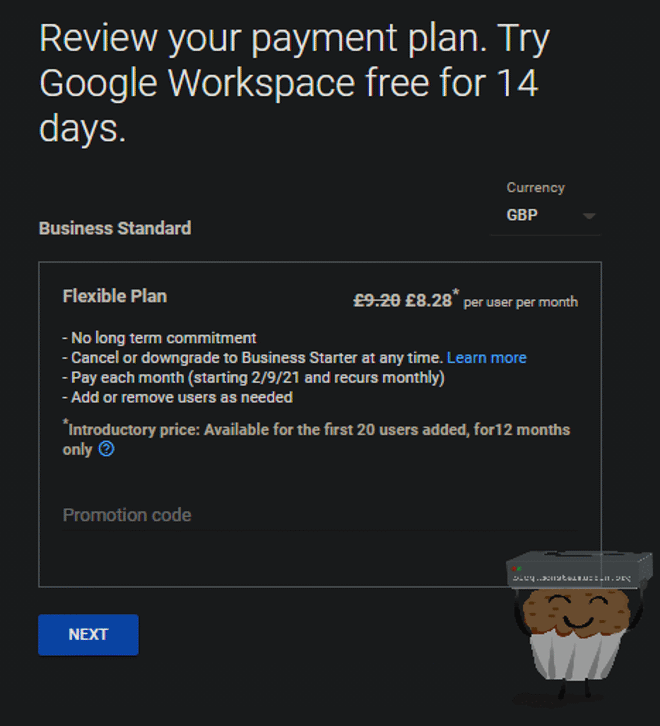
You will need to enter payment information after this, note that Workspace has a 14 day free trial, so cancelling anytime inside this will not incur any charges.
Follow the steps to verify your domain and add the correct records into DNS. This will be different with every registrar/DNS provider.
Once this is done, you should be thrown into the Google workspace admin console, over at admin.google.com and click on ‘Billing.’
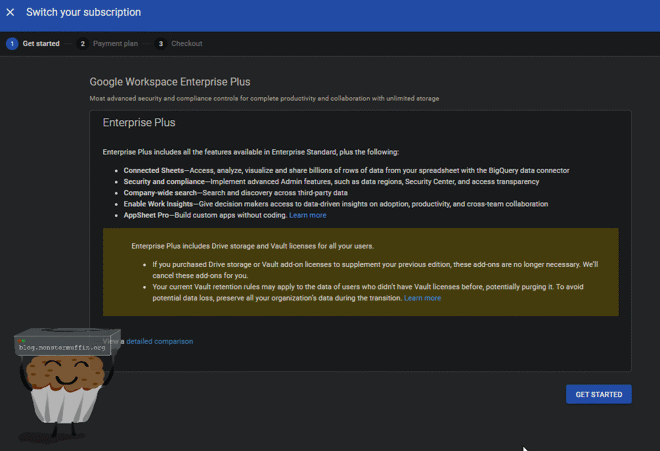
Inside billing you should see your current license, “Google Workspace Business Standard”, and above this a link to “Add or upgrade a subsection”, click on this.
Now you will have the ability to upgrade to Google Workspace Enterprise Plus. Go ahead and do this.
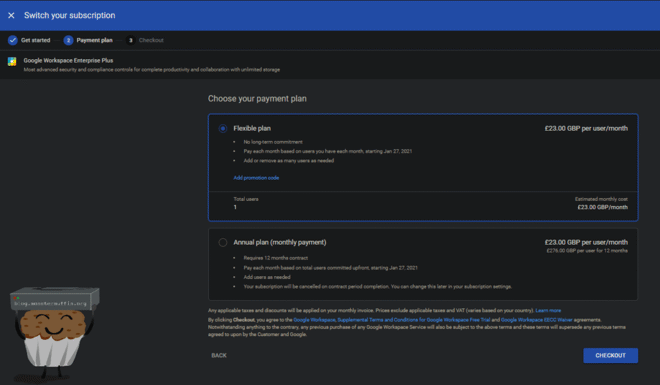
Select your payment plan and go through to checkout, you will see now that our new plan has unlimited storage for the new monthly cost.
Here is the costing at the time of writing:
The OS, and a few notes #
For the purposes of this tutorial, I will be using Ubuntu Server as my OS of choice. I love Debian, and I love Ubuntu server, if you would rather use another distro then by all means, but this tutorial won’t necessarily translate 1-1.
I don’t usually use a root account for my work on Linux servers usually, however, the Hetzner install script defaults to using a root account and I’ve just not bothered to set up a less privileged account with sudo access, so if you’re following along please take this into account. I will still append sudo to my commands for easy paste-ability.
This also means that my permissions will ‘just work’ for things such as Docker, you will need to ensure that you are setting the correct permissions for your setup.
Another thing to note is that I will be using vim to edit configurations because vim is awesome. If you do not wish to use vim and prefer instead, say nano, please replace all instances of vi with nano.
Once we’re connected to our server we will make sure the OS is up to date and ready for our applications, so run the following:
sudo apt update; sudo apt upgrade -y; sudo apt autoremove -y
I have created some template files that we will be using for this tutorial, so we will grab these now. This will create a folder rclone-gmedia in your home directory.
Configuration files for
cd ~
git clone https://github.com/MonsterMuffin/rclone-gmedia/
Installing and Configuring Rclone #
Now we will install rclone, this is done with one simple command that downloads and runs an installation script.
curl https://rclone.org/install.sh | sudo bash
Rclone is a tool we will be using to interface with Google drive via API. It supports many other backend storage services and has a lot of cool built-in tools. You can find out about rclone here, as well as read its very well-written documentation. If you do not wish to use the install script for security reasons, you can follow the [install instructions.]
After this, you should be able to run the following and get back the version installed.
rclone --version
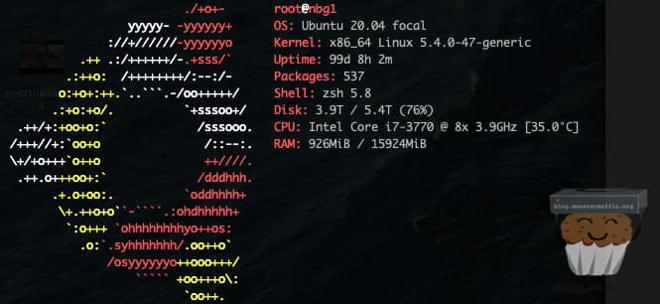
root@nbg1 ~ # rclone --version

rclone v1.53.4
- os/arch: linux/amd64
- go version: go1.15.6
Before going any further, follow the instructions here to obtain a client-id. You need to do this to use rclone properly.
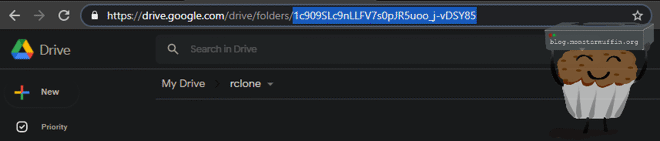
After this head over to Google Drive in your web browser and create a folder where all rclone data will live and enter the folder.
Now we will set up the rclone config required for connecting rclone to our Google drive. Run the following command to bring up the rclone config.
rclone config
n - Creates a new remote
gdrive-media - This is what we will call this remote, you can call this whatever you like.
13 - Selects Google Drive
client_id - Enter the client ID you obtained previously.
client_secret - Enter the client secret you obtained previously.
1 - Enables access to the entire drive.
root_folder_id - Enter your folder id from the created folder before.
service_account_file - Leave blank and continue.
y - Edit adavnce config.
Once you get here, keep pressing enter to accept the defaults until you get to the following:
Remote config
Use auto config?
 * Say Y if not sure
 * Say N if you are working on a remote or headless machine
y) Yes (default)
n) No
Type n and the setup will be waiting for a code.
As part of the new authentication setup, you are required to get this code on a machine that is not headless. This is explained in this link that is given to you at this stage.
The best way to get your auth code is by running rclone on the machine you’re using to do all of this. You can get rclone from Chocolatey for Windows or Brew for MacOS using the following:
Windows Chocolatey Rclone Install: #
choco install rclone
MacOS brew Rclone Install: #
brew install rclone
If you do not know what Chocolatey or Brew is, I suggest looking into whichever is applicable to the OS you’re running. They are extremely useful, easy to install tools that you should be using!
If you’re doing this on Linux I will presume you know how to get rclone locally on your distro.
You should now be able to run rclone authorize “drive” "<your very long generated ID>" on your local machine and get an authorisation code to finish off the rclone setup with.
This is the end of this edit. This tutorial will now continue.
Once you do this and allow access, you will be given a code, copy that code and paste it into the terminal when rclone config is asking for your verification code.
n - Do not configure as team drive.
y - Accept the config.
You will now be thrown to the start of the rclone config page with your config sitting there, we can now create the encrypted config.
What we will do now is create another config, that will be using our previous config and adding an encryption layer.
n - Creates a new remote
gdrive-media-crypt - This is what we will call this remote, you can call this whatever you like.
10 - Encrypt a remote
remote - Enter the name of the previous remote, in my case gdrive-media, with a colon at the end and path. For me this is gdrive-media:/media
1 - Encrypt file names.
1 - Encrypt directory names.
g - Generate password.
1024 - Generate 1024 bit password.
y - Accept password.
g - Generate password.
1024 - Generate 1024 bit password.
y - Accept password.
n - Do not edit advanced config.
y - Accept config.
You should now have the 2 configurations as so:
Name                 Type
====                 ====
gdrive-media         drive
gdrive-media-crypt   crypt
If you ever need to setup rclone again for this mount, you will need these keys, you have been warned.
Now we can test what we just did running the following commands:
touch test
rclone copy test gdrive-media-crypt:
Now if you head over to the rclone folder inside Google Drive in your web browser, you will see a new folder called ‘media’ and our encrypted file with the obfuscated file name.

But if we run the following command inside our terminal we can see the file unobfuscated.
rclone ls gdrive-media-crypt:
Rclone is now set up to read and write from the cloud at our whim, but currently, we can only send and receive files using the rclone command. Our next step will be to create a systemd service file to tell rclone to use its `rclone mount`` command to actually mount our storage onto the filesystem so we can read and write to it like a normal directory.
We do this as a systemd service file so we can have systemd start the mount at bootup, restart it against failure and allow us to stop/start it whenever we please.
I have already done this for you, but I have left variables to allow for your own paths. We will use sed to change these variables in the files.
s
First, however, we will need to decide a few things:
- Where do you want your log files to live?
- Where are your mount points going to be for rclone?
- Where do you want your media to be downloaded to temporarily when something is watched?
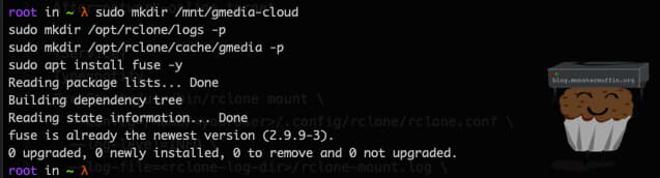
I have chosen /opt/rclone/logs/ for my log directory, /mnt/gmedia-cloud for rclone to mount GD and /opt/rclone/cache/gmedia for my cache directory.
Once you have done that, we need to create the directories.
We will also install fuse here so we are able to use rclone mount. This may be installed already on your system but was not on mine.
sudo mkdir /mnt/gmedia-cloud
sudo mkdir /opt/rclone/logs -p
sudo mkdir /opt/rclone/cache/gmedia -p
sudo apt install fuse -y
Now, cd into the directory we pulled earlier, and then into the services folder. We will use sed to change the values in the service files to what you have decided on, please ensure you replace the variables specified in square brackets with your chosen options, without the brackets. I have included my variables if you are using the same paths as me.
Here are the variables you are changing and what they should be changed to:
<youruser>- The username that holds your rclone config, this is most likely your user and not root like me.<rclone-log-dir>- The directory you will be using for logs, do not add a trailing / as I have included this in my config.<useragent>- Specify a unique user agent for rclone to use to connect to GD.<cache-dir> - Where will locally downloaded files be temporarily stored?<cache-size>- How big should your cache be? If this is filled up then older files will be removed before the cache time is up (see below).<cache-time>- How long will files you watch stay on the server locally before being deleted? If you have the local space available this can be set somewhat high as it allows files that will be watched multiple times in a short timeframe, new TV shows for example, to not have to be pulled from the cloud again.<cloud-mountpoint>- Where will rclone mount GD?
With your own variables:
cd ~/rclone-gmedia/services/
sed -i 's,<youruser>,[YOUR USERNAME HERE],g' *
sed -i 's,<rclone-log-dir>,[YOUR LOG DIR HERE !!NO TRAILING /!!],g' *
sed -i 's,<useragent>,[YOUR USERAGENT HERE],g' *
sed -i 's,<cache-dir>,[YOUR CACHE DIR HERE],g' *
sed -i 's,<cache-size>,[YOUR CACHE SIZE HERE],g' *
sed -i 's,<cache-time>,[YOUR CACHE TIME HERE],g' *
sed -i 's,<cloud-mountpoint>,[YOUR RCLONE MOUNTPOINT],g' *
With my variables:
cd ~/rclone-gmedia/services/
sed -i 's,<youruser>,root,g' *
sed -i 's,<rclone-log-dir>,/opt/rclone/logs,g' *
sed -i 's,<useragent>,muffinsdrive,g' *
sed -i 's,<cache-dir>,/opt/rclone/cache/gmedia,g' *
sed -i 's,<cache-size>,150G,g' *
sed -i 's,<cache-time>,12h,g' *
sed -i 's,<cloud-mountpoint>,/mnt/gmedia-cloud,g' *
If you used another name for your rclone configuration, you will need to replace that too the same way, if not then ignore this.
sed -i 's,gdrive-media-crypt:,[YOUR CRYPT CONFIG NAME HERE],g' gmedia.service
You will now have a completed service file that will look something like the one below (or exactly like mine). These commands will have also changed the relevant variables in the other service file too, which we will come to.
[Unit]
Description=Gmedia RClone Mount Service
After=network-online.target

[Service]
Type=notify
ExecStart=/usr/bin/rclone mount \
  --config=/root/.config/rclone/rclone.conf \
  --log-level=INFO \
  --log-file=/opt/rclone/logs/rclone-mount.log \
  --user-agent=muffinsdrive \
  --umask=002 \
  --gid=1002 \
  --uid=1000 \
  --allow-other \
  --timeout=1h \
  --poll-interval=15s \
  --dir-cache-time=1000h \
  --cache-dir=/opt/rclone/cache/gmedia \
  --vfs-cache-mode=full \
  --vfs-cache-max-size=150G \
  --vfs-cache-max-age=12h \
  gdrive-media-crypt: /mnt/gmedia-cloud
ExecStop=/bin/fusermount -uz /mnt/gmedia-cloud
Restart=on-abort
RestartSec=5
StartLimitInterval=60s
StartLimitBurst=3

[Install]
WantedBy=multi-user.target
--config= is not /home/ but instead /root/, this makes sense for a root user. If you’re running as root then you will need to change this in the config file too.
You may also need to change the uid and gid settings to match your system/needs.
Let us go over some of these flags. You can see all the rclone mount flags in their documentation here, but we will go over a few I feel are noteworthy.
Here is where you can change some of the settings to better suit yourself.
--poll-interval- The interval at which rclone will look for ages, I set this to pretty low as I like to keep things up to date. This is not an API heavy task and it is safe to have this low.--dir-cache-time- How long rclone caches the directory. This is set to very high to keep the directory in cache as it remains pretty static, and is updated regularly.--vfs-cache-mode- Sets how vfs cache functions. In the setup we are deploying the file is downloaded in it’s entirety and served from local storage. I had very bad experiences with watching media on anything but full, reading directly from the cloud led to many stutters and buffering, so change this at your own will but setting it to full has the best experience.--vfs-cache-max-sizeand--vfs-cache-max-age- As explained above, this is how large your cache is for files being downloaded for viewing, and how long they will stay cached. If you are playing with minimal storage, set this as big as your expected file size to stream. If you expect to be downloading 50GB MKVs, then ensure this is at least 51GB. Similarly, you can set the max age very low to remove anything as soon as it’s been played if you need the storage. This will not remove files that are being read,.
If you feel like you need to tweak the settings, especially the VFS settings, then by all means play with this yourself. You will see the changes once everything is setup and you can start testing with your media.
In my experience --vfs-cache-mode=full was the best and only way to go, but if you want to play around with the other modes then please read about them here.
We can copy the service file, enable it and start it. Enabling it will ensure that it starts at bootup, and starting it will start the mount.
cd ~/rclone-gmedia/services/
sudo cp gmedia.service /etc/systemd/system
sudo systemctl enable gmedia.service
sudo systemctl start gmedia.service
Now if we check the service, we should get an output that looks something like the following.
sudo systemctl status gmedia.service

If the service doesn’t start, consult your log file in the directory we told rclone to use to figure out what the issue it.
It’s quite easy to think that we’re almost done here, and that we can now start reading and writing out files to GD via rclone, but this is not the case.
Installing and Configuring MergerFS #
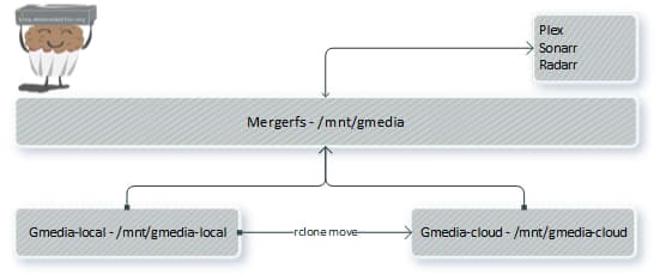
In this setup, we are using MergerFS. You can read about it here. MergerFS can do some really complex and cool things, but we will be using it very simply here.
What we are doing is creating a local mount point on our server and telling MergerFS to ‘merge’ the cloud and the local one. We do this so that we can point all of our apps to this ‘merged’ share which allows us to have a mix of files both in the cloud and locally, but in the same location to applications.
What this enables us to do is have all new files placed locally and moved to GD at a timeframe that we set. The applications reading these files will always be pointed to the one ‘merged’ directory, however.
We do this for several reasons:
- Plex will do analysis of files when it finds them, this is much faster if the files are local, whilst also avoiding unnecessary IO on GD, eating into our API hits.
- We never want to directly write to GD. If we were to push files directly to GD via our mount point, we would incur very heavy performance penalties.
- We want to be able to point Plex to our local directory and cloud at the same time without having to actually point it at two directories, to Plex this will be the same.
To install mergerfs, do the following:
sudo apt install mergerfs
Now running merger fs with the version flag we should get something akin to the following:
mergerfs --version
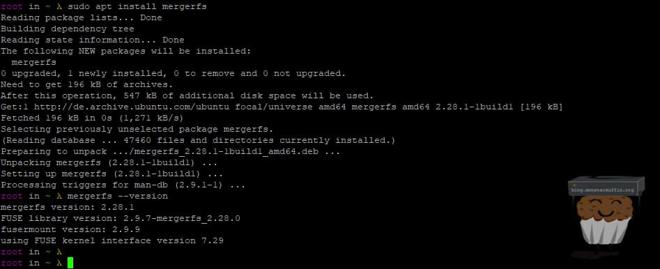
If the output of mergerfs --version gives you a version below 2.28 then this will now work. At the time of writing the version shipping with Debian is 2.24. If your version is below 2.28, then follow the instructions here to install the latest version of mergerfs without using the outdated apt source.
To configure mergerfs how we would like is very easy and I have done the work for you, we will need to substitute some variables in the service file like we did last time. There are two variables left to configure, again this is up to you if you wish to change the paths.
<local-mountpoint>- Where do you want your data to live before being shipped off to GD? This can be anywhere. I will be using/mnt/gmedia-local.<mergerfs-mountpoint>- Where will the mergerfs mount point live? This will be the combined cloud and local mount points. I will be using/mnt/gmedia.
Create the directories, substituting your own if you’re using different ones.
sudo mkdir /mnt/gmedia
sudo mkdir /mnt/gmedia-local
With your own variables:
cd ~/rclone-gmedia/services/
sed -i 's,<local-mountpoint>,[YOUR LOCAL MOUNT],g' *
sed -i 's,<mergerfs-mountpoint>,[YOUR MERGERFS MOUNT],g' *
With my variables:
cd ~/rclone-gmedia/services/
sed -i 's,<local-mountpoint>,/mnt/gmedia-local,g' *
sed -i 's,<mergerfs-mountpoint>,/mnt/gmedia,g' *
Your gmedia-mergerfs.service file should look something like the below now:
[Unit]
Description=Gmedia MergerFS Mount
Requires=gmedia.service
After=gmedia.service

[Service]
Type=forking
ExecStart=/usr/bin/mergerfs /mnt/gmedia-local:/mnt/gmedia-cloud /mnt/gmedia -o rw,use_ino,allow_other,func.getattr=newest,category.action=all,category.create=ff,cache.files=auto-full
ExecStop=/bin/fusermount -uz /mnt/gmedia
KillMode=none
Restart=on-failure

[Install]
WantedBy=multi-user.target
As before we will copy the service file into systemd and then enable it.
cd ~/rclone-gmedia/services/
sudo cp gmedia-mergerfs.service /etc/systemd/system
sudo systemctl enable gmedia-mergerfs.service
sudo systemctl start gmedia-mergerfs.service
If everything has gone correctly, you should be able to ls that directory and find that test file we uploaded earlier.
Note: #
I have been informed that the above settings can result in extremely slow IO in some conditions, these conditions seem to be if you are using a mergerfs mount that is over the network. If this is the case in your setup it is advisable to test with both the above config, and with the following to see if this is better in your use case:
cache.files=off
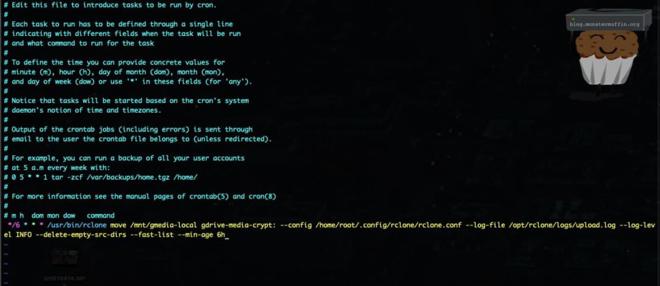
Configuring rclone move #
Getting your local data into GD from your local mount is easy enough, I’m doing this via a simple crontab job that runs every 6 hours but there are many scripts out there to do more fancy stuff, however with the rclone move flags I see no need for this.
I move my data every 6 hours as Plex scans every 2 hours. This allows Plex time to do its thing before it’s uploaded to the cloud. You will see here that I also have a flag set to ensure files must be older than 6 hours, stopping a scenario where a file is added just before the next run and Plex does not pick this up.
cat the crontab file from my git repo:
cd ~/rclone-gmedia/snippets/
cat crontab
And we’ll see my rclone move command with missing variables.
0 */6 * * * /usr/bin/rclone move <local-mountpoint> gdrive-media-crypt: --config /home/<youruser>/.config/rclone/rclone.conf --log-file <rclone-log-dir>/upload.log --log-level INFO --delete-empty-src-dirs --fast-list --min-age <min-age>
0 */6 * * *- How often do we want this to run, you can use a site like crontab guru to help you if you need help./usr/bin/rclone move <local-mountpoint> gdrive-media-crypt:- The actual move command. This is tellingrclone moveto move files from the local mount to our GD rclone config.--config- Directory of the rclone config.--log-file- Directory and file for our upload logs.--log-level- Sets the logging level.--delete-empty-src-dirs- Delete empty folders on the source (local mount).--fast-list- Recursive file listing, supposed to vastly improve IO.- --min-age - Minimum age a file must be to be moved.
For more information on these flags and many others, as previous, see the global flags.
Substations need to be made as before. Again, use your own or copy mine. Make sure your user is correct, and as before you will need to manually edit the file or the sed command if you’re root to reflect the proper directory.
With your own variables:
cd ~/rclone-gmedia/snippets/
sed -i 's,<local-mountpoint>,[YOUR LOCAL MOUNT],g' *
sed -i 's,<youruser>,[YOUR USERNAME HERE],g' *
sed -i 's,<rclone-log-dir>,[YOUR LOG DIR HERE !!NO TRAILING /!!],g' *
sed -i 's,<min-age>,[YOUR MIN AGE HERE],g' *
My variables:
cd ~/rclone-gmedia/snippets/
sed -i 's,<local-mountpoint>,/mnt/gmedia-local,g' *
sed -i 's,<youruser>,root,g' *
sed -i 's,<rclone-log-dir>,/opt/rclone/logs,g' *
sed -i 's,<min-age>,6h,g' *
Running cat crontab should result in a file that looks something like this:
0 */6 * * * /usr/bin/rclone move /mnt/gmedia-local gdrive-media-crypt: --config /home/root/.config/rclone/rclone.conf --log-file /opt/rclone/logs/upload.log --log-level INFO --delete-empty-src-dirs --fast-list --min-age 6h
Copy this line and enter it into crontab by running:
sudo crontab -e
Paste the line as shown below, then exit and save the file.
Cron will now execute this every 6 hours, or however long you set. We can always do this manually too of course, and with a progress output. This is useful if you need to free up space quickly. Of course, you will need to remove the cron section and possibly replace it with sudo.
By adding a --progress to the end of the command and running it in your shell, you will be able to see the progress of your manually triggered move.
Here is an example of a complete run on my production machine. Whilst the move is occurring it will also show which files are currently being moved, and the status of each file.

The Docker bit #
As I said before I will not be going into great detail in this step as you can find out everything you need about setting up the individual apps themselves and running them in Docker on the internet.
If you want, you can use my included docker-compose file which will create and set up all the apps with the config we are about to set, from there you can do your own configurations inside the apps themselves.
My compose file leverages a .env file where the variables are stored. Once the .env is configured to your settings, the docker-compose file will install the apps to that configuration.
Here are the apps that this file will install along with their GitHub/product pages:
- Sonarr - https://github.com/Sonarr/Sonarr
- Radarr - https://github.com/Radarr/Radarr
- Sabnzbd - https://github.com/sabnzbd/sabnzbd
- Transmission - https://github.com/transmission/transmission
- Ombi - https://github.com/tidusjar/Ombi
- Overseerr - https://overseerr.dev (Overseerr has replaced Ombi in my setup as I have found it is vastly superior and much more reliable.) As of 31/01/2022 docker-compose.yml was changed to reflect this.)
- Jackett - https://github.com/Jackett/Jackett
- Tautulli - https://github.com/Tautulli/Tautulli
- Plex - https://www.plex.tv/
- Watchtower - https://github.com/containrrr/watchtower
- Portainer - [https://github.com/portainer/portainer]
Here is how I structure my downloads folder. This can, of course, be located on a network location, simply mount the share via SMB/NFS and then set your .env to reflect this, ensuring permissions are correctly set.
/opt/downloads/
├── nzb
│   ├── complete
│   │   ├── movies
│   │   └── tv
│   └── incomplete
└── torrent
    ├── complete
    │   ├── movies
    │   └── tv
    ├── incomplete
    └── watch
Your media directory should include 2 folders like so:
/mnt/gmedia
├── movies
└── tv
Once you have docker installed along with docker-compose, edit the .env file inside the docker folder to make sure the variables suit your setup.
#Global
TZ=Europe/London  - Your timezone.
PUID=1000  - The UID the container will run as.
PGID=1000  - The GID the container will run as.

#Directories
APPDATA=/opt/dockerdata/  - Docker data directory.
GMEDIA=/mnt/gmedia/:/gmedia  - gmedia directory.
DOWNLOAD=/opt/downloads/:/download  - Download directory.
WATCH=/opt/download/torrent/watch/:/watch  - Torrent watch directory.
GMEDIA_TV=/mnt/gmedia/tv:/tv  - TV Show directory.
GMEDIA_MOVIE=/mnt/gmedia/movies:/movies  - Movie Directory.
Your UID and GID should be a user created for running containers, usually docker. You must ensure this user has access to the download and gmedia shares.
Once you are happy with that, you can simply run the following to deploy the apps:
cd ~/rclone-gmedia/docker/
docker-compose -f compose.yml up -d
After this is done, running docker ps will show us that all of our containers are now running and will be accessible over from your web browser. You can also use portainer now by heading over to port 9000 on your host, and manage your containers from there.
When setting up your apps, you need to point Sonarr to /tv, Radarr to /movies and Plex libraries can be added from /gmedia.
Your downloads will go to /download inside the downloader container, which will have the same mapping under Sonarr and Radarr, so it will move completed files to the mergerfs gmedia.
Fin #
That’s it! This has taken me a stupid long time to write up as I wanted to be as detailed as possible, so I sincerely hope this has helped you!
I have been using this setup for a good few months now with amazing results, I finally have storage for an extensive 4K collection and can stream this directly to may clients.
If you have any questions, just leave a comment.
~~Muffin.