Intro #
So I need to create an IPSEC point to point link between two sites so my two FreeNAS boxes can replicate between each other as per this project. I already run my network on PfSense and have done for a few years now and think it’s great so slapping a PfSense box at my mother’s house seemed like the easiest thing to do. Once all the NAS business was setup I dug out an old desktop machine (Dell Optiplex 760), put a 2 port Intel gigabit card inside and installed PfSense. After bringing it to my old house and changing the config on their DD-WRT router to act as a switch+AP I brought up the WAN connection and did some IP configuring. Once the interweb was setup and I confirmed the LAN was fully working (had to turn on static NAT for my lil’ bros PS4) I went ahead and configured the tunnel.
This is actually pretty easy and all is explained in the PfSense documents, at the time of writing the documentation is a little behind with the my current version of PfSense (2.2.1) but it’s still very valid. I’ll go through my config on here if you wish to carry on reading on here instead. I’d already done all the legwork with the config on my firewall, all I had to do was access it, copy over the settings and change a few things. The following is my inital config for Phase 1 in MuffNET (my house).
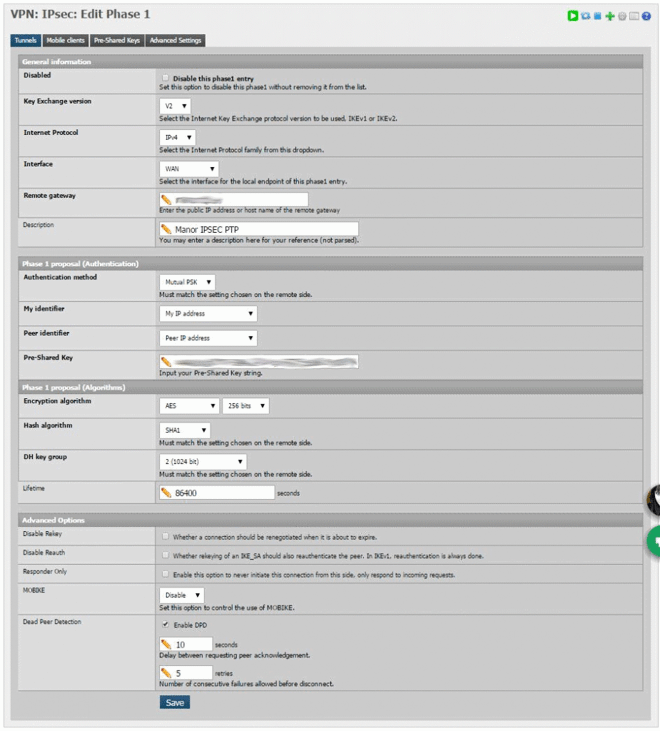
If you have a static IP at either of the sites this should be used in the ‘remote gateway’ field, if you do not have a static IP then you should use a hostname with dynamicDNS. Since both mine and my mothers internet connection is not static I opted to use a dynamic address that is handled by PfSense as my other domains under NameCheap is handled by their client and can sometimes take a little while to update; I use freeDNS for any of you curious.
I used a rather long Pre-Shared key from an online generator for peace of mind. The setup on the other PfSense firewall needs the SAME key so make sure you paste it somewhere safe and be sure to paste characters only, no spaces.
Phase 2 is even more straightforward, again here is my config:
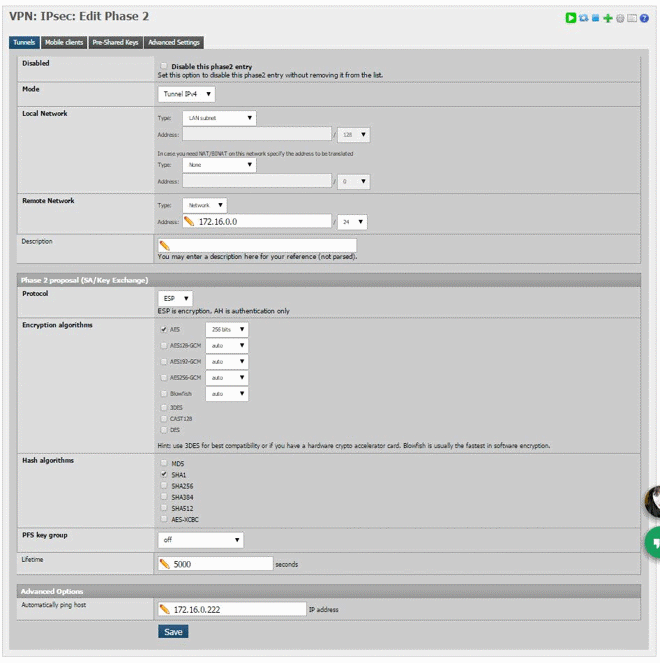
Make sure to use the same encryption and has as phase 1. Local network is the network that is able to access the remote site and ‘Remote Network’ is the network that needs to be accessed on the other end of the tunnel. “Automatically ping host” can be any address on the remote side, PfSense docs say that this host doesn’t have to be real or even on, the traffic between the firewalls will keep the tunnel up regardless. Once this is done you should have something that looks like this:
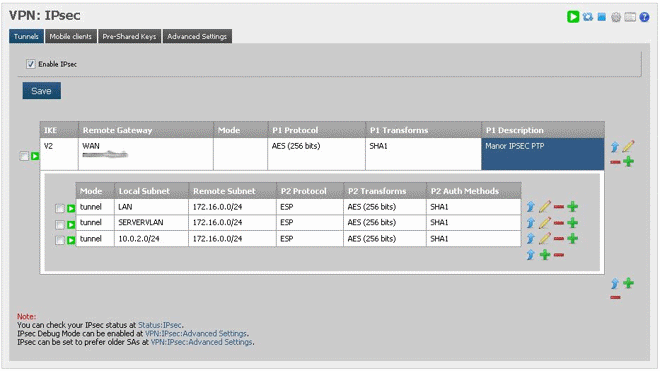
NOTE: The reason I have three phase two entries is to enable both my LANVLAN, OpenVPN and my SERVERVLAN to access the remote network. This is done on the other side too as you will see to enable traffic to the different subnets across the tunnel. If you’re just going from LAN A > LAN B then only one entry is necessary.
Next step is to do the exact same thing on the other firewall. The only things that need to change is the following;
- Remote Gateway in Phase 1
- Description in Phase 1 (probably helpful)
- Remote Network in Phase 2
- Automatically Ping Host in Phase 2
And you should end up with something like this on the other side:
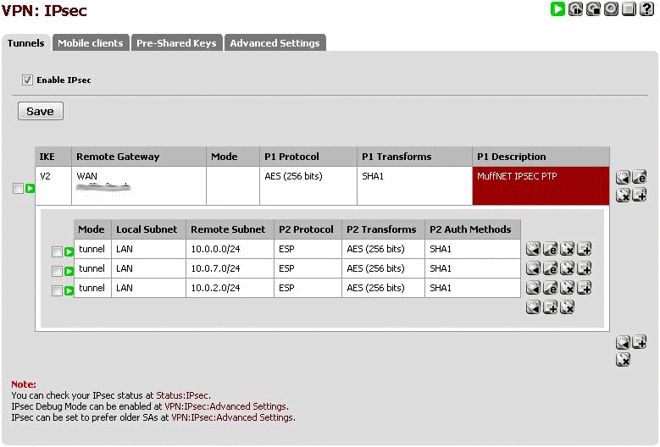
At this point, if you’ve made sure that the “Enable IPsec” checkbox has been ticked on both sides PfSense should start negotiating the tunnel as the firewall rules create themselves, you can check this by going to “Status > IPsec”.
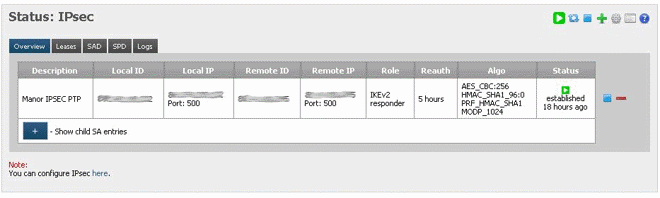
If all went well you should see an established connection, if not you should check your firewall rules for port 500 ESP on both sides.
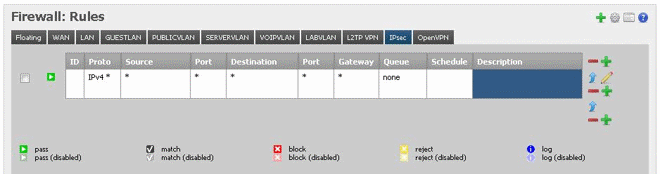
The last step is to allow traffic over the connection which is very easy, go to “Firewall > Rules > IPsec”. Add a rule to pass all to all like in the following and you should be a happy camper!
So let’s see if this works:
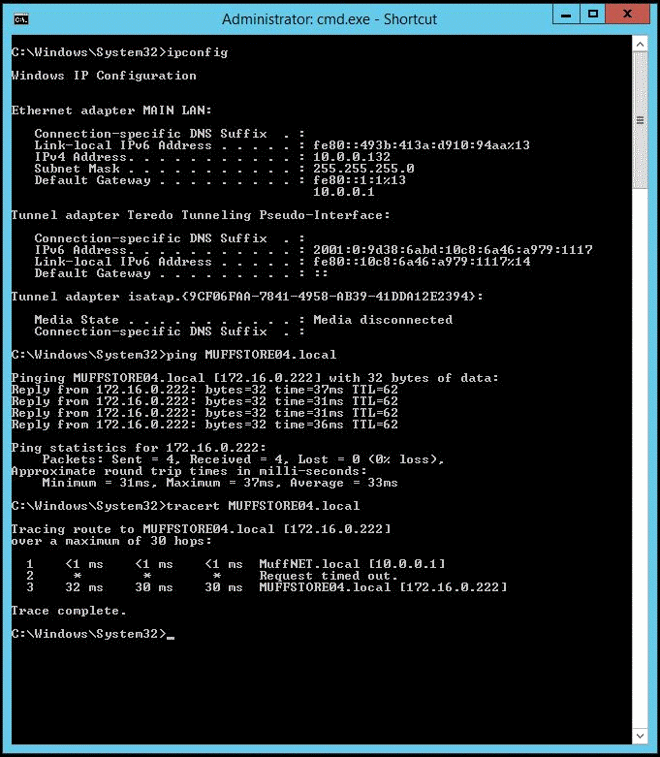
Whoop! You can see that this machine is in the MuffNET site (10.0.0.132) and can ping over to MUFFSTORE04 and successfully traces the route. I can also access all of MUFFSTORE04s shares over my entire network over various subnets (thanks to the multiple phase 2 configs). With some quick file transfers I am getting around 24Mbps Write/29Mbps Read which isn’t too bad at all, I will do some tweaking but for weekly RSYNC jobs this will do the trick.
Note: This will not route internet traffic over the link from one site to another, this is simply for accessing resources on the other end of the tunnel, you can tunnel all the data from one site to the other if you wish however using NAT.
There you have it. That’s how you set up an encrypted site to site link over IPsec with PfSense.