📔 Intro #
Anyone who’s tried torrenting over VPN knows it can be a bit of a pain. Sure, basic setups work - connect to VPN, start downloading, done. But if you want proper speeds and proper seeding ratios, there’s a bit more to it than that.
I’ve spent way too much time optimizing my torrent setup over the years, and I’ve finally got something that I’m pretty happy with. This post will go through how to set up a proper torrenting environment that’s both secure and fast, using Docker containers to keep everything neat and tidy.
🛡️ Why VPN for Torrents? #
Besides the obvious privacy benefits, there are some real practical benefits to tunneling P2P:
- ISP Throttling/Blocking: Some ISPs these days will throttle/block torrent traffic like it’s their job (I guess it kind of is). A VPN prevents this by making your traffic unidentifiable to the ISP.
- Better Peering: Sometimes, VPN routes can actually give you better connections to peers than your ISP’s routes. I’ve seen this a lot with certain providers.
- Connection Privacy: Your IP isn’t exposed to the swarm, which is just good practice.
🔹 VPN Provider Notes: #
- ProtonVPN requires a Plus subscription for port forwarding and must use WireGuard
- PIA needs specific server regions that support port forwarding
- Both require
VPN_PORT_FORWARDING=onin Gluetun to enable the magic
🔹 Private Trackers #
If you use private trackers, port forwarding is an absolute must for maintaining a healthy ratio and ensuring you stay “connectable.” Private trackers typically require you to allow inbound connections so other peers can upload from you. If your client can’t accept connections—because your port isn’t forwarded through the VPN—you’ll struggle to seed and risk a poor ratio (or even account warnings/bans).
You might think, “I’m only on private trackers, so I don’t need a VPN.” That’s not the case. Private trackers aren’t synonymous with total anonymity; your IP will still appear in logs or be visible to tracker admins and peers—plus anyone else in the swarm. Unless you’ve personally vetted every single seeder and leecher, it’s best to always tunnel your P2P traffic, as outlined in this post.
🚀 Port Forwarding #
From what I’ve seen most people understand the need for the above, tunnel their bittorrent traffic via a VPN and call it a day, but that is far from optimal.
When you’re torrenting without a proper port forwarded, you’re basically in a “can’t connect to me, I’ll connect to you” situation.
Here’s what happens in a typical torrent connection:
🔹 Without Port Forwarding #
Your client sits behind NAT (network address translation). Incoming connections can’t be established, so you rely solely on outbound connections. Your “connectable” status often shows as red or false in clients, limiting your ability to seed effectively and sometimes even to download quickly.
🔹 With Port Forwarding #
A single (or multiple) ports are mapped through the VPN so that external peers can initiate connections to you. Now you’re “connectable,” and you can participate fully in the swarm. Speeds can skyrocket, especially on well-seeded torrents.
In my experience, the difference can be night and day. A properly configured client with port forwarding can mean the difference between a 20MB/s download and a 200MB/s download on well-seeded torrents.
🛠️ The Implementation #
This is where things get interesting. Port forwarding with VPNs requires:
- A VPN provider that supports port forwarding.
- A way to detect which port you’ve been assigned and set that in qBittorrent automatically.
- This isn’t required when providers statically assign you port(s).
So, Gluetun supports automatic port mapping. We will be using native integrations for this, which, when VPN_PORT_FORWARDING=on is set, Gluetun obtains the forwarded port from the VPN. This port is not always static; it can change periodically or whenever the tunnel reconnects. Hence, the need for qSticky-my container that queries Gluetun’s Control Server API to grab the port and pushes it to qBittorrent automatically.
This is exactly why I built qSticky - to automate this entire flow to make it “set and forget”. Let’s look at how the pieces fit together:
🧱 The Stack #
Here’s a high-level overview of what we’ll spin up in Docker:
- Gluetun - Popular VPN container that handles the connection and port forwarding, now with a secure control server API
- qBittorrent - Our torrent client (fight me, Transmission users)
- qSticky - My tool to keep ports in sync using Gluetun’s API
VPN client in a thin Docker container for multiple VPN providers, written in Go, and using OpenVPN or Wireguard, DNS over TLS, with a few proxy servers built-in.
qBittorrent BitTorrent client
🔄 Automated port forwarding manager that keeps qBittorrent in sync with Gluetun VPN’s forwarded ports. Monitors port changes in real-time and updates qBittorrent automatically.
🔑 Setting Up Authentication #
Before we dive into the containers, we need to set up secure authentication for Gluetun’s control server. This is a new requirement that makes everything more secure. Create one of the following config.toml files:
|
|
Or if you prefer basic auth:
|
|
routesdefine which API endpoints a particular role can accessauthdetermines if you useapikeyorbasiccredentials- For
auth = "apikey", any request must include the headerX-API-Key: your_secure_api_key_here
This config file defines what qSticky can access and how it authenticates. If you need help creating a key you copy-pasta one of the following in your terminal:
🔹 Generating a Secure API Key #
- OpenSSL
|
|
- Python:
|
|
🔧 Setting Up Gluetun #
Below is a minimal Gluetun Docker Compose snippet using ProtonVPN + WireGuard as an example. If you’re using PIA, the variables differ slightly (see Gluetun’s Wiki for details).
|
|
🔹 Generating WireGuard Keys (ProtonVPN) #
For ProtonVPN’s WireGuard configuration, you’ll need to generate proper keys:
- Log in to ProtonVPN and download your WireGuard config.
- Extract
PrivateKeyand Address from[Interface]. - Put those into
WIREGUARD_PRIVATE_KEYandWIREGUARD_ADDRESSES.

The Wireguard config can be configured as above or by mounting a Wireguard configuration into the container. The above approach is better IMO as it allows you to easily change settings, like which country/city to connect to.
The key bits here are:
- Enabling the control server with
GLUETUN_HTTP_CONTROL_SERVER_ENABLE - Mounting our auth config file
- Ensuring port forwarding is enabled
🌊 Adding qBittorrent #
Next, we add qBittorrent. The big difference is we point network_mode to the service:gluetun. That ensures qBittorrent only sends traffic out via Gluetun (a “VPN kill switch”).
|
|
ports: on qbittorrent itself. The 8080:8080 mapping in Gluetun is what actually exposes the qBittorrent WebUI outside of Docker.
🔄 qSticky #
Finally, add qSticky. This is the small Python container that polls Gluetun’s Control Server for the forwarded port and updates qBittorrent as needed.
- If you chose API key auth, set
GLUETUN_AUTH_TYPE=apikeyandGLUETUN_APIKEY=.... - If you use
basic auth, useGLUETUN_AUTH_TYPE=basicplusGLUETUN_USERNAME&GLUETUN_PASSWORD.
|
|
🔹 How qSticky Works #
- Periodically calls the Gluetun API endpoint:
/v1/openvpn/portforwarded. - Authenticates using either API key or basic auth (based on your config).
- Compares the returned port with the current port in qBittorrent via qBit’s Preferences API.
- Updates qBittorrent if they don’t match.
This ensures your torrent client always has the correct port, even if your VPN reassigns a new one.
🔬 qSticky: A (Slightly) Technical Deep Dive #
Now, I must preface this by stating I am not a developer, I am a system engineer/architect. I can be a code monkey when it’s required, but I don’t necessarily love it. qSticky, like all my other projects that involves code, is just me trying my best with the help of the internet and trying to not rely too heavily on AIs.
🔹 Secure API Communication #
qSticky v2 moves away from file monitoring to API-based port detection, significantly improving security and reliability. Here’s a look at the authentication flow:
|
|
This simple approach allows for both API key and basic auth methods, with API keys being the recommended approach and set by default.
🔹 Health Monitoring #
qSticky continuously writes out JSON health info, letting you see at a glance whether it can contact Gluetun and qBittorrent:
|
|
This health data will mark the container as unhealthy if any of the services are not reporting as they should to qSticky.
🔹 Port Management Flow #
The new API-based workflow looks like this:
🔹 Performance Considerations #
Key optimizations include:
- Async I/O (via
aiohttp) to handle network calls without blocking. - Minimal resource overhead (~30–50 MB RAM).
- Polled only once every
CHECK_INTERVALseconds (default 30s).
qSticky typically uses around ~30MB of RAM whilst using next to no CPU. Yes, this could probably be better but, again, I am not a code monkey.
🔌 Networking Considerations #
When running these containers in Docker, it’s important to understand how networking works so that qSticky, Gluetun, and qBittorrent can talk to each other properly. Here’s a ’not as short as I wanted’ overview:
🔹 Docker Compose Default Network #
By default, when you run docker compose up with multiple services, Docker creates a default network for all the containers. Each container on this default network can resolve the others by their service name as a DNS host. For example:
- The gluetun service is reachable at the hostname gluetun.
- The qbittorrent service is reachable at the hostname qbittorrent.
- The qsticky service is reachable at the hostname qsticky, etc.
In the compose file shown, qSticky is configured with:
|
|
- Gluetun is just the DNS name on the Docker network; qSticky sends requests there on port 8000 to reach gluetun’s control server API.
- We are not exposing port 8000 on the Docker host (no
8000:8000in theports:section), because qSticky only needs to talk to Gluetun internally over the Docker network.
🔹 Container:gluetun Networking Mode #
In the example Compose, qBittorrent has:
|
|
This means qBittorrent runs inside the same network stack/namespace as gluetun. Essentially:
- qBittorrent does not get its own IP address from Docker’s default bridge; instead, it shares Gluetun’s network interface and routes all traffic through Gluetun.
- Because qBittorrent “lives” inside gluetun’s container network, we do not use the normal Docker bridging to map ports. Instead, we expose qBittorrent’s 8080 externally by doing
ports: 8080:8080on Gluetun.
This is critical for a “kill-switch” approach:
- If gluetun goes down, the qBittorrent container’s networking goes with it-thus preventing accidental leaks.
- It ensures qBittorrent is always forced through the VPN.
🔹 Why qBittorrent Host Is gluetun #
You’ll notice that in qSticky’s environment variables, we also set QBITTORRENT_HOST=gluetun. Why not qbittorrent?
From the perspective of qSticky (which is on the default Compose network), qBittorrent doesn’t directly have its own IP in that network, it’s “piggybacking” on gluetun.
The qBittorrent service is effectively inside the Gluetun container’s network namespace, so qSticky must call qBittorrent via the Gluetun container’s IP and port. In short, qBittorrent is listening on localhost:8080 inside Gluetun, and Gluetun itself is accessible as gluetun:8080 across the Docker network.
This is exactly why qBittorrent’s ports are exposed in the gluetun stack.
If we’d used a “bridge” mode for qBittorrent, we would typically do:
|
|
and then set QBITTORRENT_HOST=qbittorrent. But that would bypass the VPN for qBittorrent unless you do more advanced Docker routing. That’s why container:gluetun is used instead-all traffic is forced through the VPN.
🔹 Using localhost vs. Container Names #
A common question: “Why not just set GLUETUN_HOST=localhost in qSticky since they share the same Docker network?”
If both containers are truly sharing the same network namespace (like container:gluetun would imply), then localhost might work for that scenario. But in reality, qSticky is running in its own container with an isolated environment and an IP assigned on the Docker default network. Meanwhile, qBittorrent is living inside Gluetun’s container. So, from qSticky’s perspective, localhost is qSticky’s own container, not Gluetun.
Also, Docker resolves the name gluetun to the IP address of the Gluetun container on the shared Docker network, which is the correct address for qSticky to talk to Gluetun’s control server.
🔹 When Gluetun Restarts #
One caveat to be aware of is that if Gluetun restarts, containers that depend on it (like qBittorrent via network_mode: service:gluetun) lose their network connectivity. You might need to restart qBittorrent or other containers that are attached to Gluetun’s network, this is why the recommended deployment is to not put qSticky into gluetun’s container network.
Sometimes, Docker Compose’s depends_on feature helps ensure startup order, but for restarts or unplanned stops, you might need to run docker compose restart qbittorrent qsticky after gluetun is back up. This can also be automated with external scripts or Docker Healthchecks to watch gluetun’s status.
🔹 Exposing the Control Server (Optional) #
By default, you don’t need to expose Gluetun’s port 8000 to the host-that is, you don’t need a 8000:8000 in the ports: section-because qSticky is on the same internal Docker network.
However, if you do want or need external access to that Control Server, you could:
|
|
Then you’d set GLUETUN_HOST=<your-docker-host-ip-or-localhost> and GLUETUN_PORT=8000 in qSticky if it runs elsewhere. But this also means the control server is accessible outside your Docker network, so be aware of security implications.
🔹 Separate/Custom Docker Networks #
In some advanced setups, you might want a dedicated Docker network for just Gluetun, qSticky, and qBittorrent, separate from other containers. For example:
|
|
This can help keep containers organised, but the same principles still apply: qBittorrent “lives” in Gluetun’s network namespace, and qSticky communicates over a Docker network to the gluetun hostname on port 8000.
If you do use a custom network, just ensure all relevant containers are attached to it so DNS resolution and traffic routing works as expected.
🔹 TLDR: #
container:gluetunensures qBittorrent is forced through the VPN (no leaks).- qSticky runs on the default (or custom) bridge network and communicates with the Gluetun container’s IP via the Docker DNS name gluetun.
- No need to expose Gluetun’s API port externally unless you specifically want to interact with it from the host.
- Be aware of restarts: if Gluetun goes down, dependent containers lose their connection. A simple restart usually fixes this.
🎮 The Full Stack #
Below is a complete example Docker Compose file. It has all three services-Gluetun, qBittorrent, and qSticky. You can grab a starter version from the qSticky repo and modify it as needed.
|
|
|
|
lscr.io/linuxserver/qbittorrent:latest line with image: ghcr.io/hotio/qbittorrent:latest and adjust accordingly.
🔹 Deploying the Stack #
-
Pull/Verify Images:
docker compose pull -
Spin Up the Services:
docker compose up -d -
Check Logs:
|
|
Gluetun logs will show if it successfully connected to ProtonVPN/PIA and whether port forwarding is enabled.
🔹 First-Time Credentials & Initial WebUI Access #
qBittorrent logs, in some images, show the default or randomly generated admin password on first run if you haven’t set the environment variables. For the LinuxServer image, the documented default is usually admin/adminadmin, but it can vary if you’re using another image (like Hotio’s qBittorrent, which might generate a random password).
Access qBittorrent via http://<your-docker-host-ip>:8080 and login using admin and the generated password shown in the logs.
qSticky logs will confirm if it can contact Gluetun’s Control Server and whether it can authenticate and set the port in qBittorrent. Navigate to Tools → Options → Web UI and change your password, ensure you update the password for qSticky to access qBittorrent in the compose file.
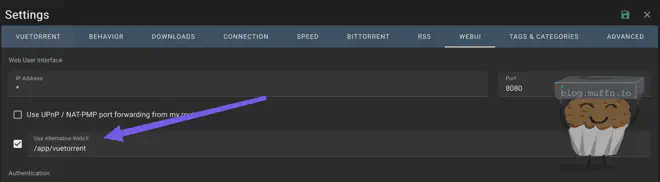
If you used hotio’s image as above, you should change the webui theme to either vuetorrent or nightwalker like so:
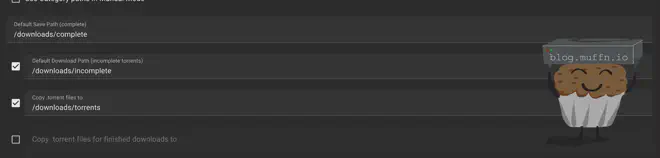
You should also map the download folders in your settings, if you used my compose file, downloads should be mapped to /downloads.
⚙️ Advanced Configuration #
🔹 Using a .env File
#
If you’d like to avoid hardcoding your environment variables directly in docker-compose.yml, you can load them from a .env file. This helps keep sensitive or variable data out of version control.
- Create a file named .env in the same directory as your docker-compose.yml.
|
|
Reference these variables in your Compose file using the syntax ${VARIABLE_NAME}, for example:
|
|
.env file to a public repo. Use something like .gitignore to avoid leaking credentials.st.
🔹 Docker Secrets for Sensitive Credentials #
For even better security, especially if you’re using Docker Swarm or advanced Compose features, you can store credentials (e.g., VPN username/password or private keys) as Docker secrets. This prevents them from appearing in plain text in your container’s environment variables.
- Create a secrets file for each sensitive value in a dedicated folder (e.g.,
./secrets):
|
|
Reference them in your docker-compose.yml:
|
|
Adjust your container logic so that Gluetun (or qSticky) reads from those file-based variables instead of normal environment variables. Many images, including Gluetun, have a _FILE variant for credentials.
API Keys"| G E -->|"VPN Settings
Ports"| G E -->|"WebUI Config"| Q E -->|"API Settings"| QS style S fill:#0f1b2d,stroke:#ff69b4 style E fill:#0f1b2d,stroke:#00ff00 style G fill:#0f1b2d,stroke:#00ffff style Q fill:#0f1b2d,stroke:#ff00ff style QS fill:#0f1b2d,stroke:#88ccff
🔍 Troubleshooting #
If things aren’t working as you expect, check the following:
- Check you can get the Gluetun forwarded port, from qSticky:
|
|
gluetun as the host. If you are using container networking, you will use localhost.
Should show something like this:
|
|
- Check qSticky’s logs & health file:
|
|
This will tell you the status of Gluetun and qBittorrent from qSticky’s prospective:
|
|
- Check qBittorrent:
- Ensure Tools → Options → Connection → Listening Port in qBittorrent shows the new port.
- The qBittorrent status indicator should be green if you have active torrents/peers.

🎬 Final Thoughts #
After years of tinkering with various VPN+torrent setups, I’m happy with how this stack has evolved, partly because some of it is using my own code. This setup is pretty much what I was aiming for - a setup that “just works” while delivering the best possible performance.
Whilst qSticky is only for a narrow subset of users, and I would imagine most people simply don’t care about port forwarding in their torrent client (hey, I didn’t for ages) I really can’t stress enough how much of an improvement it is for the individual, and the swarm.
Thanks for reading, and happy (safe) torrenting!
~Muffn


Sony A7R III + Sigma 24-70mm f/2.8 Art @ 24mm, f/2.8, 1/45s, ISO 500