🎯 Introduction #
MANS (Muffin’s Awesome NAS Stack) is a flexible, efficient approach to building a NAS that prioritizes storage efficiency and ease of expansion over redundancy, managed through Ansible. MANS aims to be ‘JBOD1’ but smarter. This guide explains everything you need to know about MANS - from understanding when to use it to deploying your own setup.
Ansible role for dynamically configuring a Debian NAS utilising caching, using BTRFS, Snapraid, Snapraid-btrfs, Snapper & MergerFS.
Firstly, this is part 4 of the 100TB Mini NAS series. Parts 1 and 2 go over the build itself, and part 3 goes over my initial rationale for MANS and why certain decisions were made. You can read these in the series view above.
You can think of MANS as a DIY Unraid2 alternative (the storage part), for free.
🤔 When Should You Use MANS? #
MANS is perfect for you if:
- You want to start with X disks and expand a few disks at a time.
- You’re storing mainly write-once, read-many data like media collections.
- You want flash write speeds.
- You’d rather automate deployment than manually configure everything.
- You want a free alternative to solutions like Unraid.
- You want to know how everything works under the hood instead of the clickops nature of Unraid.
- You don’t want to run 10,000 things on one box, a NAS is a NAS.
MANS might NOT be right for you if:
- You need real-time redundancy for critical data.
- Your workload requires consistent low-latency access.
- You need instant data recovery after disk failures.
- You are not comfortable learning/understanding Ansible.
🔹 Key Features #
- Disk Variety: Mix and match disks of any size or type.
- Write Caching: All writes go to fast storage first, giving you SSD performance in writes even though the backing is ‘JBOD’.
- Flexible Expansion: Add any size disk at any time.
- Space Efficiency: Essentially JBOD but still with redundancy.
- MergerFS Policies: Related files stay together on the same disk.
- Configuration as Code: Everything managed through Ansible for repeatability.
- Point-in-Time Protection: Efficient snapshot-based redundancy.
🧠 Understanding MANS Architecture #
🔹 Core Components #
The core components handle the following roles:
-
SnapRAID handles the parity protection. Rather than traditional RAID, SnapRAID creates point-in-time parity data. This means that while your data isn’t protected the instant it’s written, you get flexibility in exchange. You can add disks of any size at any time, and if something goes wrong, you only lose the data on the failed disk(s), not the entire array.
-
Btrfs runs on all data disks, giving us the ability to do snapshots. This is crucial because when SnapRAID calculates parity, we need a consistent view of the data. The snapraid-btrfs tool creates read-only snapshots during sync operations, ensuring our parity data is always accurate.
-
MergerFS is the magic that makes everything appear as one big pool of storage. It handles where files are written and how they’re read back. We actually use two MergerFS pools:
- One for all the data disks (the cold storage pool).
- Another that includes both the cold storage and cache (the main access point).
🔹 Data Flows #
Here’s how data flows through the system:
When you write a new file to the NAS:
- The file hits the main MergerFS pool
- MergerFS uses its ‘ff’3 (first-found) policy to write it to the cache drive
- The cache-mover script periodically checks cache usage
- When cache usage hits the threshold, older files are moved to the cold storage pool
- During the next SnapRAID sync, a snapshot is taken and parity is calculated
Reading files is even simpler:
- Request comes to the main MergerFS pool
- If the file is in cache, it’s served from there
- If not, it’s read from the cold storage pool
The protection process combines snapraid-btrfs and SnapRAID:
- snapraid-btrfs-runner creates read-only snapshots of all data disks
- SnapRAID uses these snapshots to calculate parity
- After successful sync, snapshots are cleaned up
- This process runs on a schedule via systemd timers
The benefit here is that even if files change during a sync, our parity data remains consistent because we’re working from snapshots.
🔹 Point-in-Time Redundancy #
SnapRAID is not real-time, it is point-in-time. This means that while your data isn’t protected the instant it’s written it is instead protected at ‘a point in time’.
- Data protection happens during scheduled snapshot periods.
- New files aren’t protected until the next snapshot.
- There’s a window where data on cache disks isn’t protected.
- Recovery is to the last snapshot point, not the current moment.
🔹 Storage Flexibility #
The main reason I went down this rabbithole in the first place.
No Size Matching Required Pretty much JBOD1, you can use any size disk you want, whatever they may be. If it has a mount point, it can be used.
Easy Expansion Process
|
|
Then just run the playbook, boom. Done.
Flexible Parity Pretty much the same as above, MANS will handle most of the work for you and changing parity levels, whether adding or removing requires no reshuffling of data.
All of this makes MANS pretty well suited if:
- You want to start small and grow over time.
- You have mixed disk sizes.
- You want to reuse existing drives.
- You don’t want to rebuild the entire array for changes.
🔹 Ancillary Features #
The role provides various ancillary applications also. These are explained below when going through the configuration.
🔹 Cache Considerations #
The caching system in MANS:
- Supports 0-n cache devices.
- Provides no redundancy between cache devices.
- Can use both dedicated disks and file system paths.
- Data loss on a cache device means losing cached files.
🔹 No NFS #
This role will only deploy and configure SMB via vladgh.samba. I do not use NFS for these purposes and so did not include anything that would set it up, as I wouldn’t be able to test it enough.
If you want NFS configuration added though, the one and only Mr Geerling has you covered.
Ansible Role - NFS
🔎 Planning Your MANS Deployment #
🔹 Requirements #
🔸 Hardware Requirements #
- Some kind of machine to use as a NAS.
- At least 3 storage drives:
- Multiple data drives of any size.
- At least one parity drive (restrictions explained below).
- Optional: One or more SSDs/NVMes for caching.
🔸 Software Requirements #
- Debian (latest stable release recommended - other distros unsupported).
- Python 3.
- Ansible on your control machine (where you’ll run the deployment from).
🔸 Skills Required #
- Basic Linux command line familiarity.
- Basic understanding of storage concepts.
- Ability to follow detailed technical instructions.
🔹 Disk Planning #
Before you begin setting up MANS, you need to plan your disk layout carefully. Here’s what to consider:
🔸 Data Disks #
Data disks are the primary storage in your MANS array. These disks hold your actual data and are formatted with btrfs to enable snapshots.
- Minimum requirement: You need at least 2 data disks.
- Maximum limit: SnapRAID supports up to 64 data disks.
- Disk variety: You can mix and match disks of different sizes and models.
- Identification: Must use
/dev/disk/by-id/paths for consistent identification. - Formatting: The playbook formats each data disk with btrfs and creates a
datasubvolume.
🔸 Parity Disk Planning #
For parity protection, you need to consider:
- Size requirement: Each parity disk must be larger than or equal to your largest data disk, or you need to use split parity.
- Redundancy level: Decide how many parity disks you want (1 = single redundancy, 2 = dual redundancy).
- Split parity: If you don’t have large enough disks for parity, you can use multiple smaller disks with split parity.
Examples:
- For a setup with 3x 8TB data disks, you need at least one 8TB+ parity disk.
- For a setup with 4x 16TB data disks, you could use either one 16TB+ parity disk or two 8TB+ disks in split parity mode.
🔸 Cache Planning #
Cache disks provide fast write performance. When planning your cache:
- Required?: Cache is optional but recommended for performance.
- Size: Should be large enough to hold your typical “in-flight” data (recent uploads).
- Speed: NVMe drives provide the best performance for cache.
- Multiple cache options:
- Single cache device (simplest).
- Multiple cache devices (pooled via MergerFS).
- Filesystem paths instead of dedicated disks.
- Mix of dedicated disks and paths.
Cache selection criteria:
- Speed: NVMe drives are ideal for maximum performance.
- Endurance: Higher TBW4 ratings are preferred for cache drives that see frequent writes.
- Size: Depends on your workflow, but typically 1-2TB is sufficient for media storage.
🔹 Getting Disk IDs #
Before configuring MANS, you’ll need to identify your disks correctly. Use this command to get the proper disk IDs:
|
|
The command will output something similar to:
Disk: /dev/sda
Size: 14T
Model: WDC WD140EDGZ-11
ID Links:
/dev/disk/by-id/ata-WDC_WD140EDGZ-11B2DA0_7LHXFMHD
Disk: /dev/sdb
Size: 14T
Model: WDC WD140EDGZ-11
ID Links:
/dev/disk/by-id/ata-WDC_WD140EDGZ-11B2DA0_9THGWFHV
Disk: /dev/nvme0n1
Size: 2T
Model: Samsung SSD 970
ID Links:
/dev/disk/by-id/nvme-Samsung_SSD_970_EVO_Plus_2TB_S59ANM0R912345
Use these IDs when configuring your data_disks, parity_disks, and cache_disks variables.
🔹 Performance Considerations #
Several factors affect the overall performance of your MANS setup:
- Cache disk speed: This determines your write performance ceiling.
- Network speed: 1GbE maxes out at ~120 MB/s, 10GbE at ~1.2 GB/s.
- HBA/controller bandwidth: SATA 6Gbps = ~600 MB/s per controller.
The playbook applies various optimizations for different disk types:
- Data disks (HDDs):
noatime,nodiratimemount options to reduce unnecessary writes. - Cache disks (SSDs/NVMes):
noatime,nodiratime,discardfor SSD-specific optimizations. - MergerFS tuning: Direct I/O, minimum free space settings, and optimized read-ahead for media workloads.
For more details on hardware performance, you can refer to parts 1-3 of the series.
🛠️ Setting Up MANS #
🔹 Initial Setup #
- First, clone the MANS repository on your control machine:
|
|
- Create your configuration files:
|
|
🔹 Requirements #
There are a few roles and collections we will reference in this role. I put many hours into trying to get certain aspect of the deployment to work as I wanted and, of course, someone somewhere with a much larger brain than me (admittedly, not very difficult) had done a much better job. So, we will be referencing the following:
- stefangweichinger.ansible_rclone: Used to install the latest version of rclone. Completely optional if you have use for rclone, if not you can simply set
install_rclonetofalse. - geerlingguy.docker: Needs no explanation really. Mr Greeling’s role to install
dockeranddocker composeis elegant and works well. I will say, however, I did have an odd issue when running this for the first time over my existing role/install with apparmor complaining. After addingapparmorandapparmor-utilsto the app list and rebooting, the problem was resolved, which is why you will see that as a requirement. - vladgh.samba: Used to configure Samba shares.
Install these roles and collections with the following:
|
|
🔹 Configuration Options #
The core of MANS configuration lives in your vars.yml file. Here are the key configuration sections:
🔸 Feature Flags #
passwordless_sudo: Will enable passwordless sudo.install_zsh: Will install/update zsh, ohmyzsh and set theme to powerlevel10k.install_rclone: Will install/update rclone.install_fastfecth: Fastfetch is an in-support, faster alternative to neofetch, written in C.fastfetch_motd: Enables fastfetch in MOTD5.configure_scrutiny: Will install and configure a Scruity Docker container to log and notify disk health.configure_hdidle: Enables HD-idle installation and configuration.skip_os_check: The role will only install on Debian by default. Set totrueto bypass this check.wipe_and_setup: Set totrueto enable wiping of disks. You will be prompted again before wiping.
🔸 Extra Applications #
Add additional packages to be installed via Ansible:
|
|
These are installed in addition to the required applications in default_apps.
🔸 System Configuration #
timezone: The timezone to set on the system, e.g.,Europe/London.smb_media_share_name: The name of the Samba media share for the main cached pool.
🔸 SnapRAID Configuration #
configure_snapraid_snapraid_deletethreshold: Prevents sync if more than this number of files are deleted (default: 150).
🔸 SSH Configuration (Optional) #
ssh_key_option: Method to set SSH keys. Options:github,url,file, ornone.github_username: Your GitHub username when using thegithuboption.ssh_key_url: URL to fetch SSH keys when using theurloption.ssh_key_file: Path to a local SSH key file when using thefileoption.
🔸 Users and Groups #
user: The main user for the system (default: value ofansible_user).media_group: The group for share permissions (default:media).docker_users: Users to add to the Docker group.users: List of users to create with their respective groups and settings.
🔸 Samba Configuration #
samba_users: Samba users with passwords (default password isqwerty- change this!).samba_shares: Samba shares with paths, permissions, and other settings.samba_global_config_extras: Performance optimizations for high-speed networks.
🔸 Mount Paths #
media_cached: Mount path for the cached media share (/mnt/media).media_noncached: Mount path for non-cached media (/mnt/mediaif no cache).media_cold: Mount path for cold storage pool (/mnt/media-cold).data_mount_path: Mount path for data disks (/mnt/data-disks).parity_mount_path: Mount path for parity disks (/mnt/parity-disks).cache_mount_path: Mount path for cache disks (/mnt/cache-disks).cache_pool: Mount path for cache pool (/mnt/cache-pool).
🔸 Cache Pool Policy #
When using multiple cache devices, set how files are distributed:
|
|
Available policies:
- epmfs: Keep related files on the same cache device while balancing free space.
- mfs: Place files on the cache device with the most free space.
- ff: Use the first available cache device in the list.
- epff: Similar to epmfs but prioritize existing paths over free space.
🔸 SnapRAID Content Files #
SnapRAID content files maintain the integrity of the array:
|
|
Requirements:
- Minimum content files = number of parity disks + 1
- Cannot be stored on data disks
- Must be on parity disks, cache disks, or other non-data disks
🔸 Directory Configuration #
dir_snapraid_btfs_runner: Path for snapraid-btrfs runner.data_directories: Directories to create on all disks.
🔸 Disk Configuration #
The most important section - specify which disks to use for what purpose:
|
|
🔹 Running the Playbook #
Once your configuration is ready, deploy MANS with:
🔸 First-time Deployment #
|
|
The -K flag prompts for your sudo password.
🔸 Disk Wiping Confirmation #
If wipe_and_setup is enabled and disks need formatting, you’ll be prompted:
TASK [prepare_disks : Confirm disk wipe]
The following disks will be wiped:
/dev/sdb
/dev/sdc
Are you sure you want to wipe these disks? (yes/no):
Type yes to proceed or no to abort.
🔸 Subsequent Runs #
After the first successful run with passwordless_sudo: true:
|
|
🔸 Using Tags for Targeted Deployment #
Run specific parts of the playbook with tags:
|
|
View all available tags with:
|
|
🔸 Verifying Your Deployment #
After the playbook completes, verify everything is working:
|
|
You should see your configured pools:
/mnt/media: The primary share (includes cache if configured)/mnt/media-cold: The backing HDD-only pool
🧩 Core MANS Components #
🔹 Parity Configuration #
One of the significant updates to MANS is the introduction of split parity in v0.92.
🔸 Understanding Parity Modes #
MANS supports two distinct parity modes:
Dedicated Parity This is the traditional approach where each parity disk must be larger or as large as your largest data disk. Each parity level (1, 2, etc.) corresponds to a single parity file.
- Simpler configuration.
- Recovery depends on a single parity disk.
- Traditional SnapRAID approach.
Split Parity Split parity allows you to spread a single parity level across multiple smaller disks. This means you can use multiple smaller disks when your data disks are larger.
Example: If your largest data disk is 16TB, you can now use two 8TB disks for parity instead of requiring a single 16TB+ disk.
🔸 New Parity Configuration Format #
With these changes, defining parity disk vars changed to look like this:
|
|
Let’s look at several configuration examples to understand how this works in practice.
🔸 Configuration Examples #
Example A: Single Dedicated Parity Disk A single parity disk that’s larger than any data disk:
|
|
Example B: Two Dedicated Parity Disks (Dual Parity) For extra redundancy with two separate parity files across two disks:
|
|
Example C: Split Parity Across Two Disks If your largest data disk is 16TB and you wish to use two 8TB disks for parity:
|
|
Example D: Mixed Configuration It is possible to mix dedicated and split parity - here we have level 1 split across two disks, plus a dedicated level 2 parity:
|
|
Example E: Multiple Split Parity Levels You can have multiple parity levels all using split mode:
|
|
🔸 How Split Parity Works #
When you use split parity, SnapRAID creates multiple smaller parity files across your parity disks instead of a single large file. For example, instead of a single snapraid.parity file, you’ll have multiple files like snapraid-1.parity, snapraid-2.parity, snapraid-3.parity, etc.
These files are filled sequentially - when one hits the ext4 file size limit (or disk size limit), SnapRAID moves to the next.
This is a workaround for an EXT4 limitation I had not initially thought about. Initially, if someone configured MANS with 16TB+ data disks, SnapRAID would not work when the array filled up as the parity file would not be able to grow past the EXT4 file size limitation of 16TB.
split_parity_files: Number of files per parity disk (default: 3). Each file can grow up to 16TB with EXT4, so the default supports 48TB per parity disk. This shouldn’t need to be changed.
🔹 Cache Mover #
Python script for moving files on a cached disk to a backing mergerFS pool, with Docker support.
The cache mover is a tool I made that makes the whole caching thing viable. There were other scripts that did this already but not how I liked, so I decided to completely overengineer it.
🔸 How It Works #
The cache-mover runs as a systemd timer (configured by the on_calendar_schedule variable) and performs these steps:
-
Startup Checks
- Verifies no other instance is running to prevent concurrent operations.
- If auto-update is enabled, checks GitHub for updates to itself.
- Measures the current usage percentage of the cache.
-
File Moving Process
- If usage exceeds the threshold, begins moving files from oldest to newest.
- Uses Python’s built-in file operations:
shutil.copy2()copies files while preserving metadata.os.chmod()explicitly sets file permissions to match source.os.chown()sets file ownership to match source.os.remove()removes source file after successful copy.
- Continues moving files until usage reaches the target percentage.
- Cleans up empty directories after file movement.
-
Logging and Notifications
- Logs the entire operation with detailed statistics.
- Sends notifications if configured (via Apprise).
- Rotates logs based on configured size and backup count.
🔸 Features #
Path Exclusions
The script automatically excludes important paths like SnapRAID content files that should remain on the cache. You can add your own exclusions via the cache_mover_excluded_dirs variable.
Notifications A major enhancement is the notification system that works with Discord, Slack, and Apprise-compatible services:
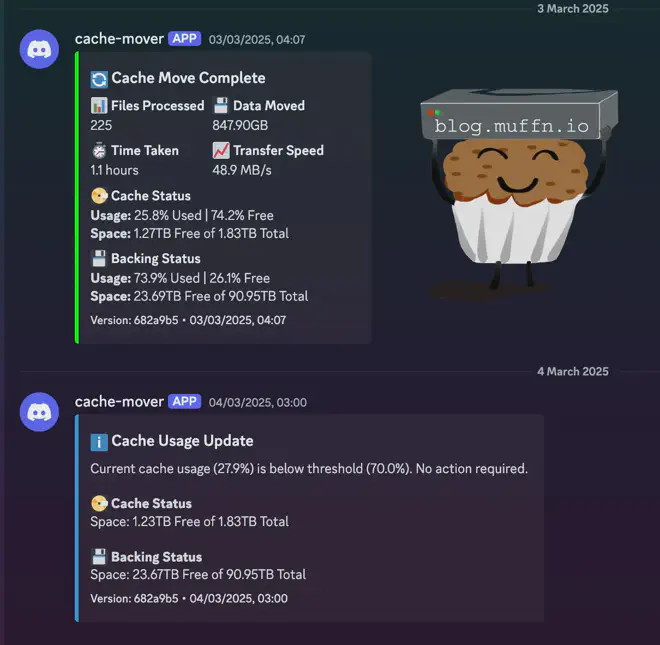
The notification system provides:
- Operation stats (files moved, time taken, space freed).
- Current disk usage before and after operations.
- Threshold alerts when no action is needed.
- Error notifications for any issues.
Empty Cache Mode
A special mode was added to completely empty the cache regardless of thresholds. To do this, set both THRESHOLD_PERCENTAGE and TARGET_PERCENTAGE to 0 in the Settings section of the config.yml file.
|
|
Docker Support I added docker support however this was not merged into MANS. I don’t see the need to deploy the containised version as of now, but this may change in the future.
🔸 Running Manually #
While typically running on a schedule, you can trigger the cache-mover manually:
|
|
Overall I’m really pleased with how cache-mover turned out, I learned a lot of Python and a lot about threading.
🔹 Cache Mover Configuration #
Here are the key configuration variables for the cache mover:
cache_mover_autoupdate: Enables/Disables self-updating the script. Set to true.cache_mover_update_branch: Keep this on main.cache_mover_dir: The directory for the MergerFS cache mover script, set to/opt/mergerfs-cache-mover/.cache_mover_log_path: The path to the cache mover log file, set to/var/log/cache-mover.log.cache_mover_threshold_percentage: The percentage of cache usage that triggers the cache mover, set to70.cache_mover_target_percentage: The target percentage of cache usage after moving files, set to30.cache_mover_max_workers: The maximum number of worker processes for the cache mover, set to8.cache_mover_max_log_size_mb: The maximum size of the cache mover log file in MB, set to100.cache_mover_log_backup_count: The number of backup log files to keep, set to5.cache_mover_excluded_dirs: Do not removesnapraidfrom this array as it keeps the content files from being moved. You may add other directories in here if you need persistent cache files.1 2- snapraid # Don't remove this # - other_dirs_as_neededon_calendar_schedule: The schedule for running the cache mover, set to 3AM daily using thesystemdtimer format.cache_mover_notif_enabled: Enables/disables notifications for cache mover operations.cache_mover_notif_urls: List of Apprise compatible notification URLs (e.g., discord://webhook_id/webhook_token).cache_mover_notif_threshold: When true, only sends notifications when cache threshold is reached and files are moved.
🔹 Disk Management and Health Monitoring #
MANS can deploy tools to help manage your disks and monitor their health.
🔸 HD-Idle Configuration #
HD-Idle is a tool that reduces power consumption by spinning down drives after a configurable period of inactivity. This means that disks are only spun up when a file on them is being accessed. Because MANS does not use any type of data striping, only one disk can be spun down at a time for a single file.
|
|
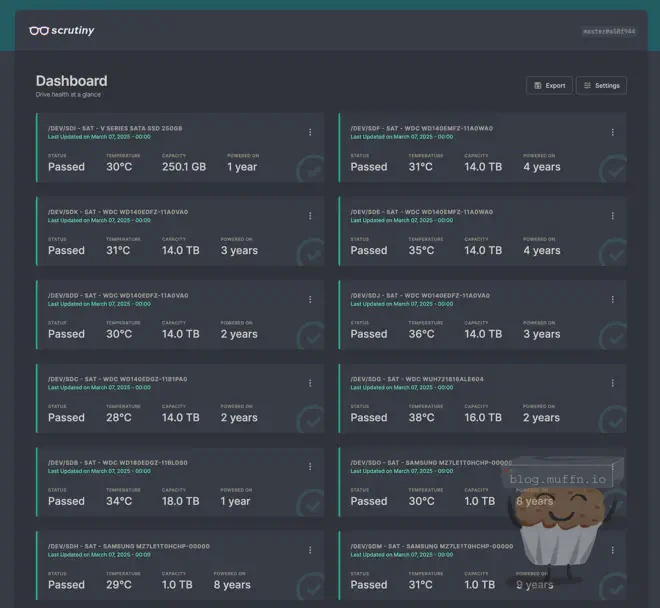
🔸 Enhanced Health Monitoring with Scrutiny #
Scrutiny is a tool that monitors the health of your disks and provides alerts when they are failing as well as a beautiful web interface to view all the data you could need on the disks.
Configuration is done in the vars.yml file and explained above. When deployed, Scrutiny will run on the server and be available at http://your-server-ip:8080.
🔸 Scrutiny Configuration #
Scrutiny can be run in Omnibus or Collector mode:
|
|
If you’re unsure, keep as-is. You will know if you need collector mode, if you do, you can configure as per:
|
|
🔸 Notification Options #
Scruity supports a wide range of notification services, configure these as per the examples in the vars file and enable the service.
Additional notification services include Slack, Gotify, Ntfy, Pushbullet, and more. Each service has its own set of required parameters as shown in the vars file. If you more information, see the project README.
🔧 Day-to-Day MANS Operations #
🔹 Storage Access #
🔸 Main Access Points #
-
/mnt/media: This is your primary storage location that includes both the cache and cold storage. This is what’s shared via SMB and what you should use for all file operations. Any new files written here will land on the cache first. -
/mnt/media-cold: This is the pool of just your HDDs with no cache. You generally won’t need to access this directly, but it’s useful for checking what’s actually moved from cache to cold storage.
🔸 Individual Disk Access #
You can access the individual disks directly if needed:
/mnt/data-disks/data01, data02, etc.: Individual data disks./mnt/parity-disks/parity01, etc.: Parity disk(s)./mnt/cache-disks/cache01, etc.: Cache disk(s)./mnt/cache-pool: Combined cache pool if using multiple cache disks.
🔹 Checking System Status #
🔸 Mounted Filesystems #
To see all mounted filesystems with sizes:
|
|
Look for your main mount points:
|
|
🔹 Monitoring Background Processes #
MANS has several automated processes running in the background. Here’s how to check their status:
🔸 SnapRAID Sync Status #
Check when the last sync ran:
|
|
A successful sync will end with:
[INFO ] ************************************************************
[INFO ] Running cleanup...
[INFO ] ************************************************************
[INFO ] All done
[INFO ] Run finished successfully
To see the current snapraid status:
|
|
🔸 Cache Mover Status #
To check when and how cache mover last ran:
|
|
Look for entries like:
INFO: Starting cache mover. Checking if /mnt/cache-disks/cache01 is over 70% utilized
INFO: Current usage: 85%
INFO: Moving files from /mnt/cache-disks/cache01 to /mnt/media-cold...
...
INFO: Completed. Final usage: 28%
To check if the timer is active:
|
|
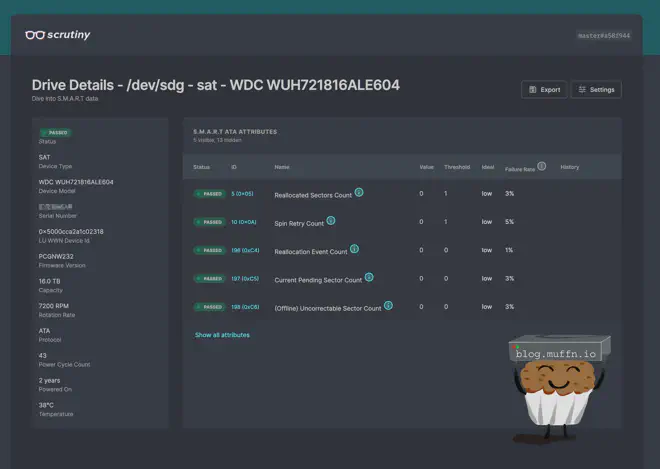
🔸 Scrutiny Disk Health Monitoring #
Access the Scrutiny web interface at:
http://your-server-ip:8080
This provides a dashboard of all your disks’ health metrics, temperature, and SMART6 attributes.
🔹 Manual Operations #
Sometimes you’ll want to trigger operations manually:
🔸 Run SnapRAID Sync #
To manually start a SnapRAID sync:
|
|
This creates snapshots, runs the sync, and cleans up afterward.
🔸 Run Cache Mover #
To manually move files from cache to cold storage:
|
|
To run in dry-run mode:
|
|
To completely empty the cache (except excluded files), set both threshold and target to 0, then run as above.
🔸 Run SnapRAID Scrub #
To verify data integrity:
|
|
This will check a portion of your data against the parity to ensure everything matches. It’s good practice to run this every so often.
🔹 Service Management #
MANS uses systemd for service management:
🔸 SnapRAID Sync Timer #
|
|
🔸 Cache Mover Timer #
|
|
🔸 Scrutiny Service #
|
|
🔹 Modifying Your Array #
Need to make changes after initial deployment? Here’s how to handle common modifications:
🔸 Adding Data Disks #
- Physically connect your new disk(s) to the server
- Identify the disk ID using the command shown in Section 3
- Update your vars.yml file to include the new disk(s):
1 2 3 4data_disks: - /dev/disk/by-id/existing-disk-1 - /dev/disk/by-id/existing-disk-2 - /dev/disk/by-id/new-disk-3 # <- New disk - Run the playbook:
ansible-playbook playbook.yml
That’s it! The playbook will format the new disk, create the proper structure, and add it to your array. No rebuilding required, no downtime for existing data.
mergerfs.balance_algorithm setting to force balance data against the new array configuration.
🔸 Adding Parity Protection #
- Connect your new parity disk (remember the size requirements)
- Update your vars.yml file:
1 2 3 4 5 6 7 8 9 10parity_disks: # Existing parity - device: /dev/disk/by-id/existing-parity mode: dedicated level: 1 # New parity - device: /dev/disk/by-id/new-parity mode: dedicated level: 2 - Run the playbook:
ansible-playbook playbook.yml - Initial parity calculation will happen during the next SnapRAID sync:
sudo snapraid-btrfs sync
🔸 Adding a Cache Disk #
- Connect your SSD/NVMe
- Update your vars.yml file:
1 2 3cache_disks: - /dev/disk/by-id/existing-cache - /dev/disk/by-id/new-cache # <- New cache - Run the playbook:
ansible-playbook playbook.yml
If you’re adding a second cache disk when you previously had only one, MANS will:
- Set up a new MergerFS pool for the cache disks.
- Configure the cache policy (epmfs by default).
- Update your primary pool to use the cache pool.
🔸 Other Modifications #
- Changing cache thresholds: Update cache_mover variables and re-run the playbook.
- Adding notification services: Configure Scrutiny notification settings.
- Generic system management: Add users, configure services, applications, etc.
- Removing disks: Migrate your data as required, remove the disk from vars.yml and run the playbook.
For any change, the process is the same: update vars.yml and run the playbook. Ansible’s idempotent nature means it will only apply the necessary changes.
🔹 Individual File Recovery #
MANS provides two ways to recover files that have been deleted or corrupted:
🔸 SnapRAID-Based File Recovery #
SnapRAID can recover files that have been corrupted or deleted if they were included in the last successful sync:
|
|
This works by reconstructing the file from parity data. The file must have been included in the last successful snapraid-btrfs sync.
🔸 Accessing Btrfs Snapshots Directly #
If you need to recover a file that has changed since the last sync, you can browse the snapshots directly:
|
|
You can then browse the snapshot contents:
|
|
🩺 Recovering from Disk Failures #
Recovery in MANS requires understanding the relationship between snapraid-btrfs, snapshots, and your array configuration:
- Btrfs snapshots: All data disks use read-only btrfs snapshots during sync operations.
- snapraid-btrfs wrapper: A wrapper that creates temporary SnapRAID configs pointing to snapshots.
- Point-in-time recovery: You can only recover to the last successful snapraid-btrfs sync.
- Split parity consideration: With split parity, recovery depends on multiple parity disks being available.
🔹 Preparation #
Before attempting recovery, check a few things:
|
|
🔹 Recovery Process #
🔸 Single Disk Failure #
When a single disk fails, the process is:
- Physically replace the failed disk and ensure the system recognizes it.
- Find the disk ID and put it in vars.yml.
- Run the MANS playbook (which will set up the new disk with the proper btrfs subvolume).
- Recover data using snapraid-btrfs:
1 2# If the failed disk was the third data disk (data3) sudo snapraid-btrfs fix -d3 - Verify the recovery:
1sudo snapraid check
The -d flag specifies which disk is being recovered. If unsure which disk number, check /etc/snapraid.conf or run sudo snapraid status to see the numbered list of disks.
🔸 Multiple Disk Failures #
SnapRAID can recover from multiple disk failures as long as the number of failed disks doesn’t exceed your parity levels. With dual parity, you can recover from two failed data disks:
|
|
🔸 Failed Parity Disk #
If a parity disk fails, the recovery is simpler:
- Replace the physical disk
- Run the MANS playbook to format and configure it
- Rebuild the parity:
1sudo snapraid-btrfs sync
🔸 Recovery with Split Parity #
When using split parity, ensure all parity disks of the same level are available for recovery. If a parity disk from a split configuration fails, you cannot recover as you have no complete parity set.
🔹 Recovery Verification #
After recovery, always verify your array’s integrity:
|
|
🔹 Limitations of snapraid-btrfs Recovery #
It’s important to understand that snapraid-btrfs can only restore the array to the state it was in during the last successful sync. This is because:
- The parity files correspond to specific read-only snapshots.
- Only these snapshots can be properly reconstructed using the parity.
- While you might have multiple btrfs snapshots, only the one used for the last successful sync is protected by parity.
sudo snapraid-btrfs sync followed by a scrub to ensure everything is properly protected again.
🔹 Recovery Limitations #
- Single snapshot only: By default, only the most recent successful snapshot is retained.
- Sync frequency matters: Only files that existed at the time of the last sync can be recovered using parity.
- Cache considerations: Files only on cache aren’t protected by parity until moved to cold storage and synced.
🎨 Customization and Advanced Topics #
🔹 Linux Customisations #
MANS includes several terminal/system customisations that enhance the system’s functionality, aesthetics, and usability. This is included as it was initially part of the playbook for the system before I had ideas to make MANS into a project. I kept it in as I think it makes MANS more ‘complete’. You can, of course, disable these if you don’t want them.
configure_zsh: Zsh is a powerful shell that extends the traditional Bash shell.configure_ohmyzsh: OhMyZsh is a framework for managing Zsh configuration that includes so many things by default.
Read more on the project repo:
🙃 A delightful community-driven (with 2,400+ contributors) framework for managing your zsh configuration. Includes 300+ optional plugins (rails, git, macOS, hub, docker, homebrew, node, php, python, etc), 140+ themes to spice up your morning, and an auto-update tool that makes it easy to keep up with the latest updates from the community.
configure_powerlevel10k: Powerlevel10k is a highly customizable Zsh theme.
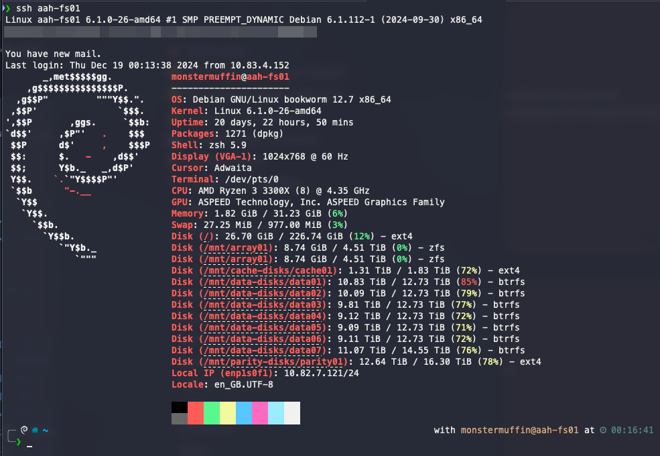
fastfetch_motd: fastfetch is a system information tool that displays a summary of your system’s hardware and software configuration.
The MOTD integration adds the following to .zshrc when both ZSH and fastfetch_motd are enabled:
|
|
Which enables the following MOTD upon logging in, which I think is kinda cool and actually useful:
🔹 Terminal Font Preparation #
If you’ve enabled powerlevel10k (configure_powerlevel10k: true), your terminal needs to be ready for it.
The powerlevel10k theme uses special characters to create its rich display. To see these properly, install Nerd Fonts on the machine you’ll be SSHing FROM:
- Download and install a Nerd Font from the official repository.
- Configure your terminal to use the installed Nerd Font.
Without proper fonts, the theme will still work but may display incorrectly.
🔹 Advanced Cache Configuration Options #
🔸 Cache Disk Types #
MANS supports three distinct cache configurations:
Single Cache Device
|
|
With a single cache device, all writes go to this disk first, and files are later moved to the cold storage pool by the cache mover.

Multiple Cache Devices
|
|
When multiple cache devices are configured, MANS creates an additional MergerFS pool just for the cache disks. This pool uses the policy specified in cache_pool_policy (default: epmfs) to distribute files across cache devices.
The cache-mover script monitors the overall usage of this cache pool rather than individual devices.

Using File System Paths as Cache Rather than dedicating entire disks, you can use directories on existing file systems as cache:
|
|
This is useful if you have an existing path you wish to use. Just ensure the paths exist.
Mixing Dedicated Disks and Paths
|
|
MANS supports mixing dedicated disks and path-based cache locations. The playbook handles each appropriately.
No Cache Devices
|
|
If you don’t specify any cache disks, MANS configures a non-cached setup where writes go directly to the data disks.

🔸 Advanced Cache Pool Policies #
When using multiple cache devices, the cache_pool_policy determines how files are distributed:
- epmfs (default): “Existing Path, Most Free Space” - Tries to keep related files on the same cache device while balancing free space.
- mfs: “Most Free Space” - Places files on the cache device with the most free space.
- ff: “First Found” - Uses the first available cache device in the list.
- epff: “Existing Path, First Found” - Similar to epmfs but prioritizes existing paths over free space.
For most setups, the default epmfs policy works well as it balances keeping related files together with preventing any single cache device from filling up too quickly.
🔸 Custom Cache Mover Schedule #
The cache mover runs on a schedule defined by the on_calendar_schedule variable using systemd timer syntax. The default is 3AM daily:
|
|
You can customize this to your needs. Some examples:
- Every 6 hours:
"00/6:00:00" - Every Sunday at midnight:
"Sun *-*-* 00:00:00" - Twice daily (noon and midnight):
"*-*-* 00,12:00:00"
🔹 Advanced SnapRAID Configuration #
🔸 SnapRAID Delete Threshold #
The delete threshold protects against accidental mass deletions:
|
|
This setting prevents sync if more than 150 files are deleted. SnapRAID will assume something has gone wrong and not sync if this is the case.
If you regularly delete large numbers of files, increase the threshold. It would probably make more sense to have this a lower value when you’re starting out with smaller amounts of data, and raise it as you get more data.
🔹 Split Parity Migration #
If you initially set up MANS with traditional dedicated parity and later want to migrate to split parity (particularly useful when your data disks are larger than 16TB), you can follow the detailed information on split parity migration via the GitHub documentation.
🪂 To-Do #
- Notifications: I am planning to add notification support to snapraid runner, to make failed runs easier to manage. This is in the works but no ETA as of now.
-
Permissions: I need to make snapraid-btrfs/snapraid work without requiring root access. I’ve been banging my head against this one for a while. According to the docs, snapraid-btrfs shouldn’t need to be run as root. You’re supposed to be able to configure some options for this but I wasn’t able to get it working. It was almost certainly a me issue, so this fix is in the works.
-
Publish to Galaxy: I am looking into getting MANS published to Ansible Galaxy. This was not something I’d thought too much about previously but I think it would be a good idea.
-
Miscellaneous: Some other things I’ve almost certainly forgotten about.
🎉 Fin #
I really hope you enjoyed this guide, and it helps you get MANS deployed. This post has been a real slog for me at times but I really wanted to write something definitive to go along with the countless hours I spent/spend on this project, I just hope it’s useful to someone.
Thanks for reading!
Muffn 🫡


Sony A7R III + Sony 16-35mm @ 16mm, f/4.5, 1/4000s, ISO 500
🦶 Footnotes #
-
Unraid - Unraid is a proprietary Linux-based operating system designed to run on home servers in order to operate as a network-attached storage device, application server, media server and a virtualization host. Unraid is proprietary software developed and maintained by Lime Technology, Inc. ↩︎
-
ff Policy - Given the order of the branches, as defined at mount time or configured at runtime, act on the first one found. ↩︎
-
TBW - Terabytes Written - A measurement of how much data can be written to an SSD before it is likely to fail. Higher TBW ratings indicate better endurance. ↩︎
-
SMART - Self-Monitoring, Analysis, and Reporting Technology - A monitoring system included in computer hard disk drives and solid-state drives that detects and reports various indicators of drive reliability, aiming to anticipate hardware failures. ↩︎